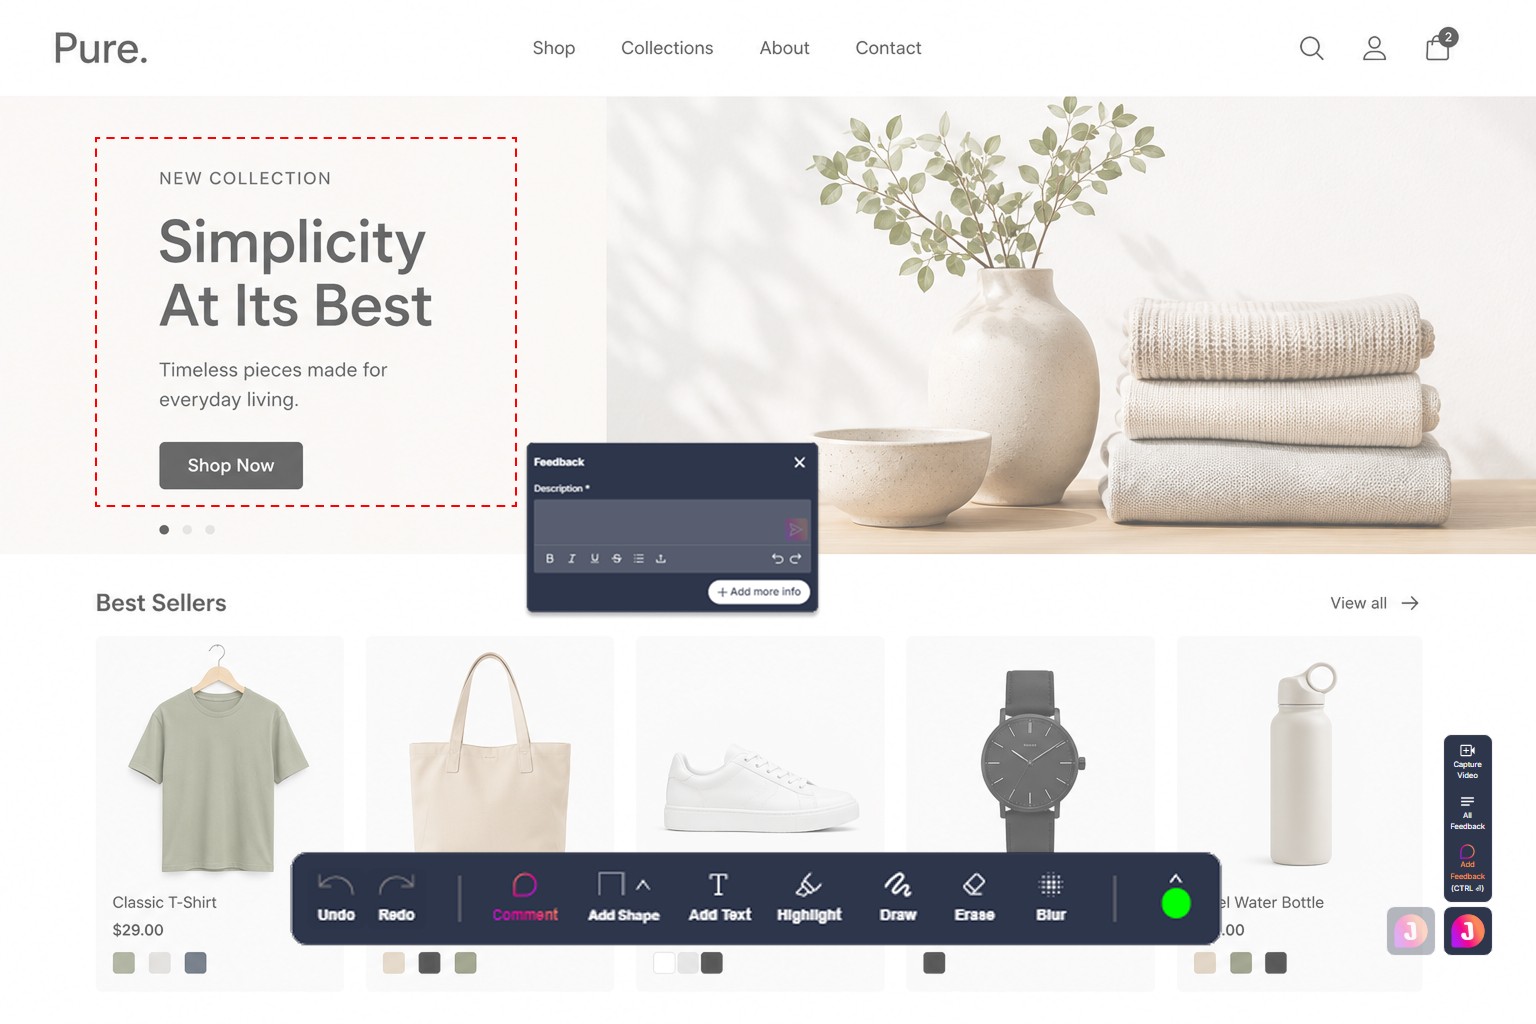
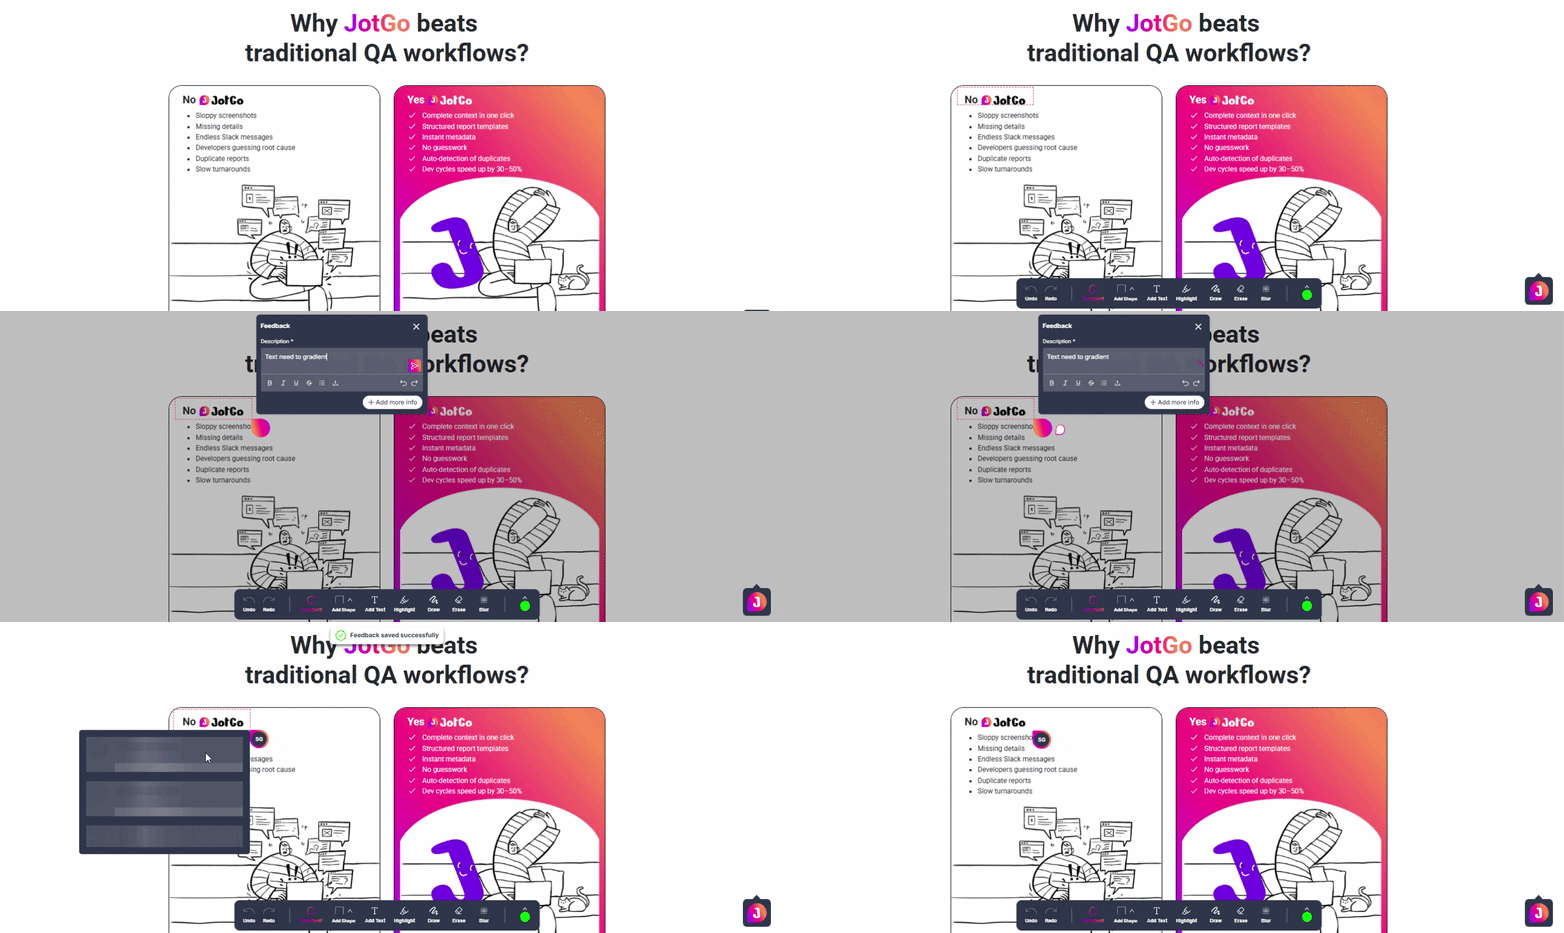
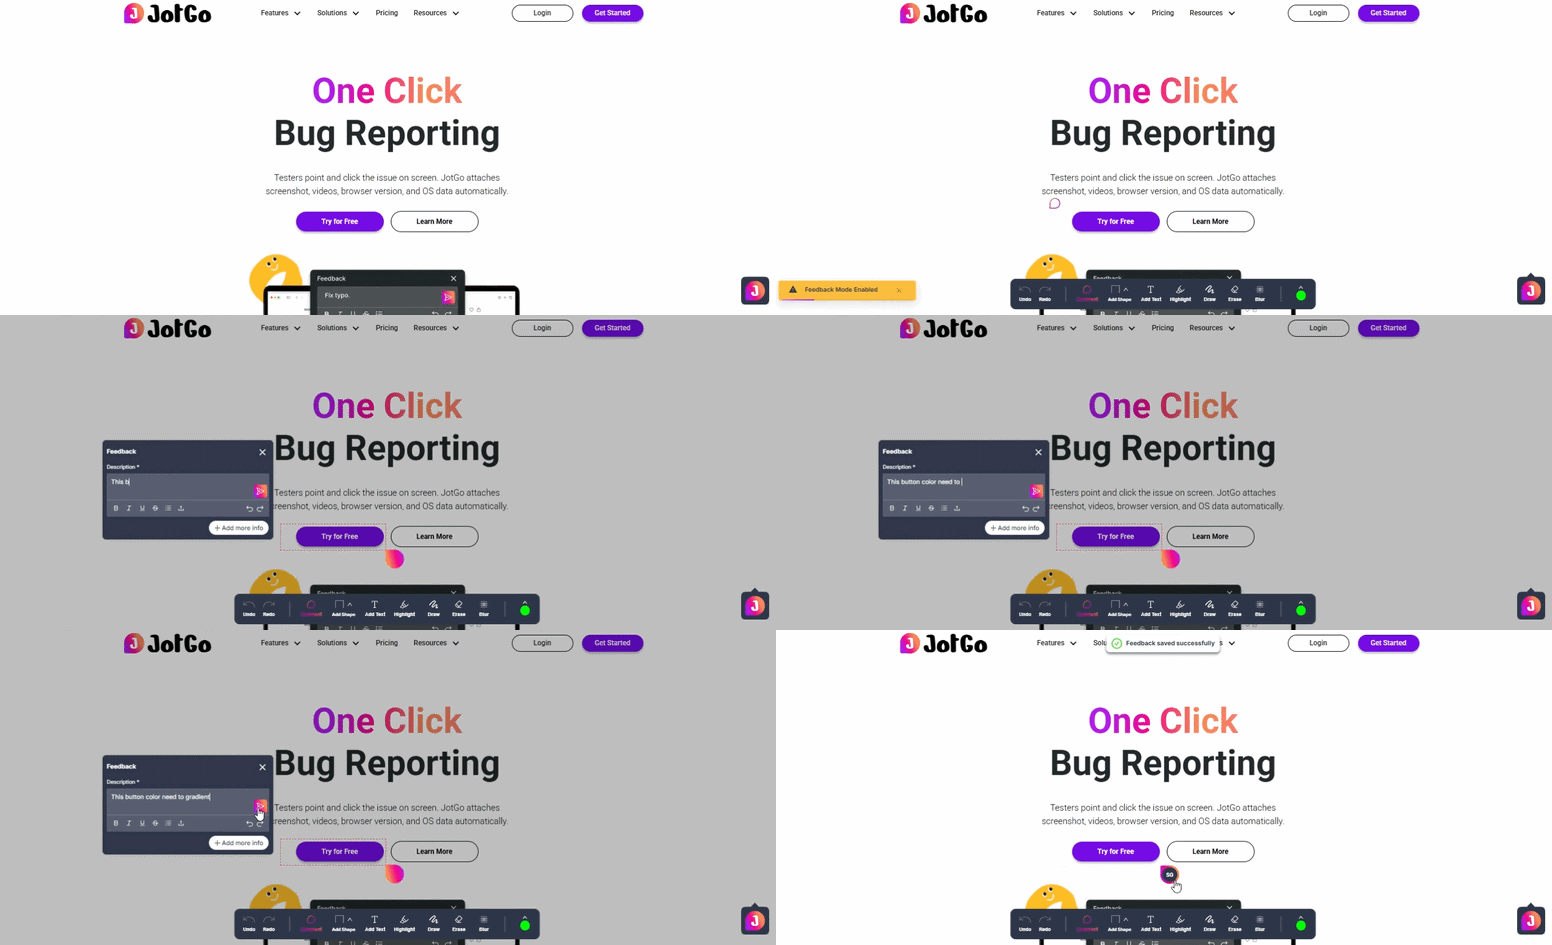
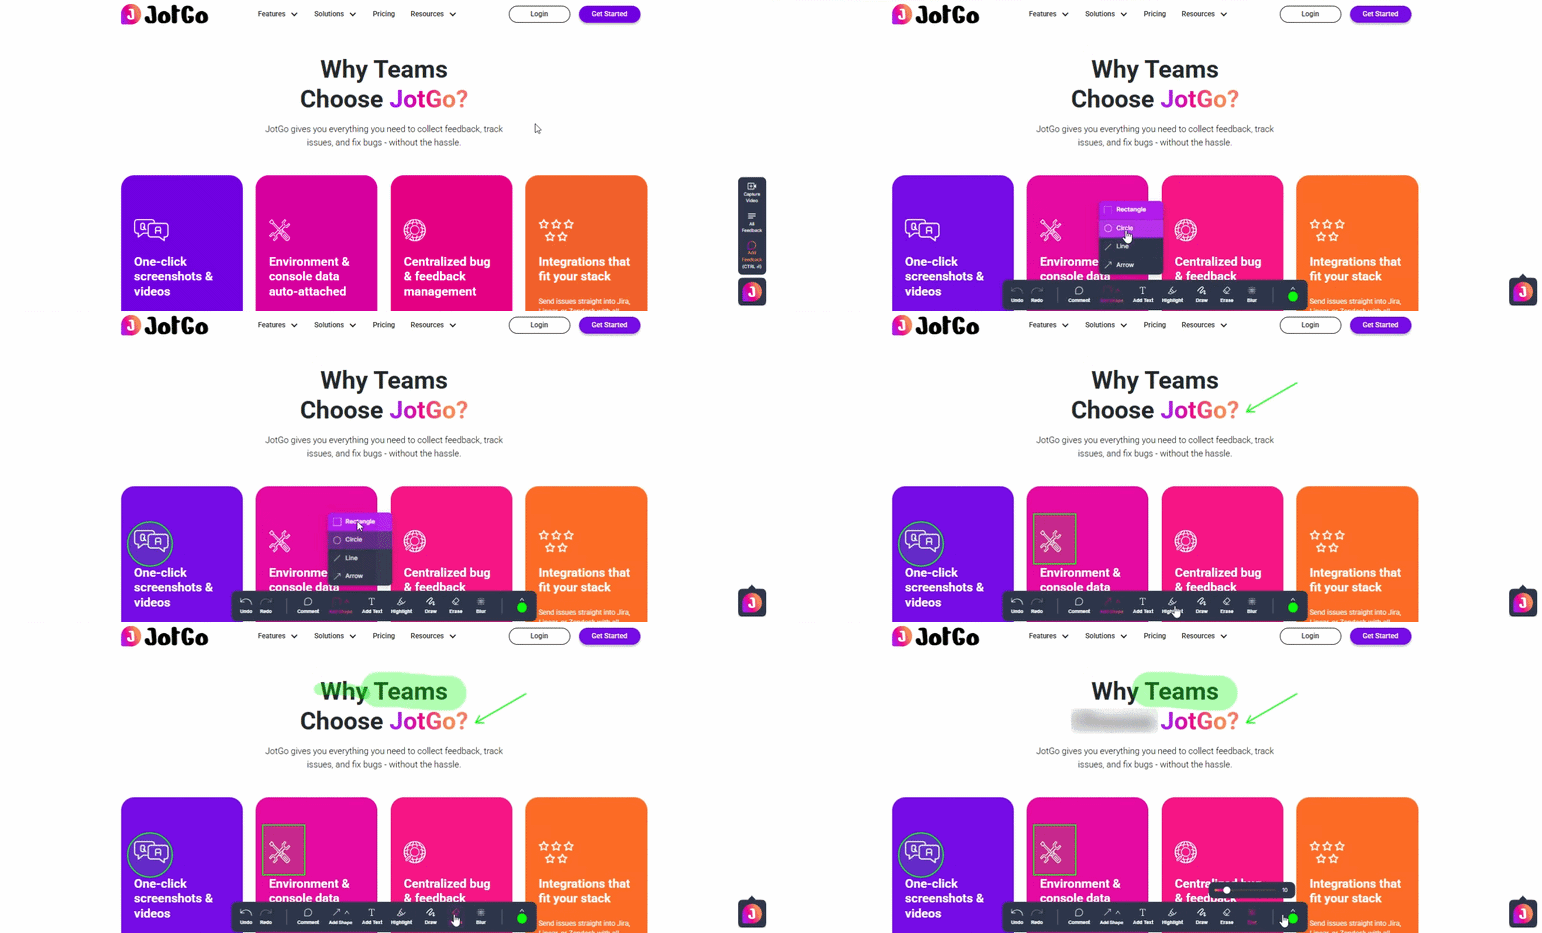
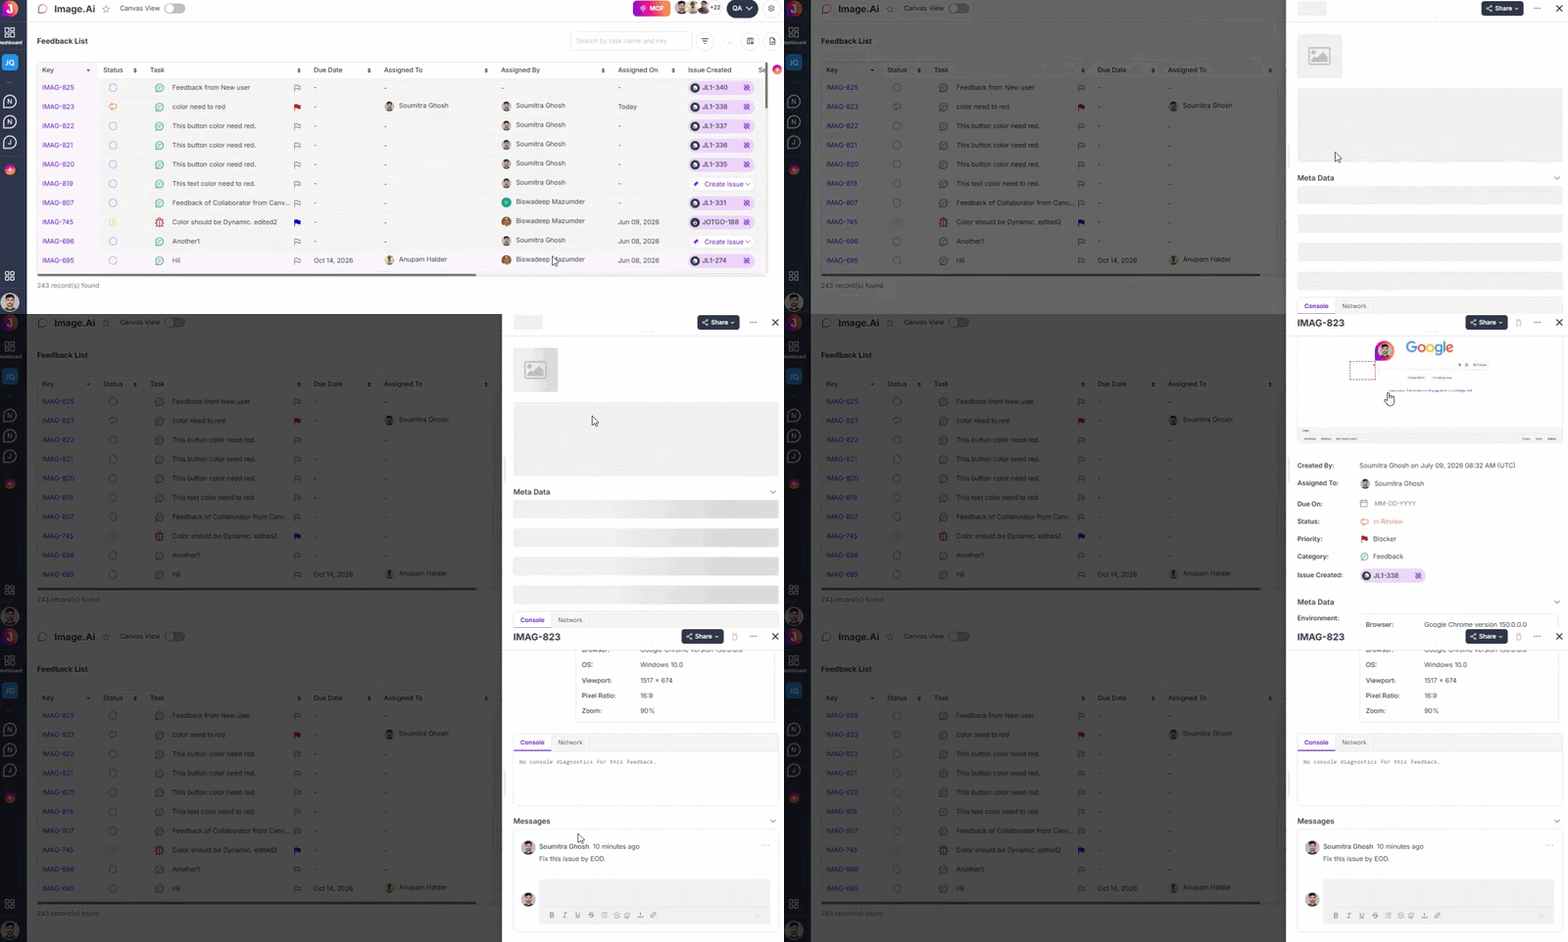
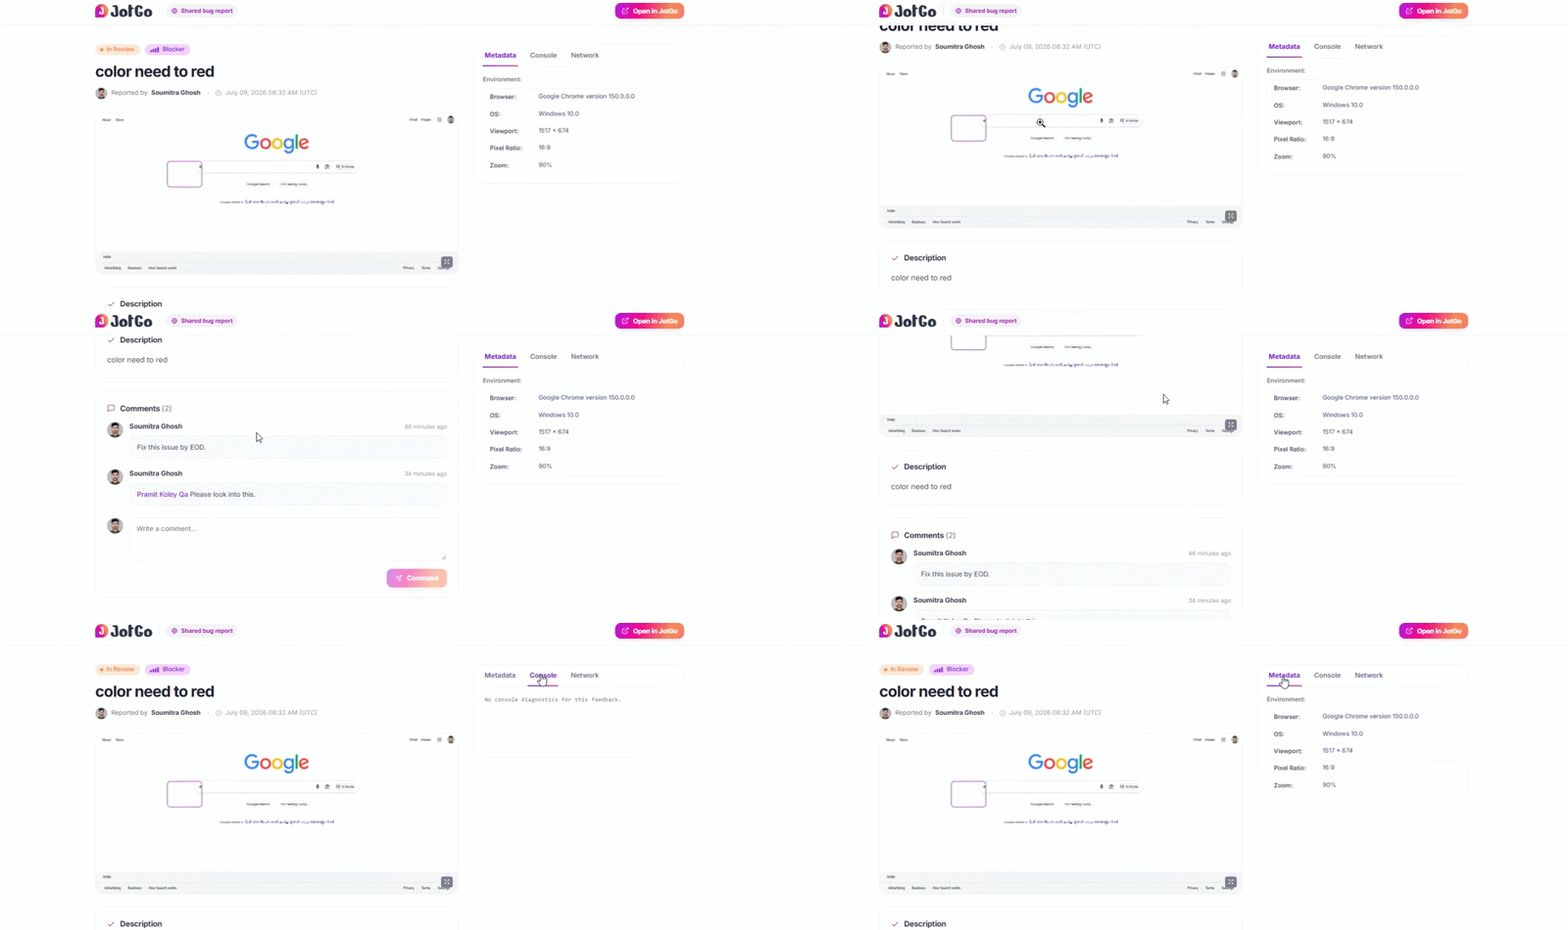
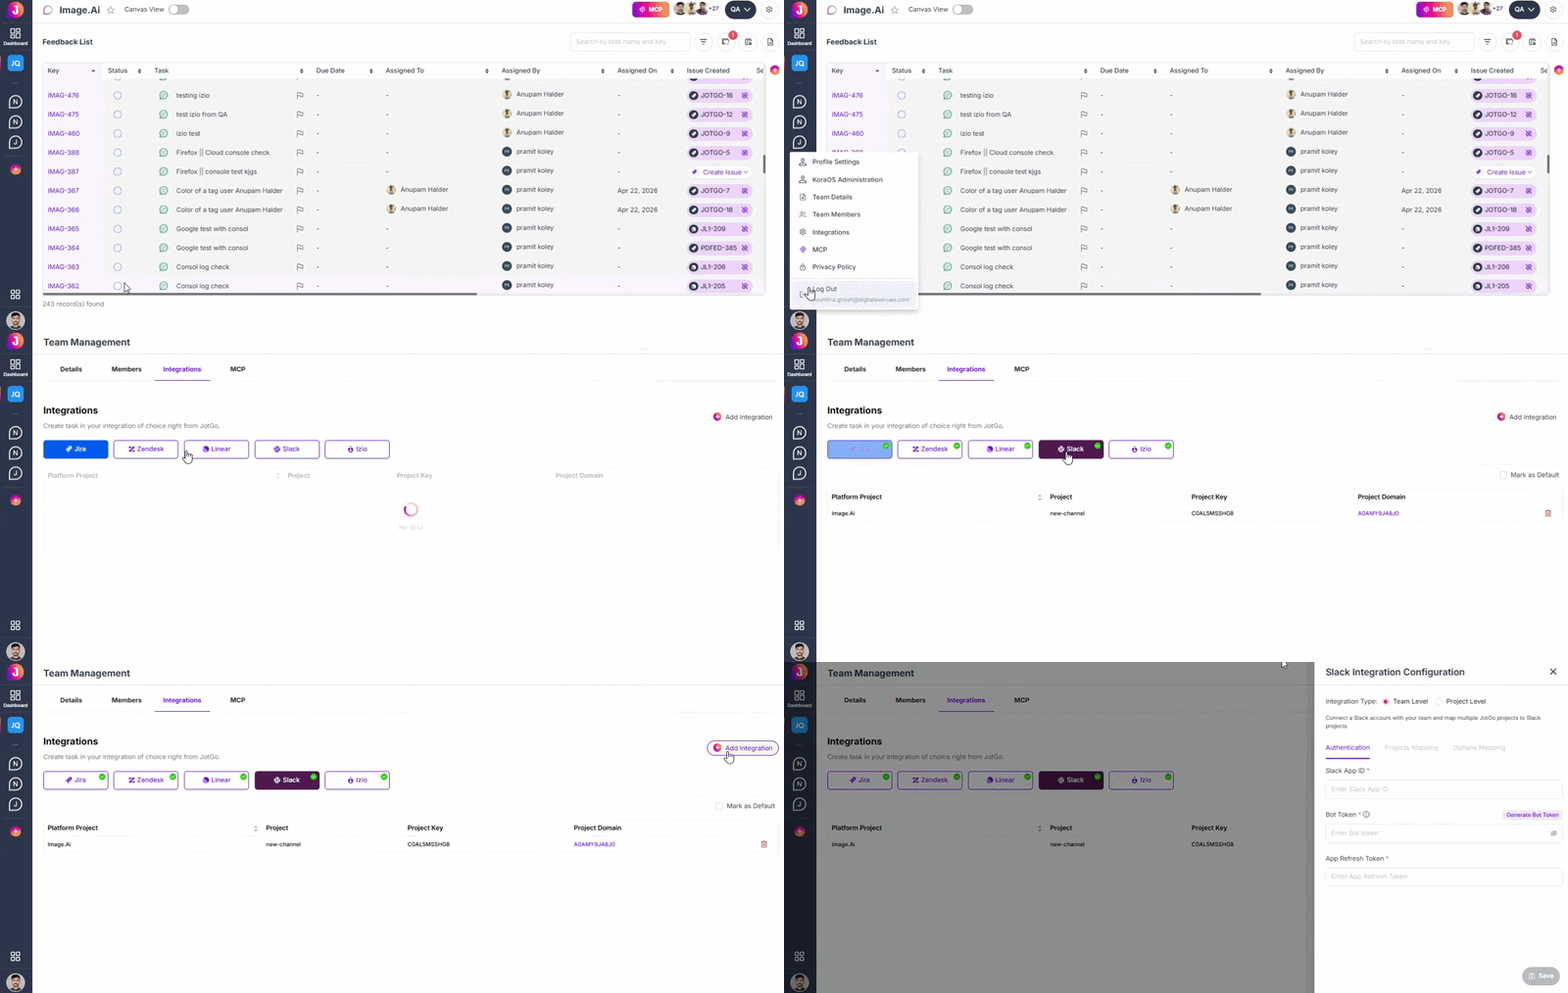
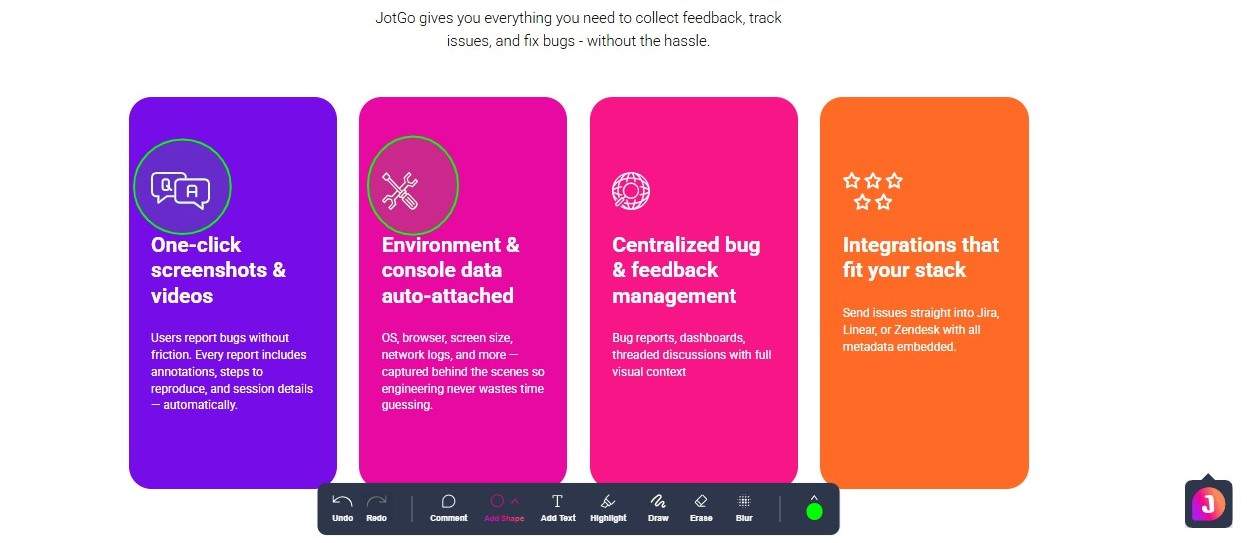
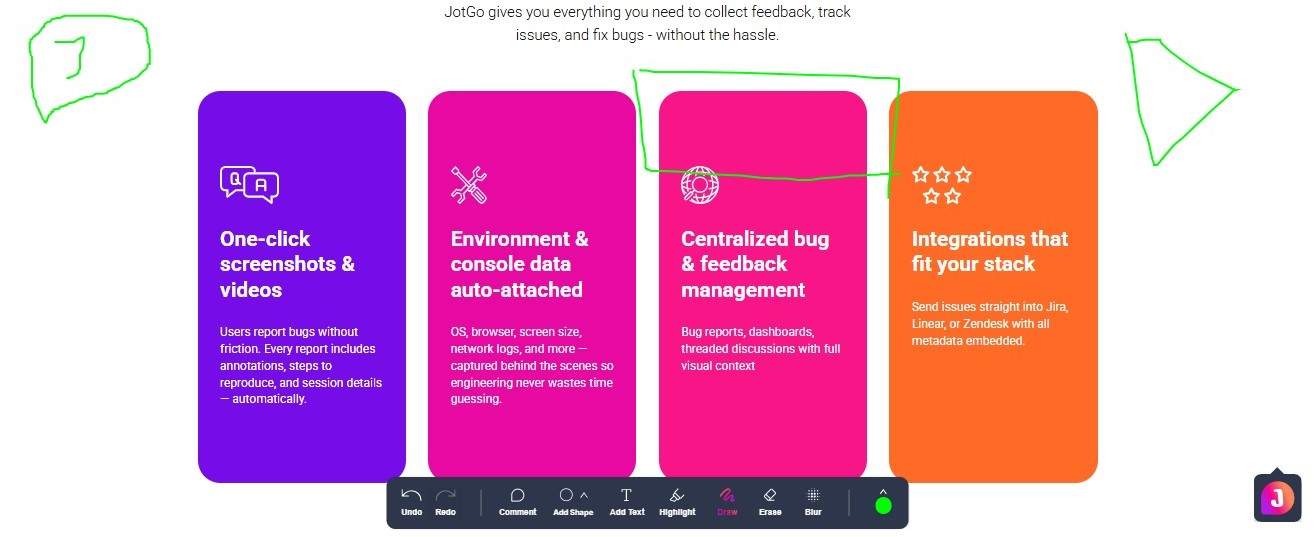
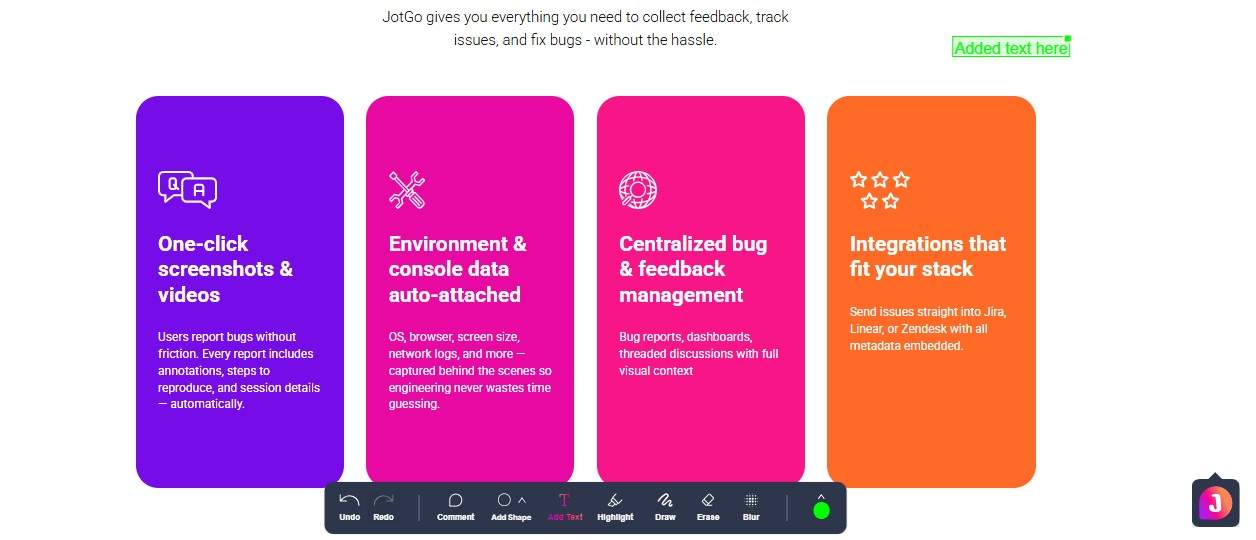
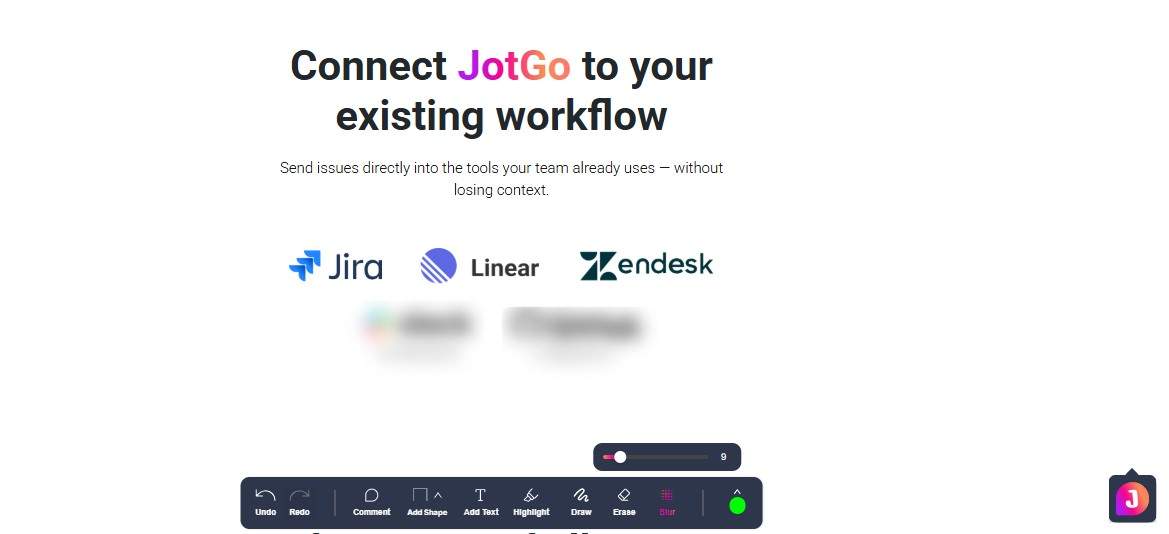
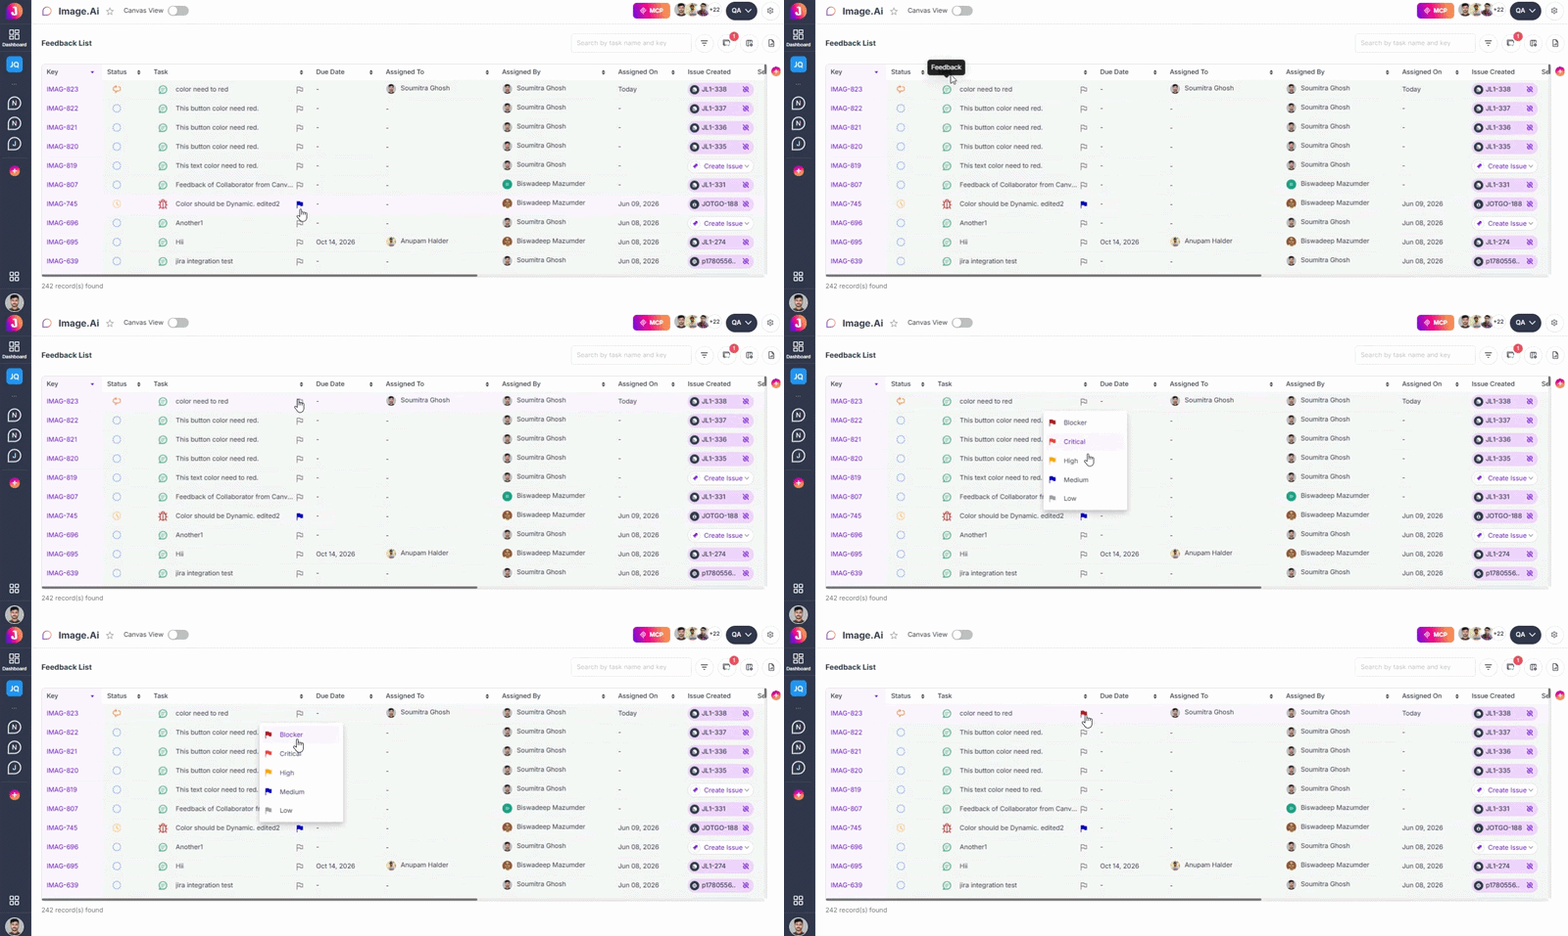
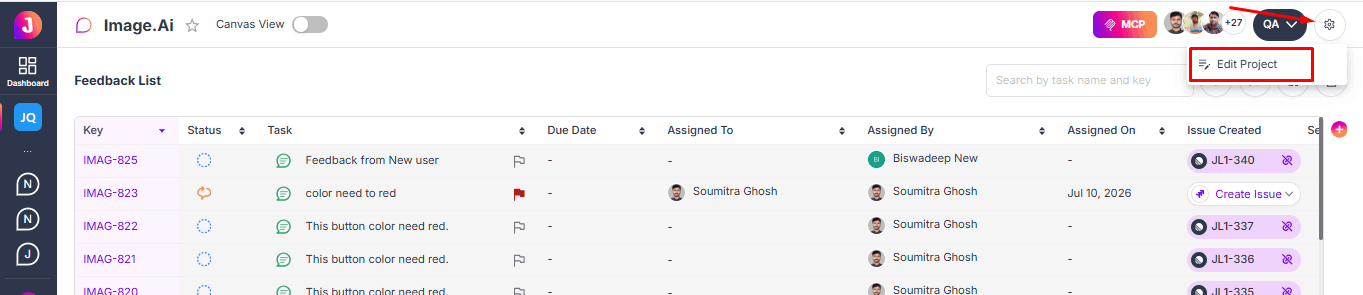
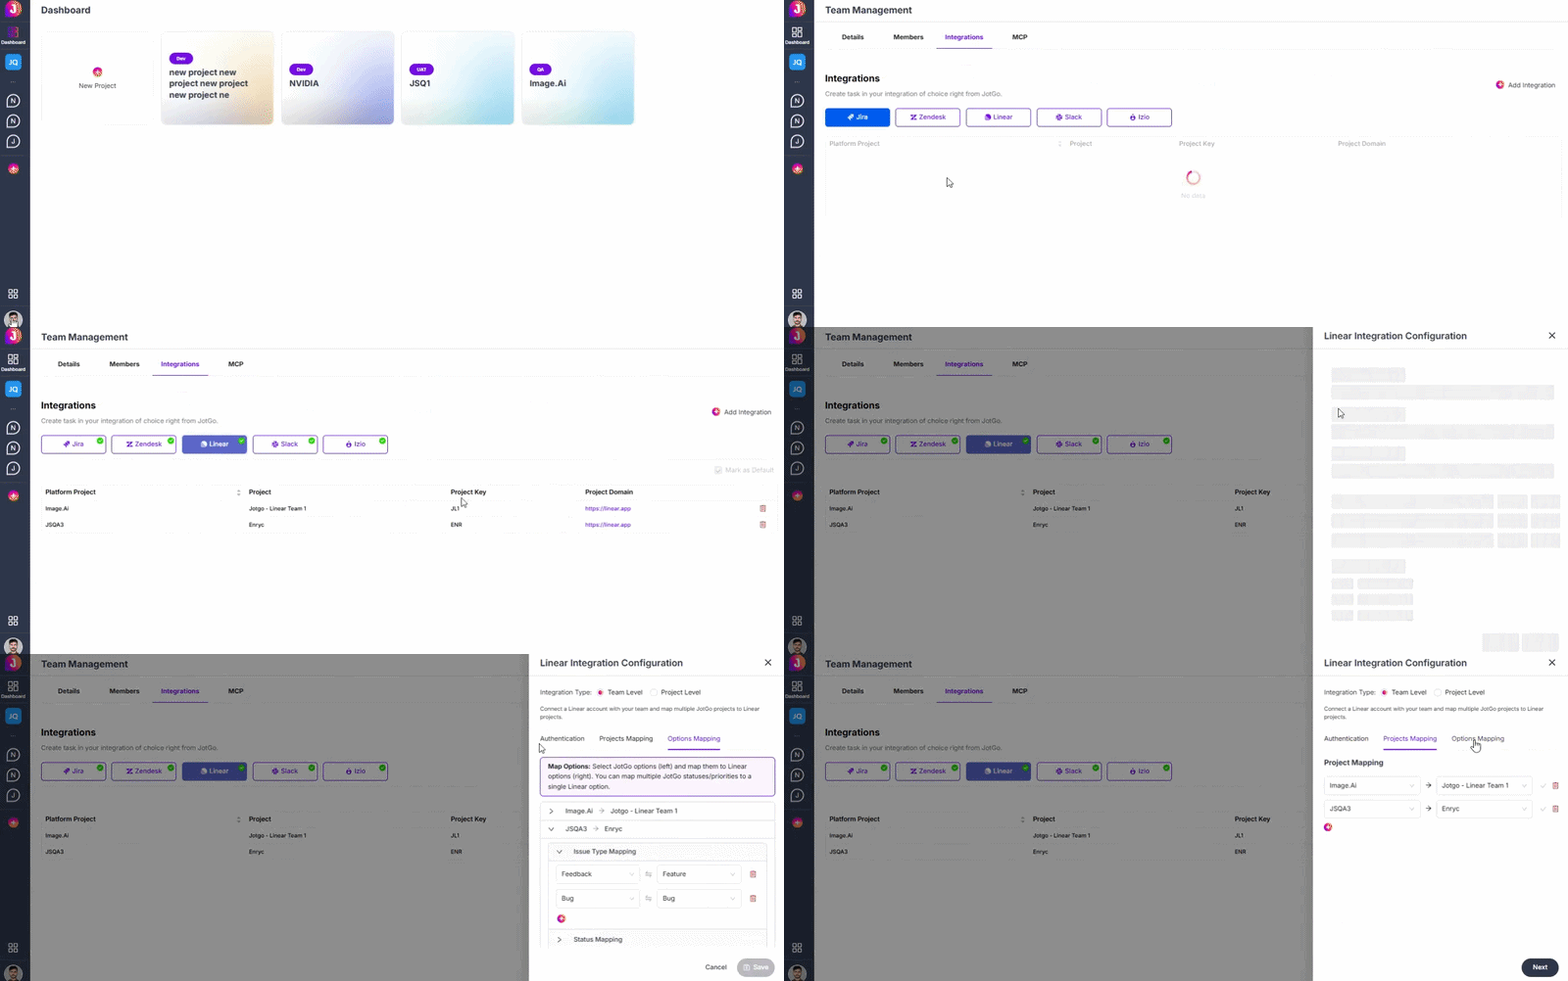
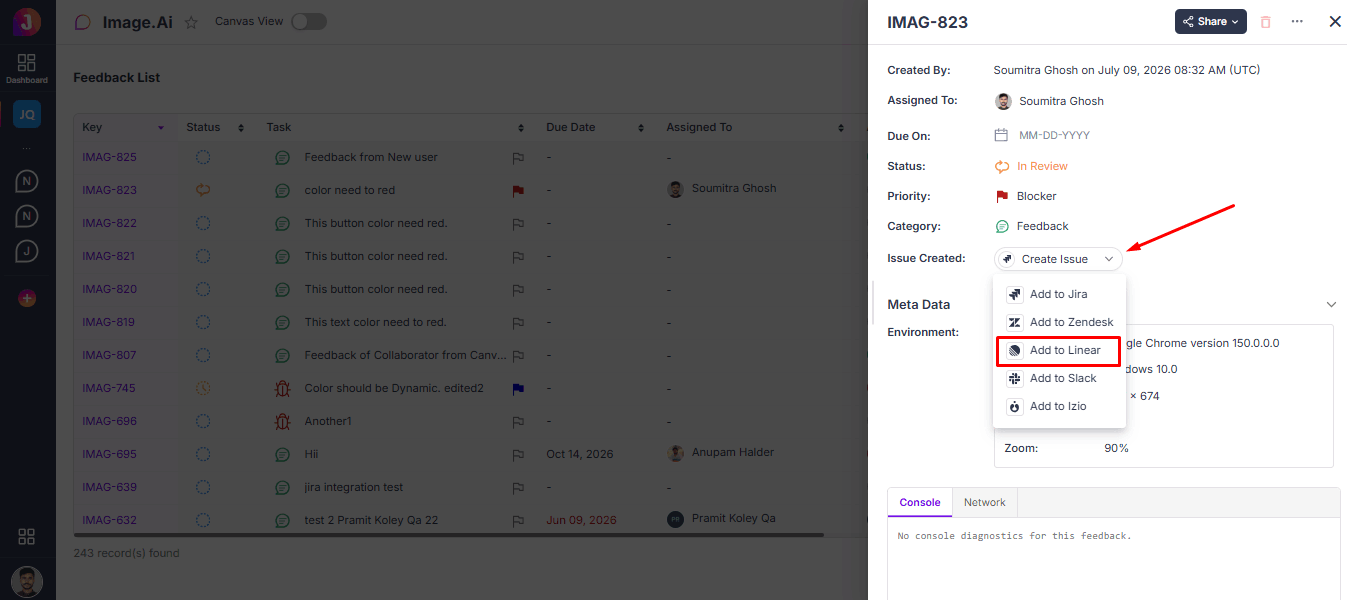
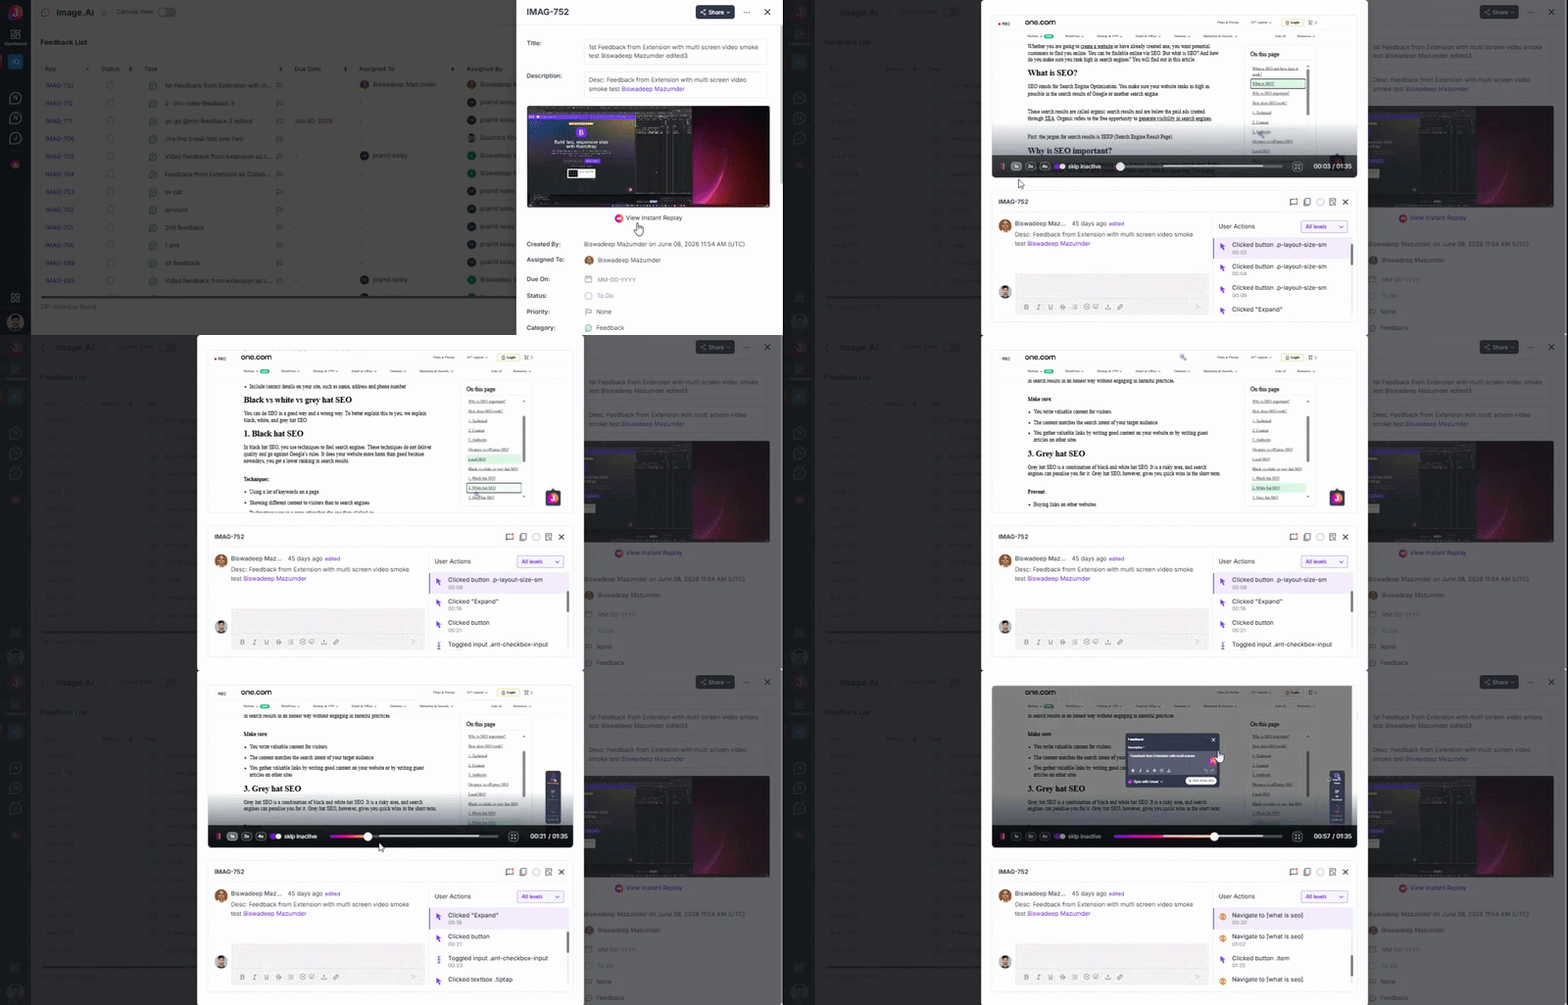
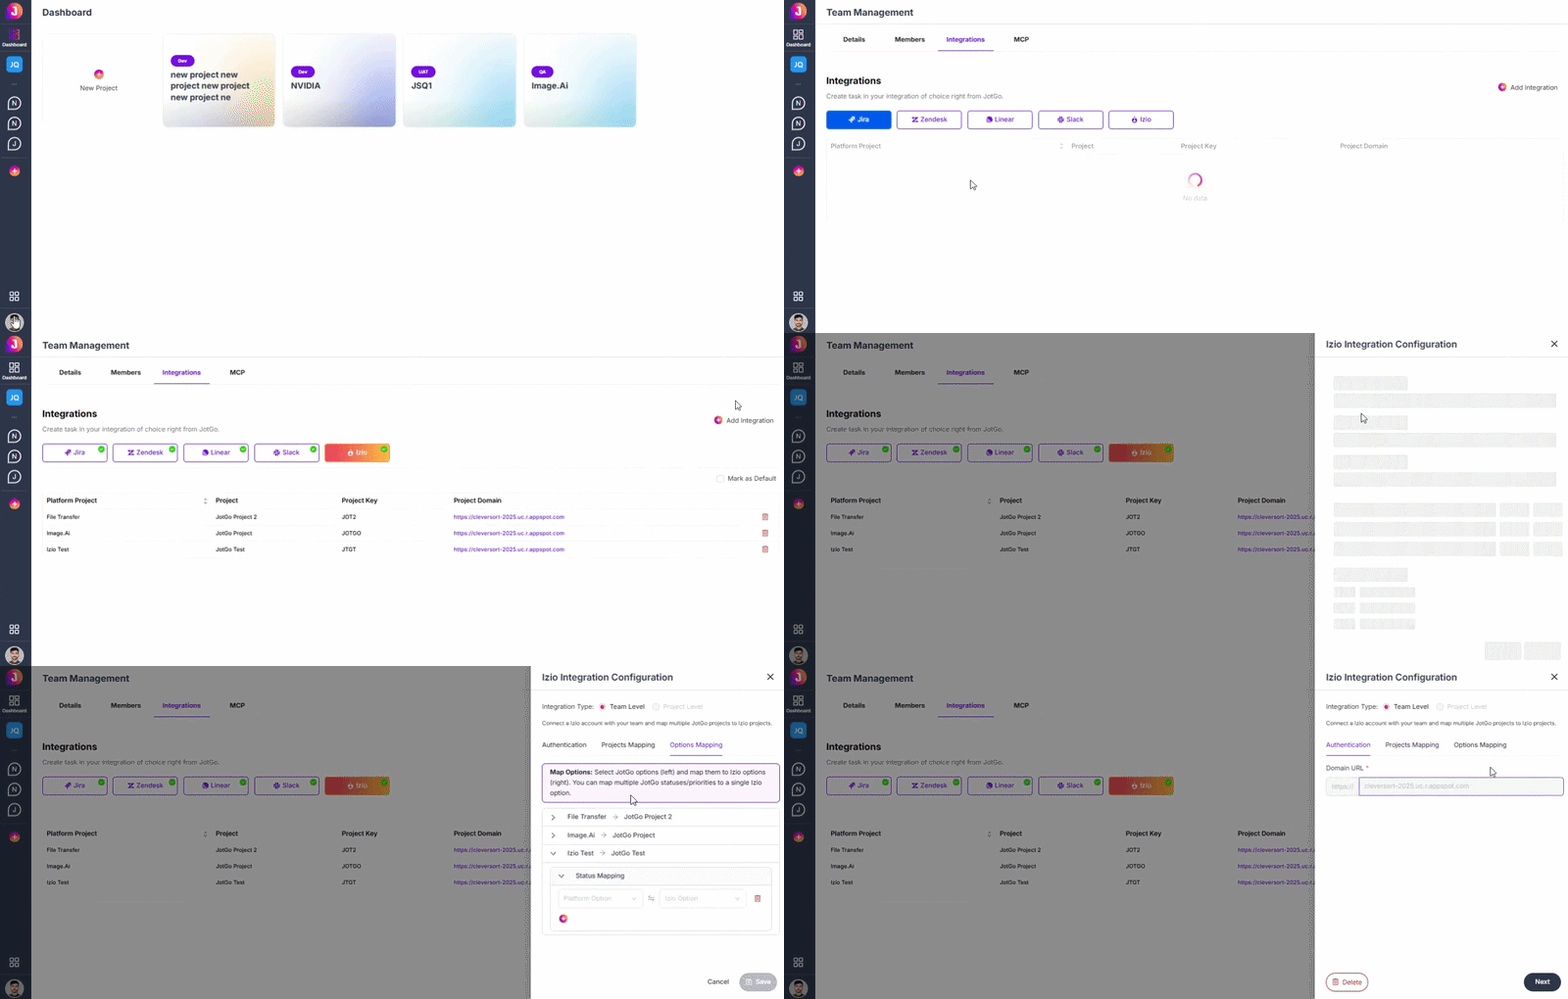
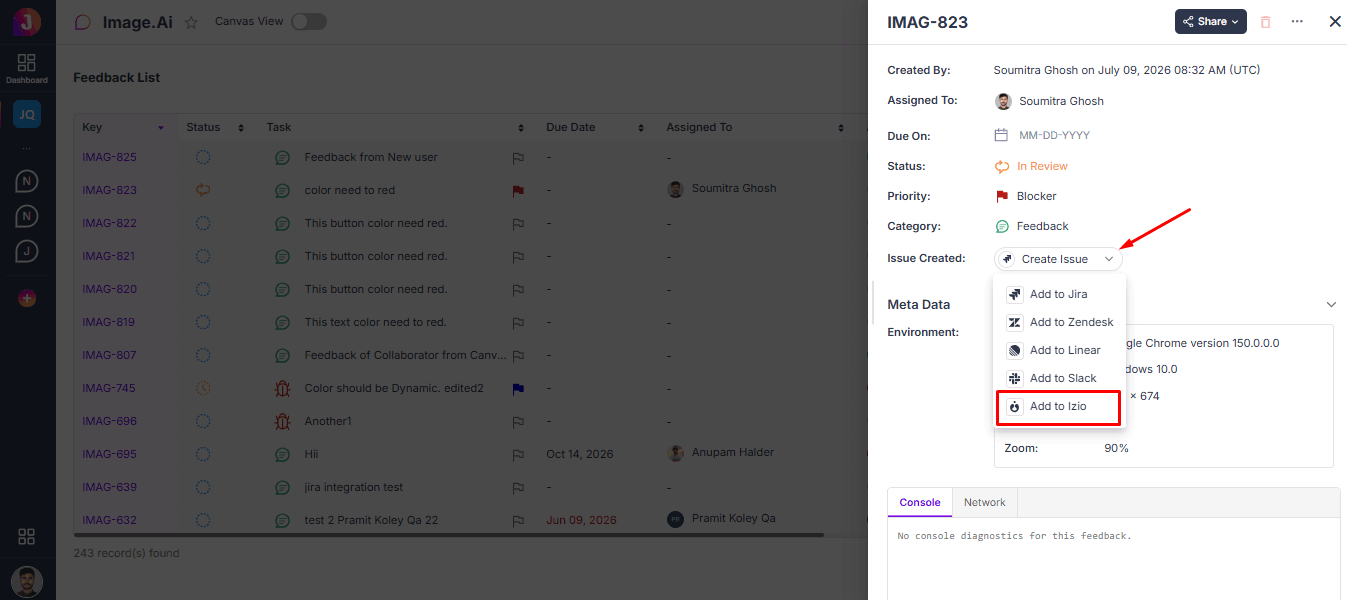
JotGo helps teams report bugs, collect feedback and collaborate without the usual back-and-forth. Instead of asking users to explain technical issues, JotGo automatically captures the information developers need, making every report faster to create and easier to resolve. Whether you're a product manager, QA engineer, developer, customer support agent or stakeholder, JotGo keeps everyone on the same page from the moment an issue is reported.
1
Getting Started
getting-started
1
What is JotGo?
JotGo is a bug reporting and product feedback platform that lets users capture issues directly from a website or web application.
With just a few clicks, users can:
Report bugs with screenshots or video recordings
Highlight and annotate specific areas
Automatically collect browser, device and technical details
Share feedback without leaving the application
Create developer-ready reports instantly
Instead of spending time asking follow-up questions, your team receives complete reports that are ready to investigate.
Why teams use JotGo
Most bug reports are incomplete.
A message like "The page is broken" doesn't tell developers enough to reproduce the issue.
JotGo automatically includes the important details that are usually missing, such as:
Browser
Screen resolution
Current page URL
Console errors
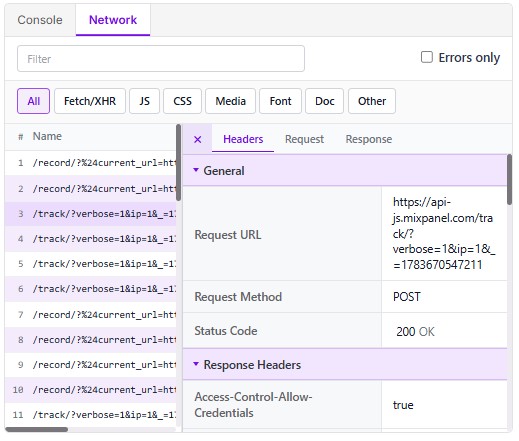
Network requests
User actions (when available)
Screenshots and recordings
User comments and annotations
This saves time for both the person reporting the issue and the team fixing it.
How JotGo works
Using JotGo is simple.
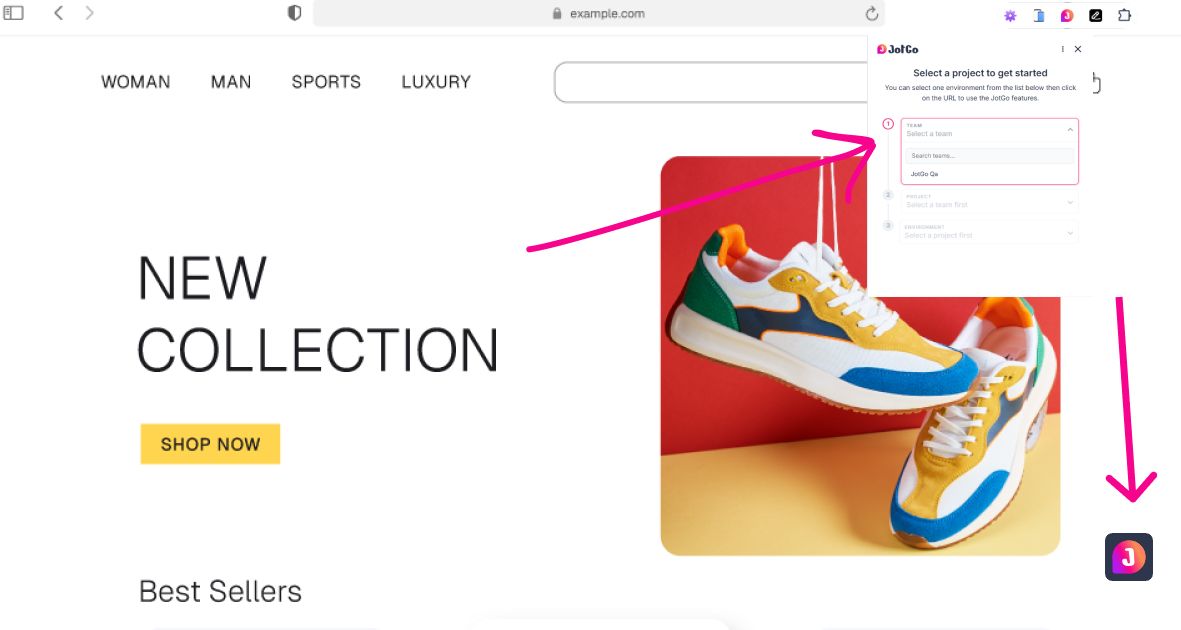
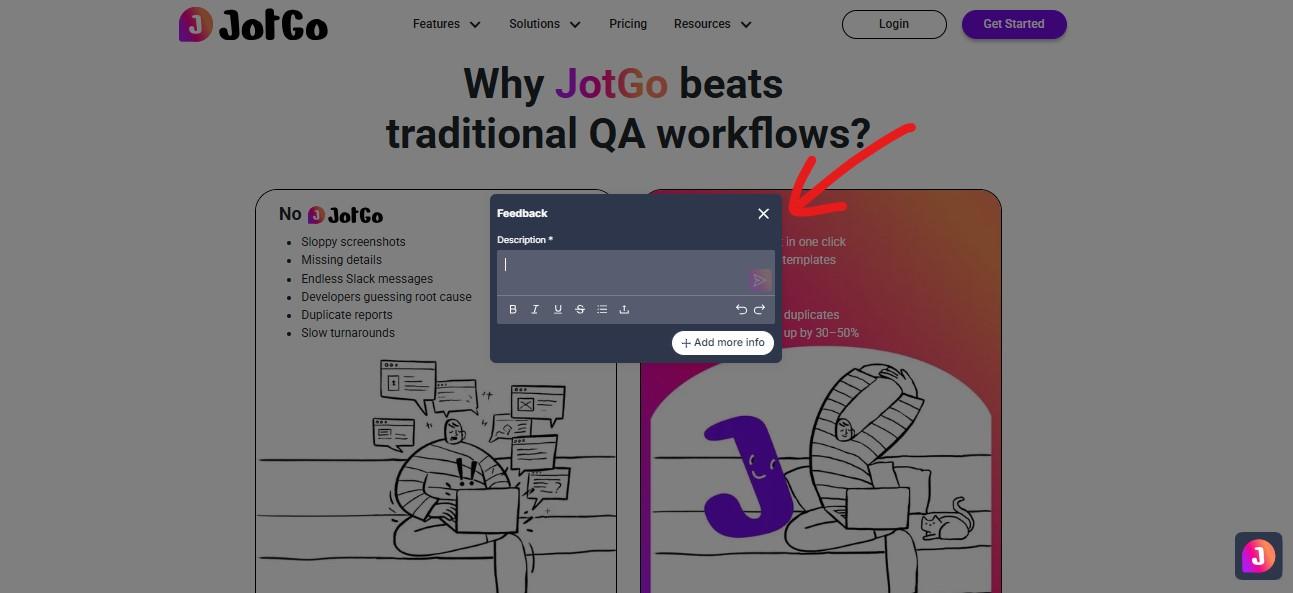
Open the JotGo browser extension.
Capture a screenshot or record your screen.
Highlight the problem using annotation tools.
Add a short description of the issue.
Submit the report.
JotGo automatically attaches technical information in the background and sends everything to your workspace, where your team can review, assign and track the issue.
Who is JotGo for?
JotGo is designed for every team involved in building digital products.
Product Managers
Collect clear customer feedback without long email threads.
QA Teams
Create detailed bug reports in seconds with all the technical context included.
Developers
Receive reproducible issues instead of incomplete bug descriptions.
Customer Support
Report customer issues directly without requesting additional screenshots or technical information.
Designers
Understand UI problems with visual annotations and real user context.
cap-screenshot
Screenshot-based issue reporting
A screenshot is the fastest way to report a visual issue. Whether you've found a broken button, layout problem, missing content or unexpected behavior, JotGo lets you capture it in seconds. Along with your screenshot, JotGo automatically collects technical details, giving your team the context they need to investigate the issue.
1
Bug & Feedback Capture
bug-feedback-capture
2
When to use a screenshot
Use a screenshot when you want to report:
UI or design issues
Broken buttons or links
Missing images or content
Incorrect text or labels
Form validation errors
Responsive layout problems
Color, spacing or alignment issues
Visual inconsistencies
If the issue requires multiple steps to reproduce, consider using a screen recording instead.
Capture a screenshot
Open the page where you found the issue.
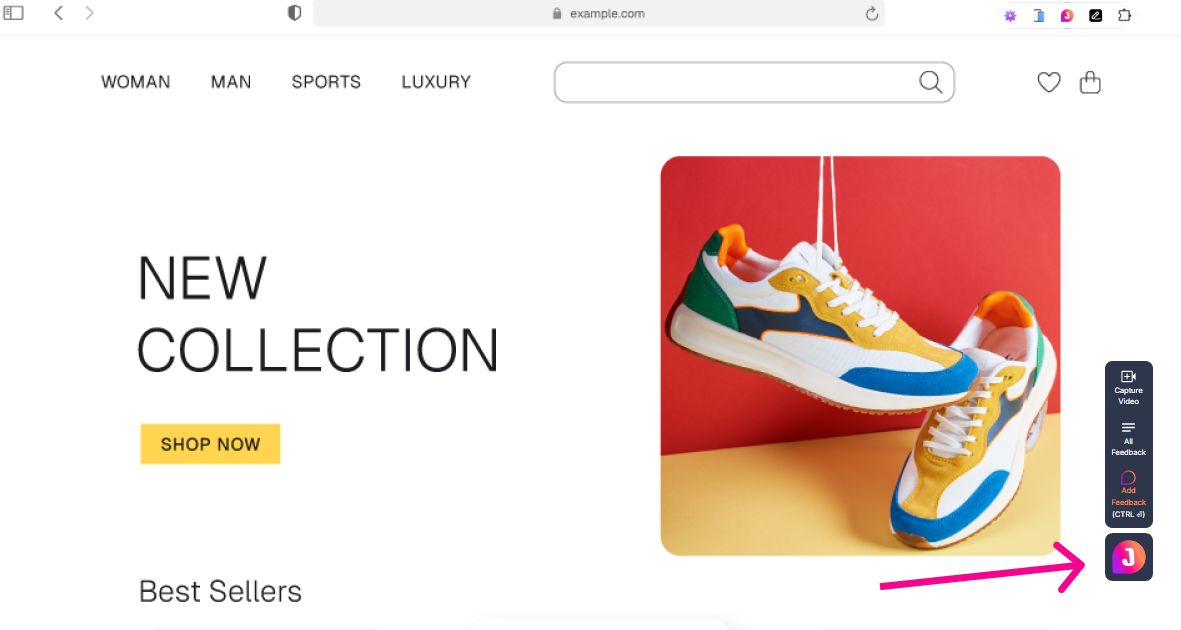
Launch the JotGo browser extension.
Select the Area.
Click and drag to capture the area you want to report.
Your screenshot will open in the JotGo editor.
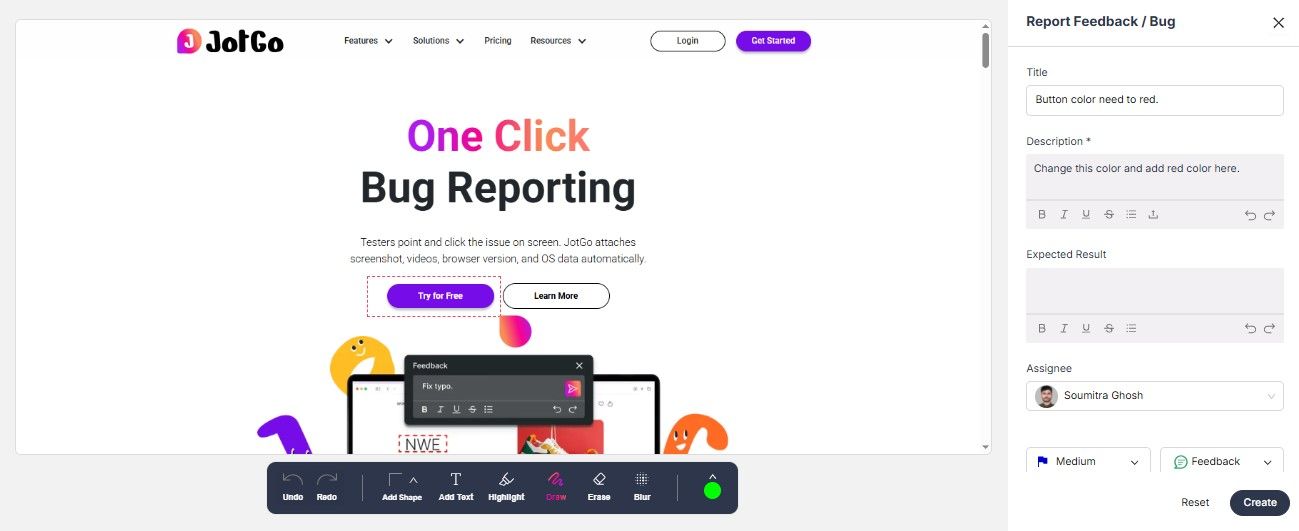
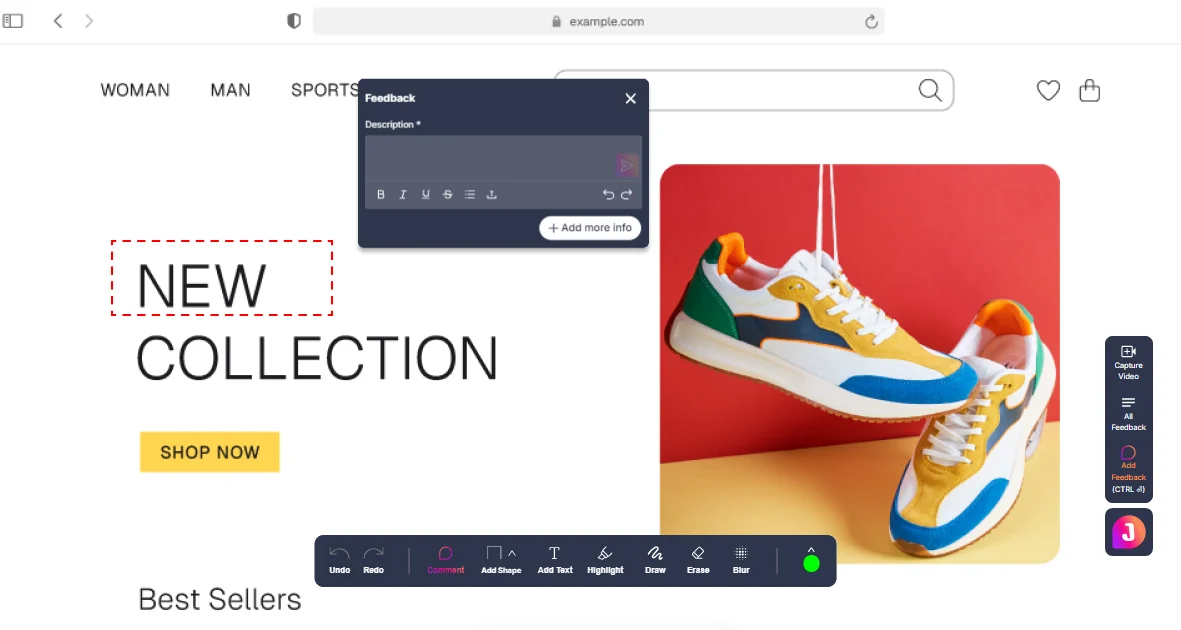
Annotate your screenshot
Before submitting your report, you can highlight exactly where the issue is.
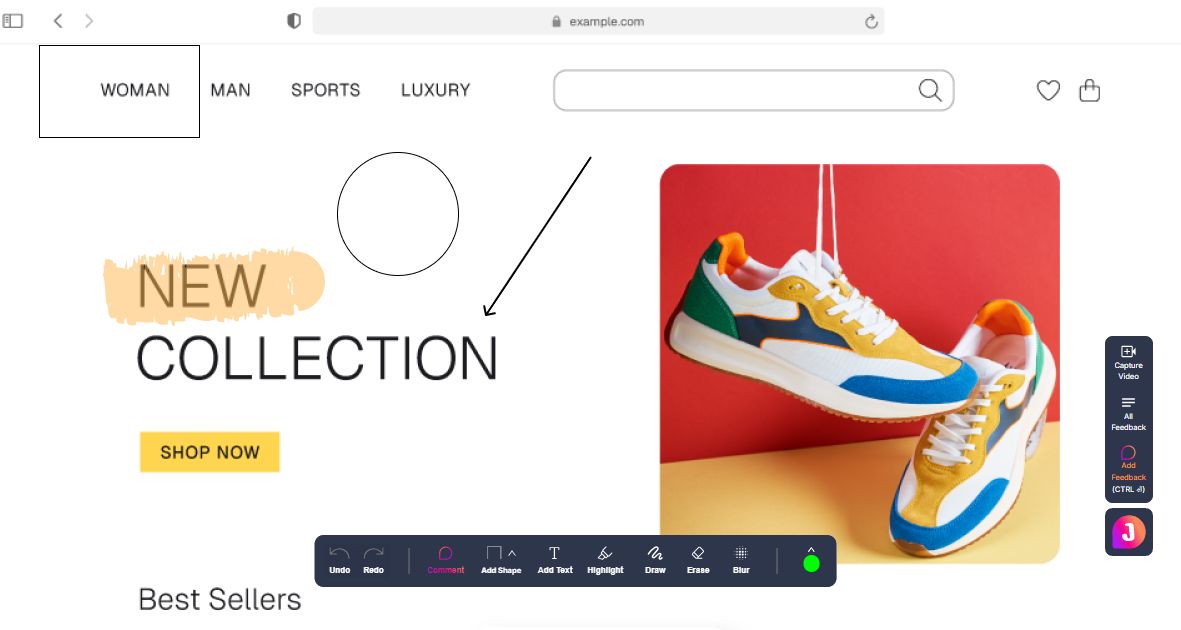
Use the annotation tools to:
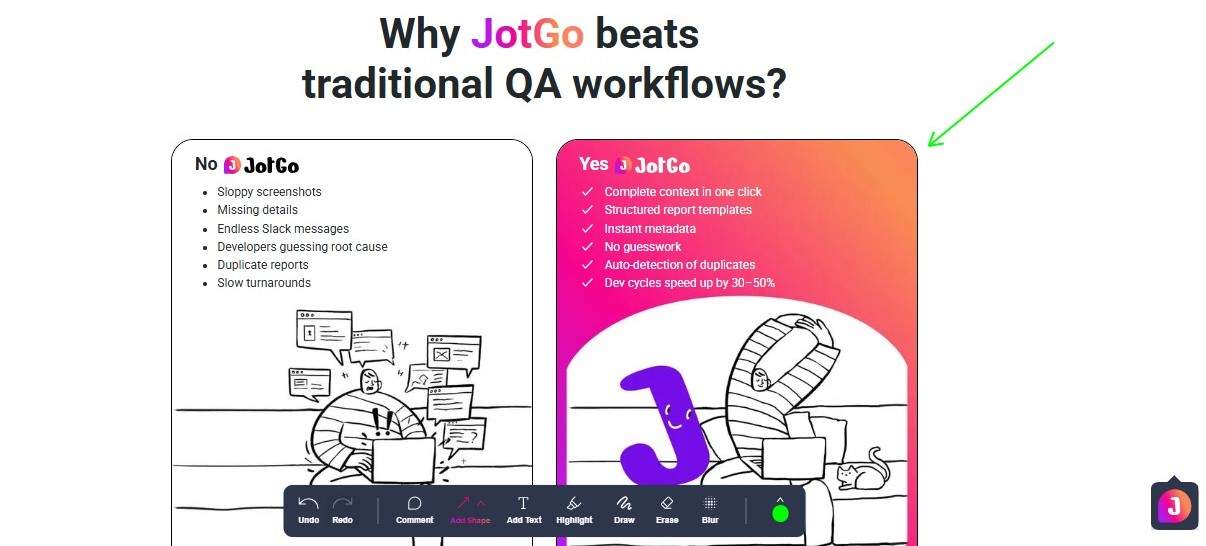
Draw arrows to point at the problem
Highlight important areas
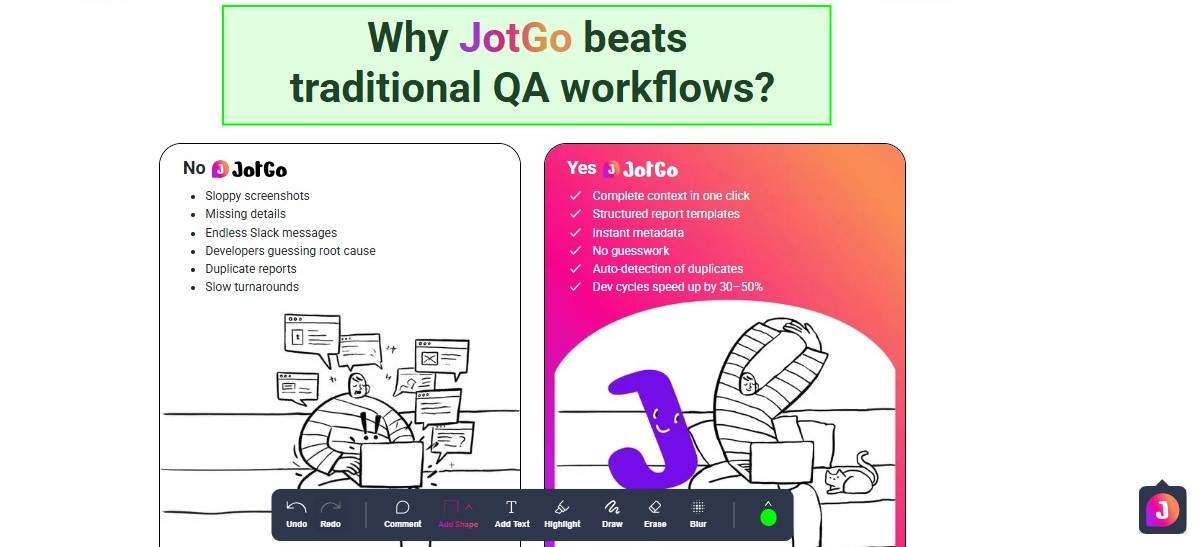
Add shapes around UI elements
Write comments directly on the image
Blur sensitive information if needed
Annotations help developers understand the issue at a glance.
Add issue details
After capturing your screenshot, provide a few details about the problem.
Issue title
Write a short, descriptive title.
Good example
Checkout button is disabled after selecting a payment method
Avoid
Bug
Description
Explain the issue in simple language.
Try to include:
What happened?
What did you expect to happen?
When did the issue occur?
Can you reproduce it?
Example
After selecting a payment method, the Checkout button remains disabled. Refreshing the page does not resolve the issue.
Automatic technical information
When you submit a screenshot, JotGo automatically attaches useful technical details, such as:
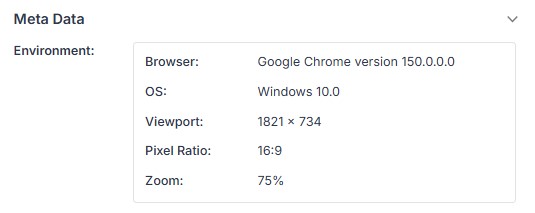
Browser and version
Operating system
Device information
Screen resolution
Current page URL
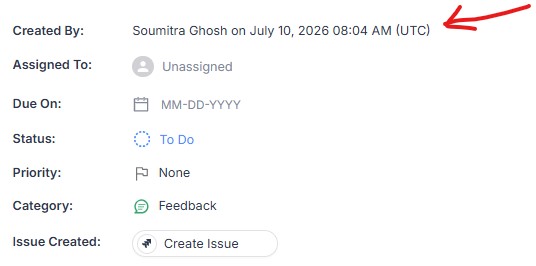
Timestamp
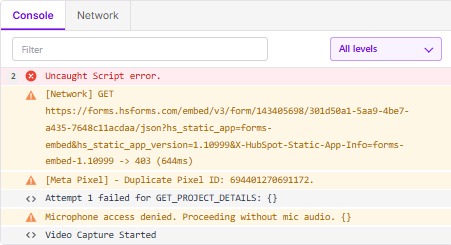
Console logs (if enabled)
Network information (if enabled)
Session Replay - Captured user actions for the previous 1 min
This information helps developers reproduce and resolve issues more quickly.
Review your report
Before submitting, take a moment to review your report.
Make sure:
The screenshot clearly shows the issue.
Important areas are annotated.
The title is descriptive.
The description is complete.
The expected result is mentioned.
No sensitive information is visible.
A quick review can prevent follow-up questions later.
Submit your report
Click Create to send your report.
Your screenshot, comments, annotations and technical details are automatically added to your JotGo workspace, where your team can review, assign and track the issue.
Best practices
Follow these tips to create more effective bug reports:
Capture only the relevant part of the screen.
Use annotations to highlight the exact issue.
Write a clear and specific title.
Include steps to reproduce the issue whenever possible.
Mention if the issue happens every time or only occasionally.
Avoid capturing sensitive or personal information.
These small details can significantly reduce the time needed to understand and fix the problem.
Example report
Title
Button background color should be red.
Description
In Hero Section CTA button color should be red and text color should be white.
Attachments (Done by JotGo automatically)
Screenshot with the affected area highlighted
Browser and device information
Current page URL
Timestamp
Console log
Network log
Previous minute user actions (session replay)
mng-repository
Centralised repository (List & Canvas)
JotGo brings all your bug reports and feedback into one central workspace, making it easy to organize, review and track every issue from a single place.
1
Bug & Feedback Management
bug-feedback-management
3
Whether your team prefers a structured list or a visual workflow, JotGo provides two flexible views to help you manage work efficiently:
List View - Best for reviewing, searching, and filtering issues.
Canvas View - Best for visual planning, prioritization and team collaboration.
Switch between views at any time without losing information.
Why use a centralized repository?
Managing bugs across emails, chat messages, spreadsheets and multiple tools can quickly become overwhelming.
A centralized repository helps your team:
Keep all issues in one place
Reduce duplicate reports
Track progress more easily
Improve team collaboration
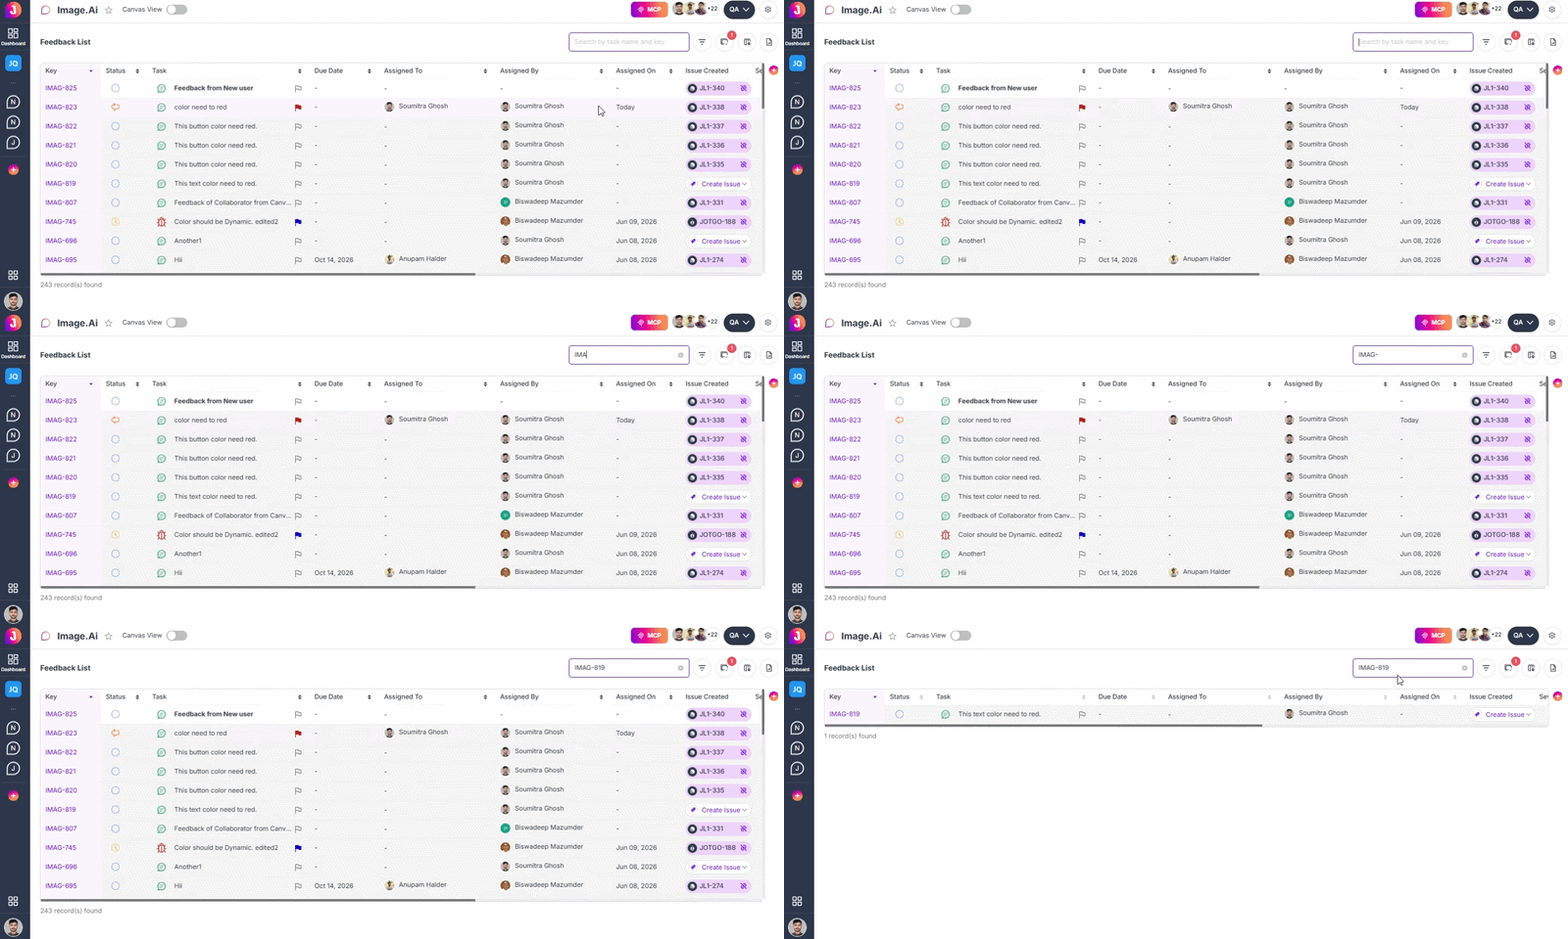
Find issues quickly using search and filters
Stay organized throughout the development lifecycle
Everything related to an issue stays together, making it easier to manage from report to resolution.
List View
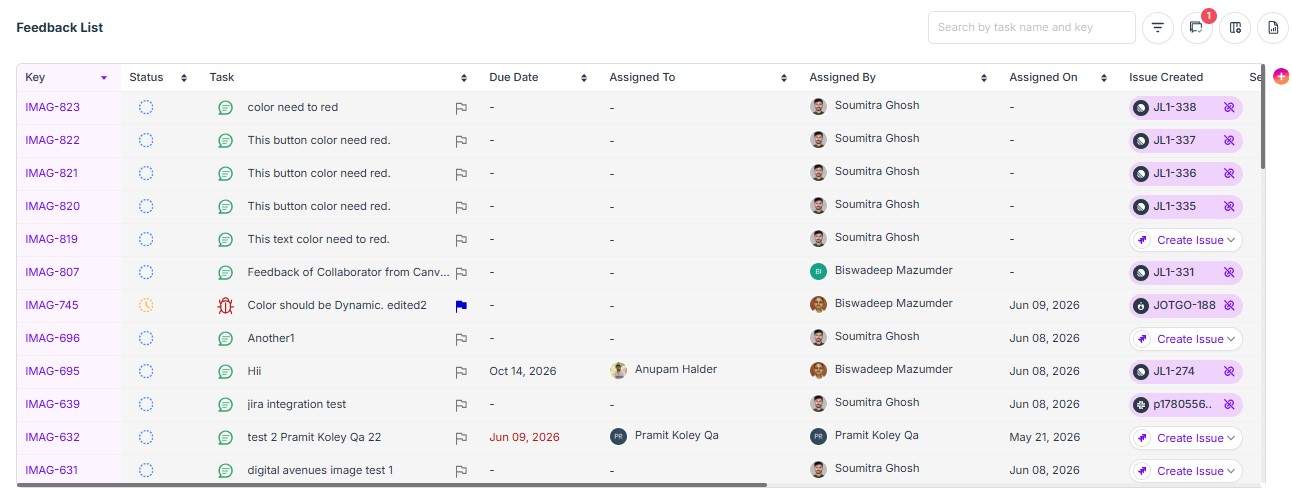
List View displays all your bug reports and feedback in a structured table, making it easy to review large numbers of issues.
This view is ideal for teams that need to search, sort and manage reports efficiently.
What you can see
Each issue includes important information such as:
Issue key
Issue title
Status
Priority
Reporter
Assignee
Project or workspace
Created date
Due date
Issue created
Last updated
Labels or tags
At a glance, you can understand the current state of every issue.
Search and filter issues
Quickly find the information you need using built-in search and filters.
You can filter by:
Status
Priority
Assignee
Reporter
Labels
Date created
Issue type
Filtering helps teams focus on the most relevant work without scrolling through long lists.
Sort your reports
Organize issues based on what matters most.
For example, you can sort by:
Newest first
Oldest first
Recently updated
Highest priority
Status
Assignee
Sorting helps you review reports in the order that best fits your workflow.
Canvas View
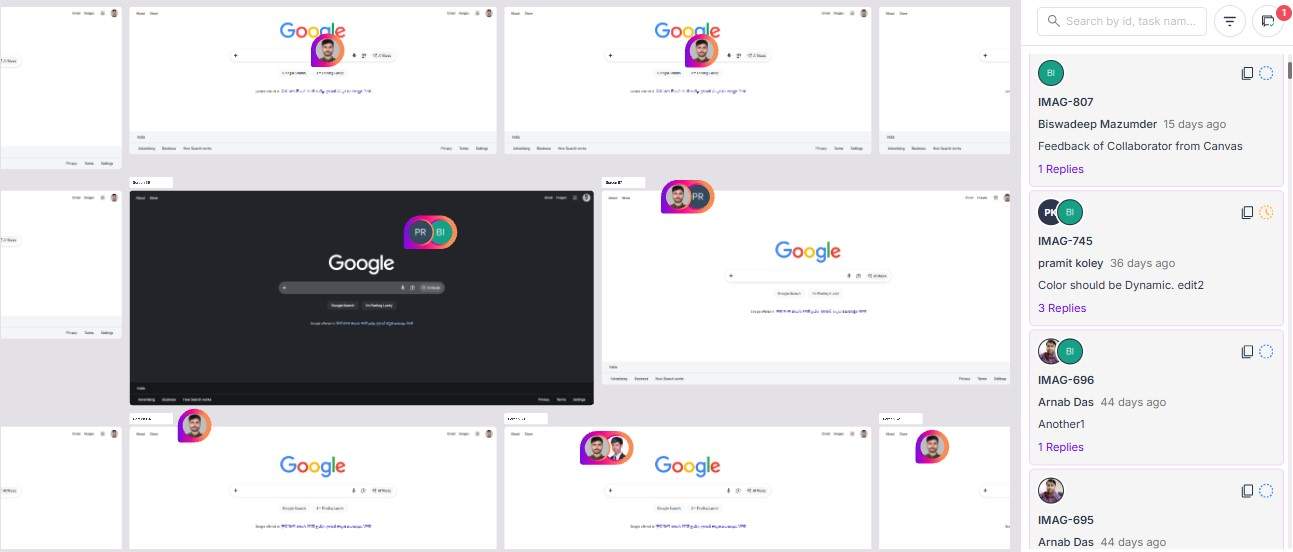
Canvas View provides a visual workspace where issues can be organized into groups based on your team's workflow.
Instead of reading through a list, you can move issues between different stages as work progresses.
This view is perfect for planning, sprint management and team collaboration.
Organize your workflow
Arrange issues into columns that match your development process.
For example:
New
Open
In Progress
In Review
Resolved
Closed
Simply drag and drop issues between stages as their status changes.
Visual progress tracking
Canvas View helps your team quickly understand:
What needs attention
What is currently being worked on
What has been completed
Which tasks are blocked
This makes project progress easier to monitor during daily stand-ups and sprint reviews.
Switch between views
You don't have to choose one view permanently.
At any time, you can switch between:
List View for detailed management
Canvas View for visual planning
Both views display the same issues, ensuring your team always works with the latest information.
Keep issue details together
Every report includes all relevant information in one place.
Depending on your workspace, an issue may include:
Screenshots
Screen recordings
Session Replay
Technical diagnostics
Comments
Activity history
Attachments
Assigned team members
Status updates
This eliminates the need to search through emails or chat conversations for additional context.
Collaborate with your team
The centralized repository makes teamwork simple.
Your team can:
Review reported issues
Assign work to teammates
Update issue status
Add comments
Share feedback
Track progress
Monitor recent activity
Everyone stays informed using a single source of truth.
Best practices
To keep your repository organized:
Write clear and descriptive issue titles.
Use consistent labels and priorities.
Assign issues to the appropriate team member.
Update issue status as work progresses.
Close resolved issues promptly.
Archive or remove duplicate reports when necessary.
A well-organized repository helps teams stay productive and reduces time spent managing issues.
Example workflow
A typical issue might move through the following stages:
A user submits a bug report.
The issue appears in the centralized repository.
A team member reviews and prioritizes it.
The issue is assigned to a developer.
Progress is tracked inCanvas View.
The developer resolves the issue.
QA verifies the fix.
The issue is marked as Closed.
Throughout this process, all comments, attachments and updates remain linked to the same issue.
Why it matters
A centralized repository ensures that every bug report and piece of feedback is easy to find, manage and track. Whether you're reviewing hundreds of reports in List View or planning work visually in Canvas View, JotGo keeps your entire team aligned and focused on delivering a better product.
col-comments
Team comments
Effective collaboration starts with clear communication. JotGo's Team Comments feature allows team members to discuss issues, share updates, ask questions and provide feedback - all within the same bug report.
1
Collaboration
collaboration
4
Instead of switching between emails, chat apps or meetings, every conversation stays connected to the issue, making it easy for everyone to stay informed.
Why use team comments?
Comments help your team collaborate throughout the entire issue lifecycle.
With team comments, you can:
Ask questions about an issue
Share investigation findings
Provide additional information
Suggest possible solutions
Request clarification from the reporter
Keep everyone updated on progress
Having all discussions in one place makes collaboration more efficient and transparent.
Add a comment
Adding a comment is quick and simple.
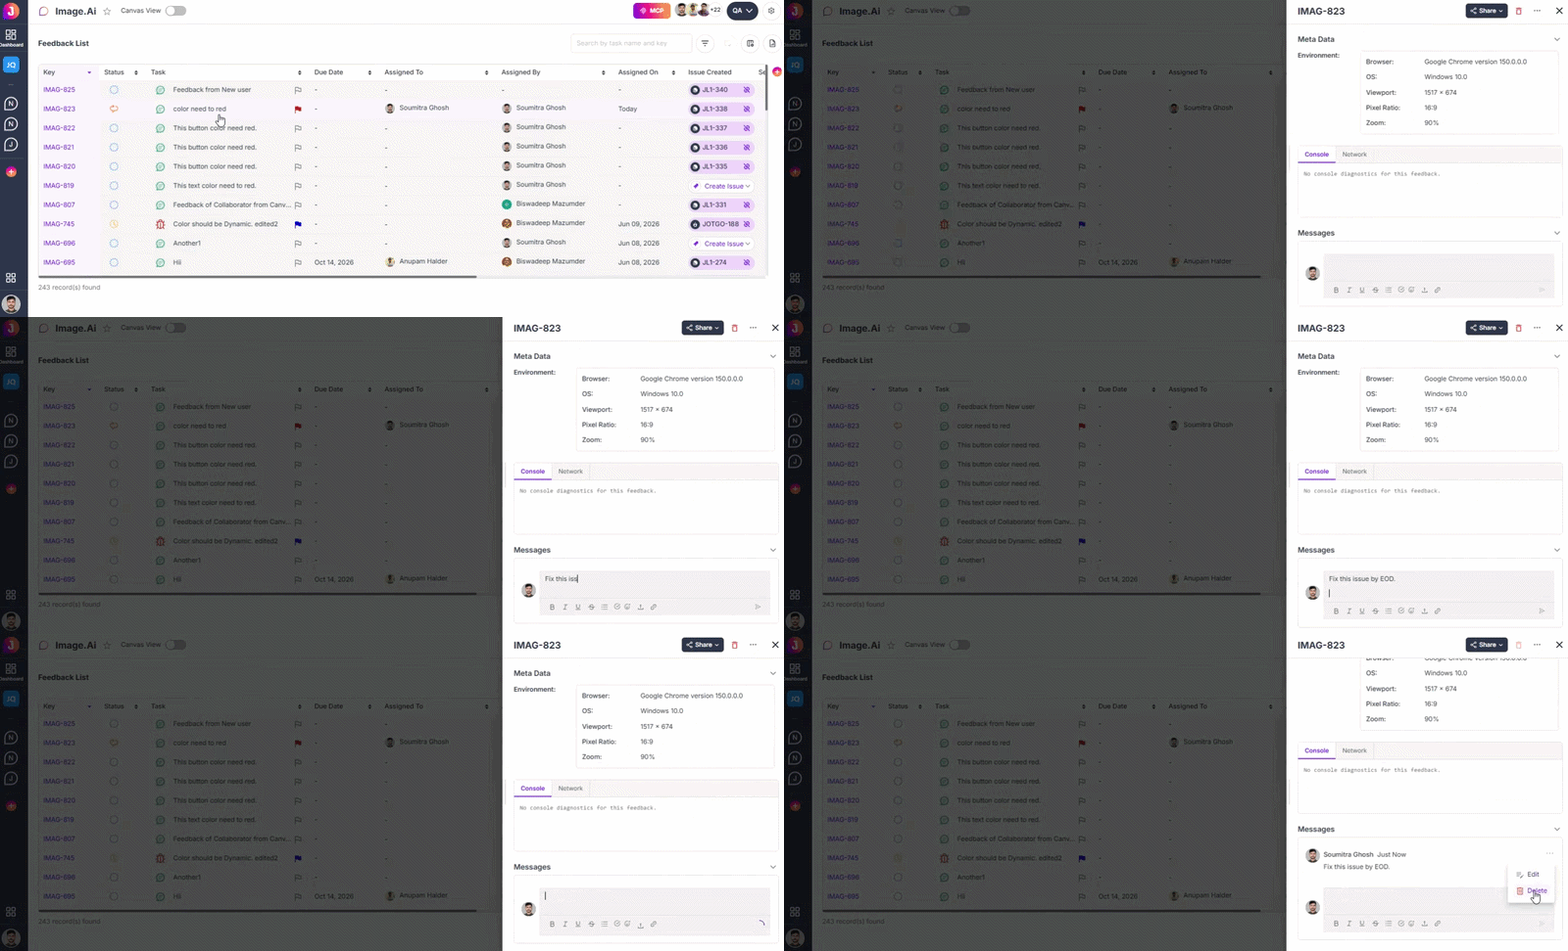
Open the issue you want to discuss.
Scroll to the Comments section.
Type your message.
Click Send Icon.
Your comment is instantly visible to everyone with access to the issue.
Share useful updates
Comments are a great way to keep your team informed as work progresses.
Examples of useful updates include:
"I have identified the root cause and started working on a fix."
"The issue has been reproduced in the staging environment."
"Waiting for QA verification."
"The fix has been deployed for testing."
Regular updates help everyone understand the current status of the issue.
Ask questions
If you need more information before resolving an issue, use comments to ask the reporter or your teammates.
For example:
Can you share the steps to reproduce this issue?
Does this happen on every browser?
Are you able to reproduce it consistently?
Can you test this again after the latest update?
Keeping questions within the issue ensures that all responses remain part of the issue history.
Mention teammates
Need input from a specific team member?
Use @mentions to notify them directly in a comment.
For example:
@Sarah Could you verify this issue in the staging environment?
Mentions help bring the right people into the conversation without creating separate discussions.
Keep discussions organized
Every comment is linked to the issue, creating a complete conversation history.
This allows your team to:
Review previous discussions
Understand why decisions were made
Track progress over time
Reduce repeated questions
Anyone joining the project later can quickly catch up by reading the conversation.
Share attachments
Comments can include supporting files to provide additional context.
Depending on your workspace settings, you can attach:
Screenshots
Screen recordings
Documents
Log files
Error reports
Other relevant files
Attachments help teammates better understand the issue without leaving the conversation.
Best practices
To keep discussions clear and productive:
Keep comments focused on the issue.
Share meaningful updates as work progresses.
Ask clear and specific questions.
Use @mentions only when someone needs to take action.
Avoid creating duplicate comments.
Keep all issue-related communication within the comment thread.
Following these practices helps everyone stay aligned and reduces unnecessary back-and-forth.
Example conversation
Reporter
The Submit button does not respond after completing the form.
Developer
I've reproduced the issue and found that the validation service is failing.
QA Engineer
The fix has been tested in the staging environment and is working as expected.
Project Manager
Great! I'll move this issue to Resolved for final verification.
This complete conversation remains attached to the issue for future reference.
Why team comments matter
Every bug report tells part of the story, but comments capture the collaboration behind the solution. By keeping discussions, updates and decisions together, JotGo helps teams communicate more effectively and resolve issues faster.
shr-links
Public shareable links
Not everyone who needs to review a bug or provide feedback has access to your JotGo workspace. Public Shareable Links make it easy to share issues with clients, stakeholders, testers or external teams-without requiring them to sign in.
1
Sharing & Stakeholder Engagement
sharing-stakeholder-engagement
5
With a single link, you can provide secure access to specific bug reports or feedback, making collaboration faster and more convenient.
Why use public shareable links?
Sometimes you need feedback from people outside your team.
Public Shareable Links help you:
Share bug reports with clients
Collect feedback from stakeholders
Review issues with external teams
Demonstrate reported problems during meetings
Reduce lengthy email conversations
Keep everyone aligned on the same issue
Instead of sending screenshots, videos and explanations separately, you can simply share one link.
Create a shareable link
Creating a public link is quick and easy.
Open the issue you want to share.
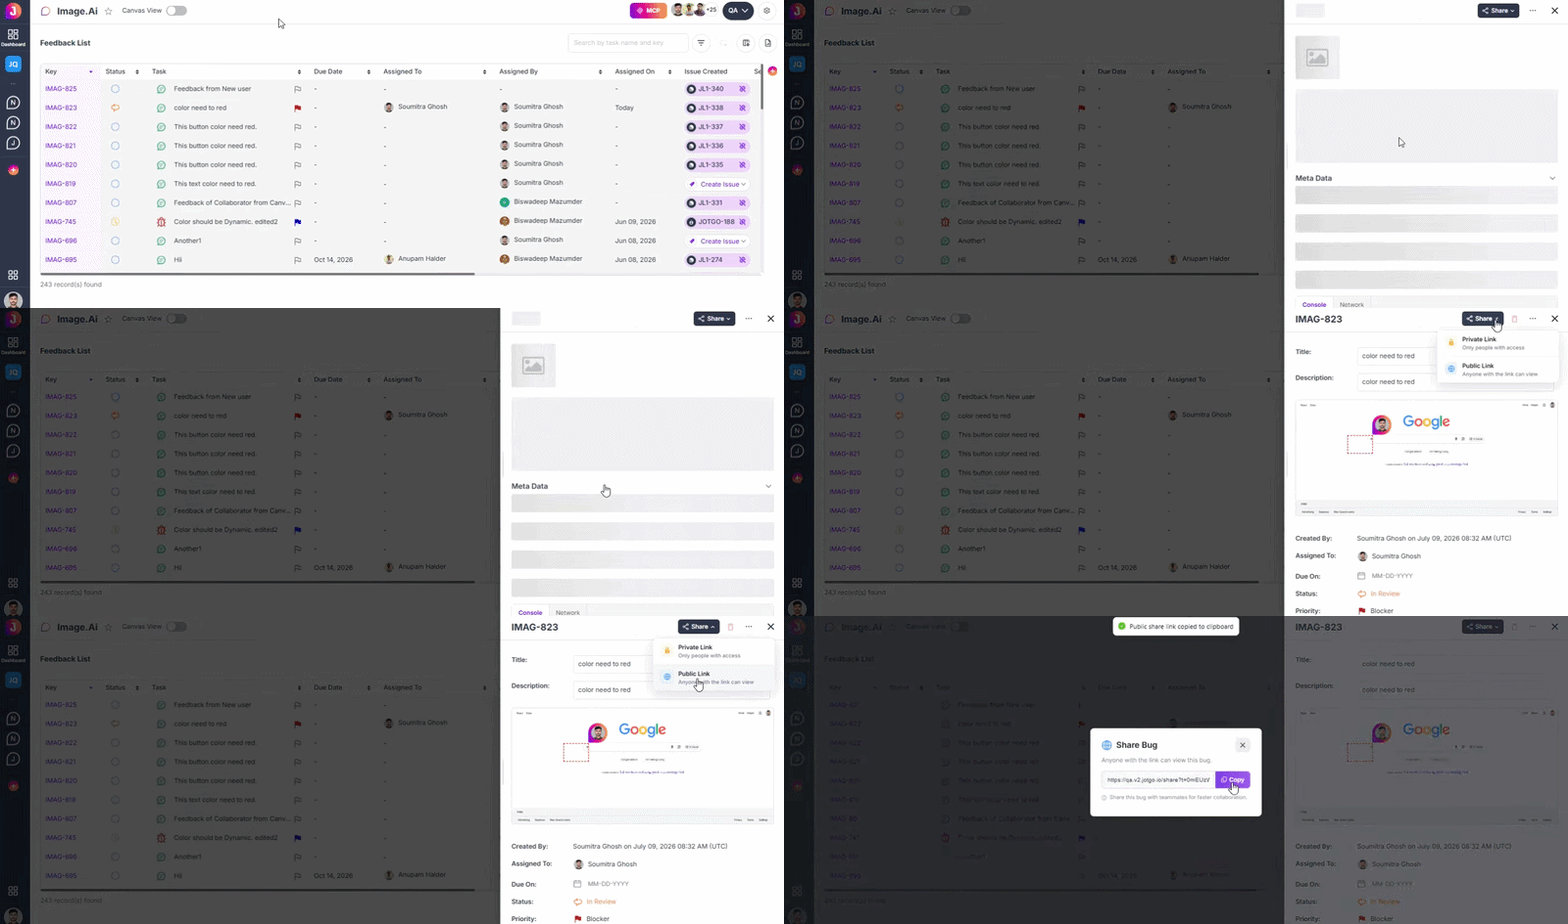
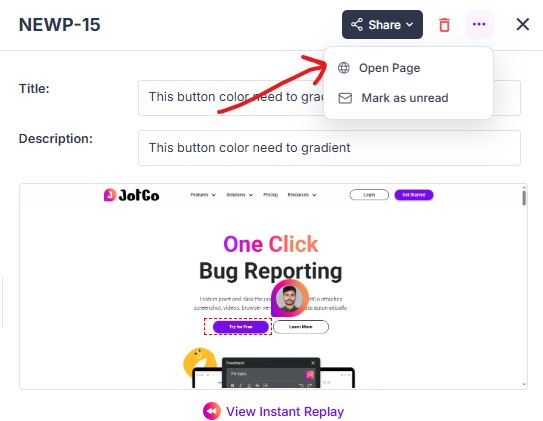
Click the Share button.
Select Public Link.
Copy the generated link.
Share it with the intended recipients.
Anyone with access to the link can view the shared issue based on your workspace permissions.
What can be shared?
Depending on your workspace configuration, a shared link may include:
Issue title
Description
Screenshots
Screen recordings
Annotations
Comments
Attachments
Current status
Technical details (if permitted)
This provides stakeholders with all the context they need to understand the issue.
Share with anyone
Public links are useful for sharing issues with:
Clients
Product owners
QA partners
External developers
Designers
Business stakeholders
Beta testers
Recipients can review the issue without needing full access to your JotGo workspace.
Keep everyone informed
Instead of sending multiple emails or chat messages, share a single link that always reflects the latest information.
As the issue is updated, stakeholders can see:
Current status
New comments
Recent activity
Resolution progress
This keeps everyone informed throughout the issue lifecycle.
Best practices
To share issues securely:
Share links only with the intended recipients.
Verify that sensitive information is hidden before sharing.
Share complete and up-to-date issue reports.
Review permissions before creating a public link.
Following these practices helps protect your project's information while making collaboration easier.
Example
Scenario
A client reports that the checkout page isn't working.
The support team investigates the issue and creates a bug report in JotGo.
Instead of sending multiple screenshots and updates by email, they:
Create a public shareable link.
Send the link to the client.
The client views the report, screenshots and current status.
As the development team updates the issue, the client can check the latest progress using the same link.
This provides a simple and transparent way to keep everyone informed.
Why public shareable links matter
Collaboration doesn't stop at your internal team. Public Shareable Links make it easy to involve clients, partners and stakeholders in the development process without giving them full access to your workspace. Everyone stays informed using a single, always up-to-date source of information.
Frequently Asked Questions
Do recipients need a JotGo account?
No. Anyone with the public shareable link can view the shared issue without signing in to JotGo.
Can I stop sharing an issue?
No. Public Shareable Links provide view-only access. Recipients can review the issue, screenshots, recordings, comments and other shared details, but they cannot modify the issue or make changes to your workspace.
Can I control what information is shared?
Yes. The public link always reflects the current state of the issue. Any updates made within JotGo-such as status changes, new comments or additional attachments-are automatically visible through the same shared link.
ana-dashboard
Report Dashboard
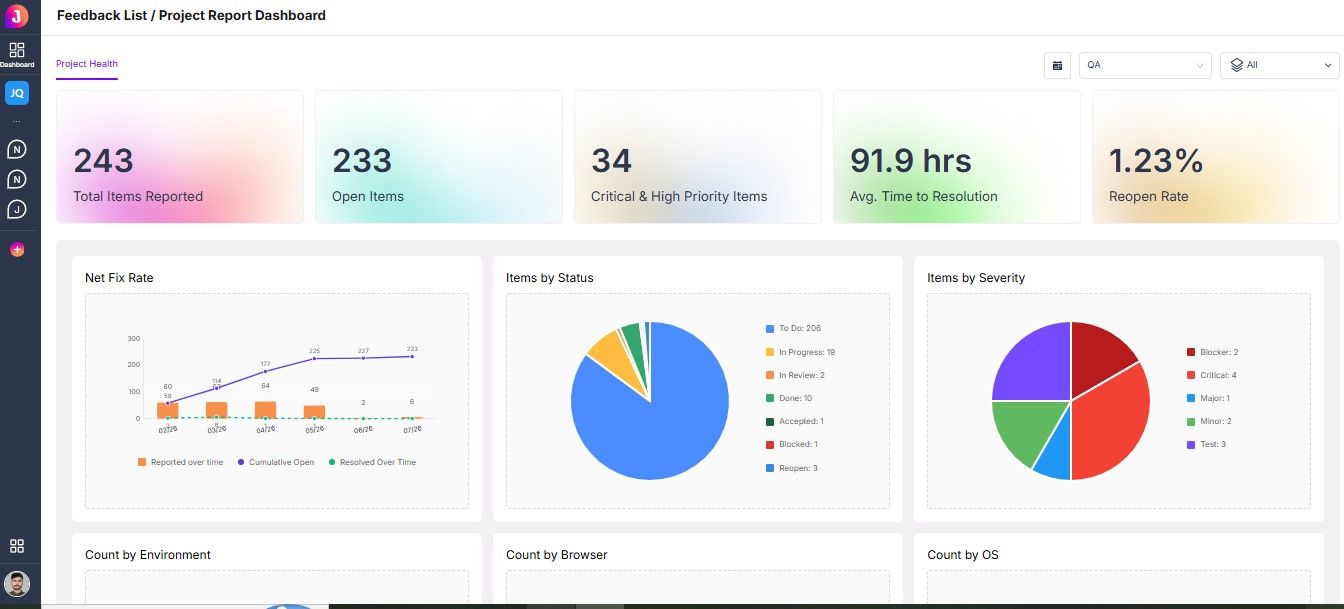
The Report Dashboard gives you a complete overview of your team's bug reports and feedback in one place. Instead of reviewing issues individually, you can monitor key metrics, track progress and understand the overall health of your projects at a glance.
1
Analytics & Insights
analytics-insights
6
Whether you're a developer, project manager, QA engineer or team lead, the dashboard helps you make informed decisions using real-time data.
Why use the Report Dashboard?
As your team handles more bugs and feedback, it's important to understand what's happening across your projects.
The Report Dashboard helps you:
Monitor project progress
Track reported and resolved issues
Identify high-priority problems
Measure team performance
Spot trends over time
Make data-driven decisions
With all your key metrics in one place, you can quickly understand where your team's attention is needed.
Dashboard overview
The dashboard provides a summary of your workspace and displays important metrics in an easy-to-read format.
Depending on your workspace configuration, you may see:
Total Issues
Open Issues
In Progress Issues
Reopen issue
Critical & High Priority Issues
Recently Reported Issues
Team Activity
This gives you a clear snapshot of your current workload.
Track issue status
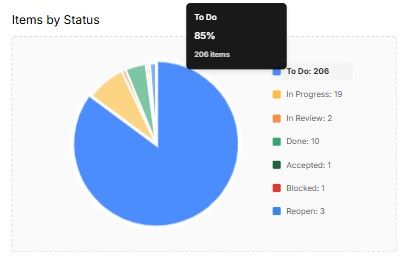
See how issues are distributed across different stages of your workflow.
For example:
To Do
In Progress
In Review
Done
Accepted
Blocked
Reopen
This helps you understand how work is progressing and identify any stages where issues are getting delayed.
Monitor issue trends
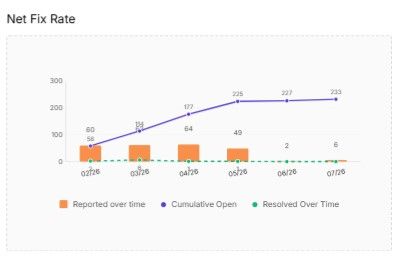
The dashboard helps you identify patterns in your reports.
You can track:
Issues reported over time
Resolved issues over time
Cumulative open
Understanding these trends helps your team focus on continuous improvement.
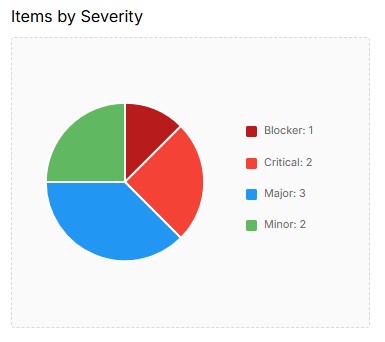
Analyze severity
Quickly see how many issues belong to each severity level.
Examples include:
Blocker
Critacle
Major
Minor
This allows your team to prioritize urgent work while keeping track of lower-priority tasks.
Measure team performance
Managers can use the dashboard to understand how work is distributed across the team.
You may be able to view:
Issues assigned to each team member
Recently completed issues
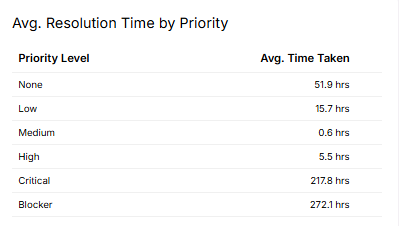
Average resolution time
Open vs. resolved issues
Overall team workload
These insights help improve planning and balance responsibilities.
Filter dashboard data
Use filters to focus on the information that's most relevant.
Depending on your workspace, you can filter by:
Date range
Status
Priority
Filters make it easy to generate insights for a specific project, sprint or team.
Use reports to improve decisions
The Report Dashboard isn't just for tracking issues-it's a tool for improving your workflow.
Use it to:
Identify recurring problems
Plan upcoming releases
Review sprint progress
Monitor product quality
Prioritize development efforts
Share progress with stakeholders
Regularly reviewing your dashboard helps your team make better decisions based on real data.
Best practices
To get the most value from your dashboard:
Review the dashboard regularly during team meetings.
Keep issue statuses updated.
Assign priorities consistently.
Resolve outdated or duplicate issues.
Use filters to focus on specific projects or time periods.
Monitor trends instead of individual reports only.
A well-maintained dashboard provides more accurate and meaningful insights.
Example
Scenario
Your team is preparing for the next sprint.
By reviewing the Report Dashboard, you discover:
18 issues are currently Open
7 issues are marked as High Priority
Most unresolved issues belong to the Payment module
The number of new bug reports has decreased compared to last week
Based on these insights, the team decides to prioritize payment-related fixes before starting new feature development.
Why the Report Dashboard matters
A Report Dashboard gives your team a clear view of what's happening across your projects. Instead of relying on individual updates, everyone can access the same real-time information to track progress, identify bottlenecks, and make informed decisions.
Frequently Asked Questions
Who can access the Report Dashboard?
Access depends on your workspace role and permissions. Administrators, managers and other authorized users can view dashboard reports.
Is the dashboard updated automatically?
Yes. The dashboard reflects the latest issue activity as reports are created, updated or resolved.
Can I filter dashboard reports?
Yes. You can apply filters such as project, date range, status, priority, assignee and more to view the information most relevant to your work.
int-jira
Jira
JotGo integrates with Jira to help your team turn bug reports and feedback into actionable development tasks. Instead of manually copying issue details, you can create and sync Jira issues directly from JotGo.
1
Integrations
integrations
7
2-Way Sync
This allows product, QA and engineering teams to work together using the tools they already use every day.
Why integrate with Jira?
Managing bugs across multiple tools can lead to duplicated work and missed updates.
With the Jira integration, you can:
Create Jira issues directly from JotGo
Sync bug reports with your development workflow
Reduce manual data entry
Keep engineering teams up to date
Track issues from reporting to resolution
Improve collaboration between QA, product and development teams
The integration ensures that bug reports move smoothly from discovery to development.
Before you begin
Before connecting Jira, make sure you have:
A Jira account
Permission to create issues in your Jira project
Access to your JotGo workspace
Administrator or integration management permissions (if required)
If you're unsure about your permissions, contact your Jira or workspace administrator.
Connect Jira
Setting up the integration is quick and simple.
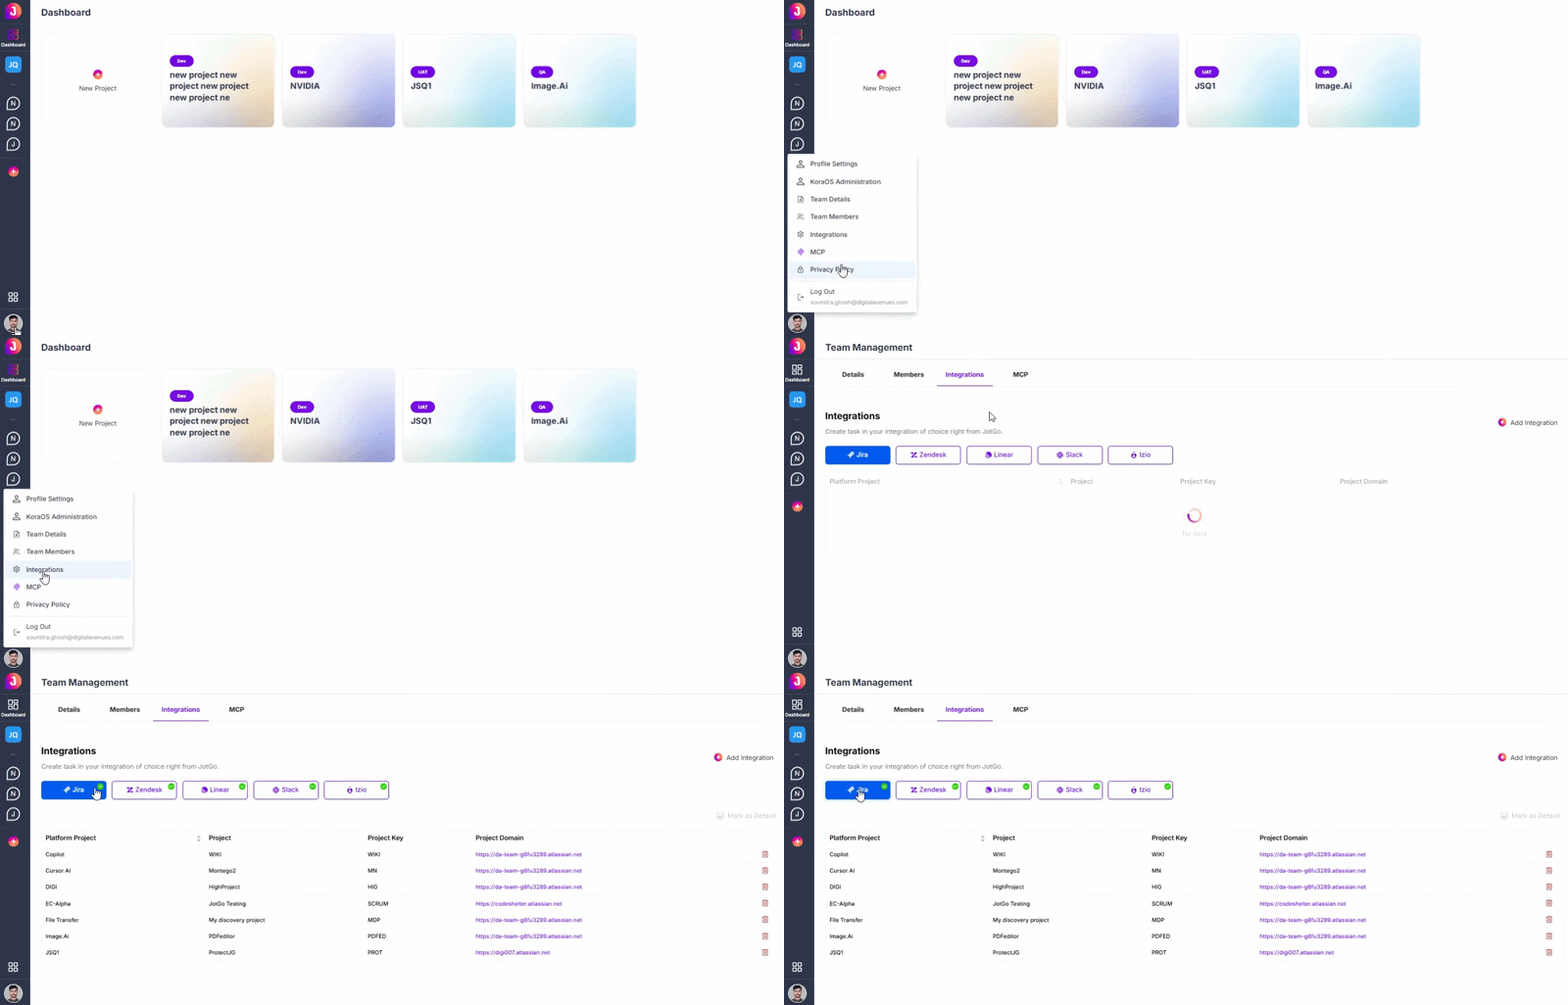
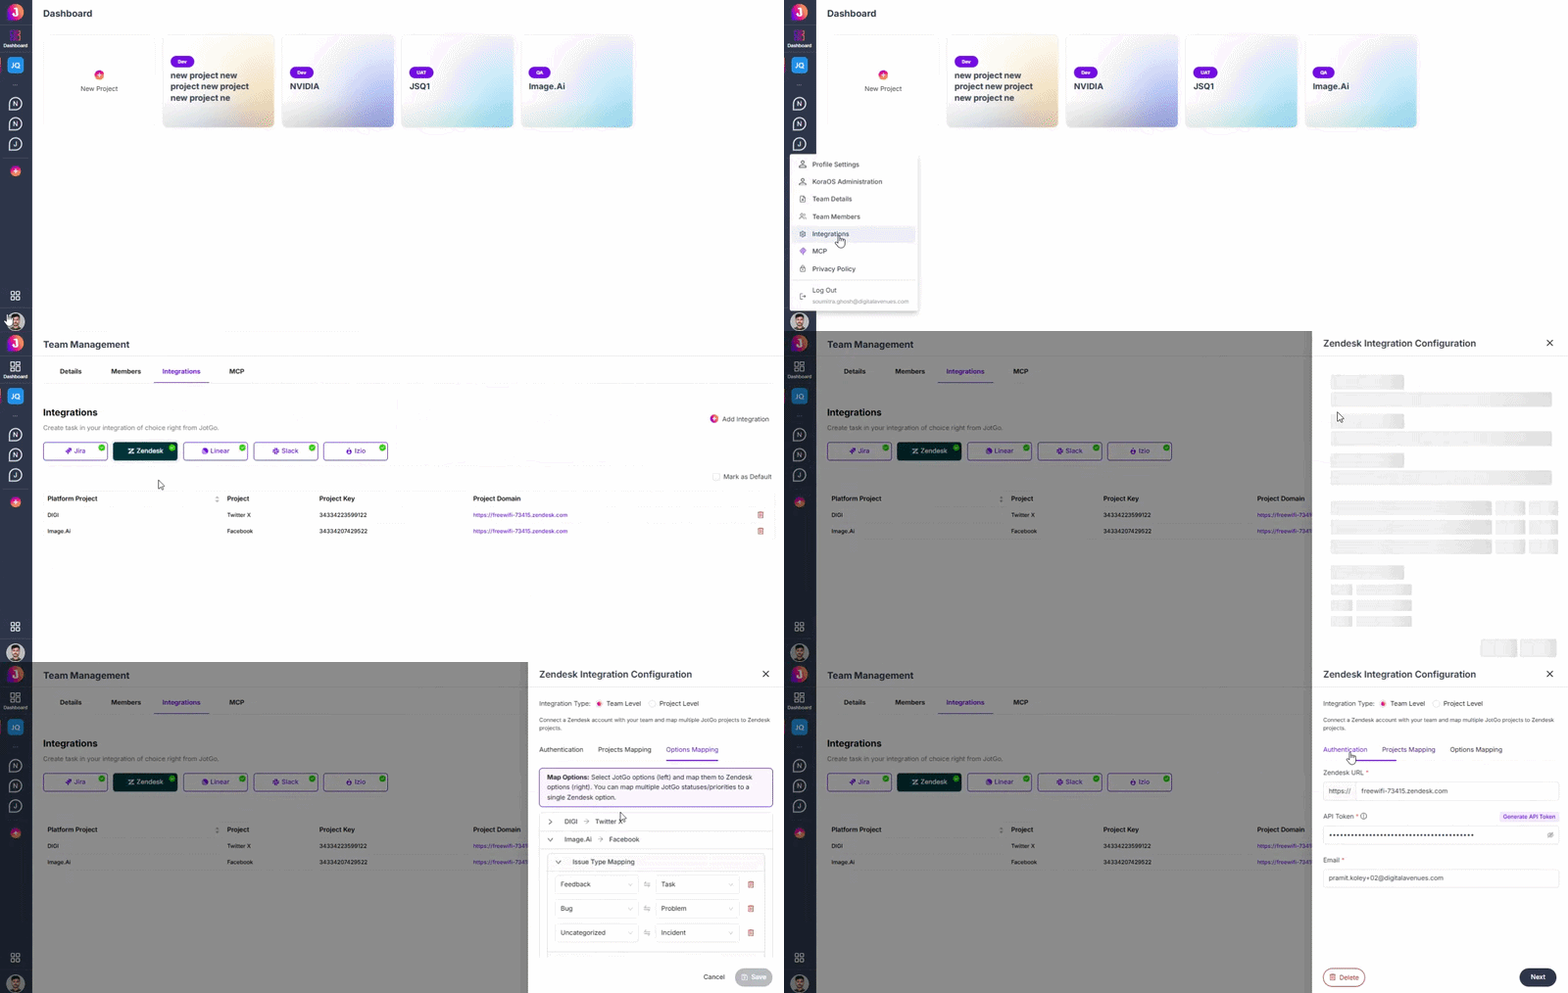
Click your profile picture.
Go to Integrations.
Select Jira.
Click Add Integration.
Sign in to your Jira account and authorize access.
Choose the Jira project you want to connect.
Once connected, your workspace is ready to sync issues with Jira.
Create a Jira issue
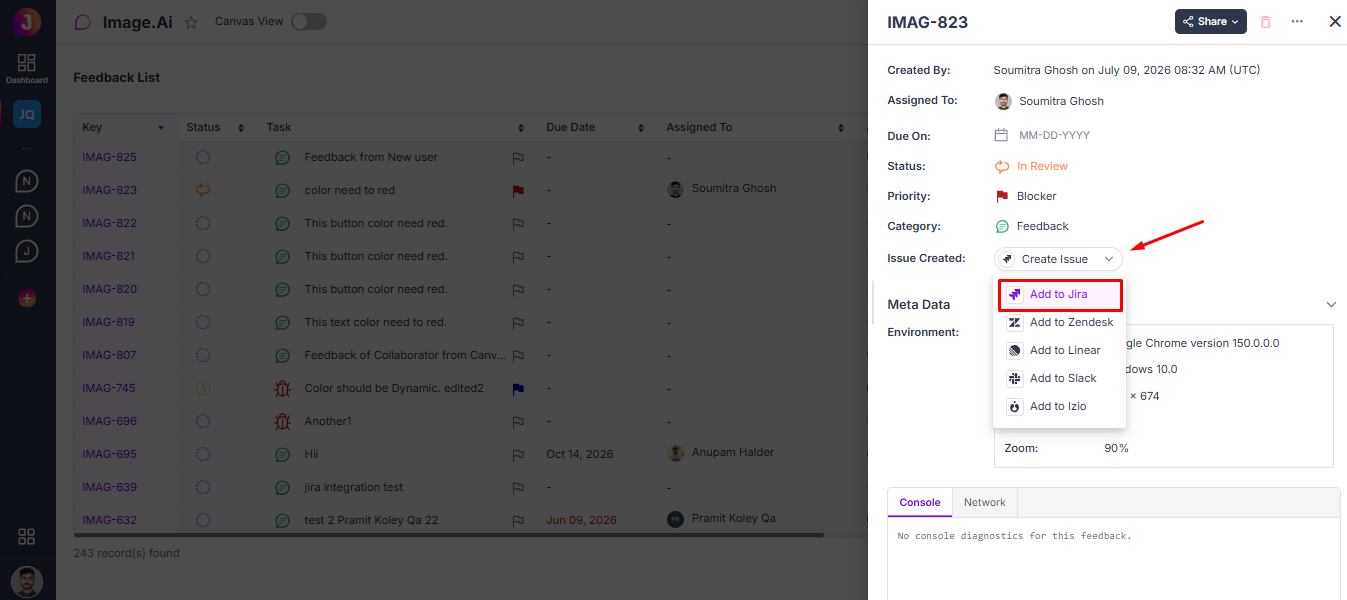
You can create a Jira issue directly from any bug report.
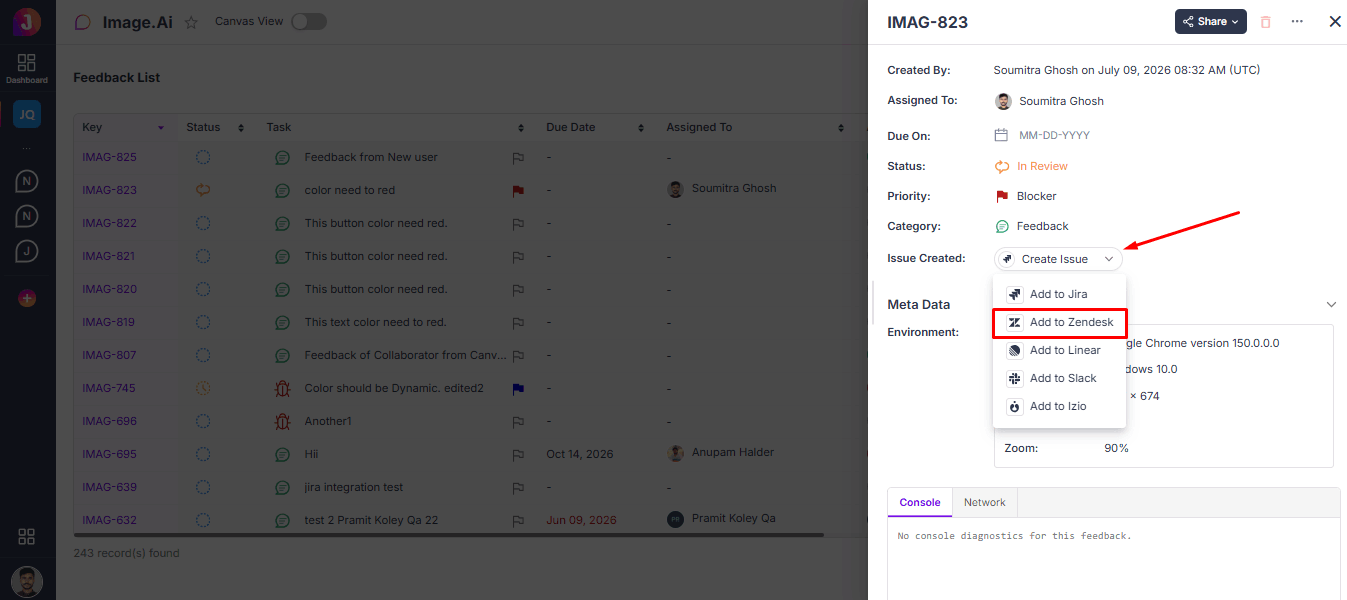
Open the task in JotGo.
Click Create Issue.
Select Add to Jira.
Choose the issue type (such as Bug, Task or Story).
Review the details.
The issue is created in Jira and linked to the original JotGo report.
What information is synced?
When a Jira issue is created, JotGo can send important details such as:
Issue title
Description
Screenshots
Attachments
Priority
Reporter information
Labels
Comments (if enabled)
This gives developers the context they need without manually collecting additional information.
Keep issues connected
Once linked, JotGo and Jira work together to keep your team informed.
Depending on your workspace configuration, you may be able to:
View the linked Jira issue
Open the issue directly in Jira
Track the Jira issue status
See recent updates
Avoid creating duplicate issues
This keeps everyone working from the same information.
Benefits of Jira integration
Integrating JotGo with Jira helps your team:
Eliminate manual issue creation
Improve communication between teams
Speed up bug triage
Reduce duplicate work
Keep development tasks organized
Deliver fixes faster
Your QA team can focus on reporting issues while developers continue working in Jira.
Best practices
To get the most from the integration:
Connect the correct Jira project before creating issues.
Review issue details before syncing.
Use consistent priorities and labels.
Keep linked issues updated.
Avoid creating duplicate Jira tickets.
Use comments to share additional context when needed.
Following these practices helps maintain an organized and efficient workflow.
Example
Scenario
A QA engineer reports a bug in JotGo.
The report includes:
Screenshot of the issue
Screen recording
Technical diagnostics
Steps to reproduce
A new Jira bug is created automatically with all the relevant information attached.
The developer opens the Jira issue, investigates the problem and updates its status as work progresses.
The JotGo report remains linked to the Jira issue, allowing both QA and development teams to track progress from one place.
Why Jira integration matters
JotGo helps you capture complete bug reports, while Jira helps your development team plan and resolve them. By connecting the two, you create a seamless workflow where issues move from reporting to resolution without unnecessary manual work.
Frequently Asked Questions
Do I need a Jira account?
Yes. You need a Jira account with the appropriate permissions to create and manage issues.
Can I connect multiple Jira projects?
Depending on your workspace configuration, you may be able to connect one or more Jira projects.
Will updates in Jira automatically update JotGo?
Synchronization depends on your organization's integration settings. Some workspaces support status updates or additional syncing between JotGo and Jira.
adm-workspace
Workspace & project management
JotGo helps you organize your work by keeping your teams, projects and bug reports in one place. With Workspace & Project Management, you can create dedicated workspaces, manage multiple projects and control how your team collaborates.
1
Administration & Security
administration-security
8
Whether you're working on a single application or managing several products, JotGo makes it easy to keep everything organized.
Why use workspaces and projects?
As your team grows, keeping issues organized becomes more important.
With Workspace & Project Management, you can:
Organize work by product or team
Manage multiple projects from one workspace
Keep bug reports separated by project
Invite team members to the right projects
Improve collaboration across teams
Maintain a structured workflow
A well-organized workspace helps your team find information faster and work more efficiently.
What is a workspace?
A workspace is the main area where your team collaborates in JotGo.
Your workspace contains:
Team members
Projects
Bug reports
Feedback
Integrations
Settings
Analytics and reports
Most organizations create one workspace for their company and manage multiple projects within it.
What is a project?
A project represents a specific application, website, product or service that your team is working on.
For example, you might create separate projects for:
Company Website
Mobile App
Customer Portal
Admin Dashboard
API Services
Each project has its own issues, feedback and team members, making it easier to stay organized.
Create a new project
Adding a new project is simple.
Open your workspace.
Go to Projects.
Click New Project.
Enter the project name and details.
Invite team members if needed.
Save your changes.
Your project is now ready to receive bug reports and feedback.
Manage multiple projects
If your organization works on several products, you can manage them all from a single workspace.
You can:
Switch between projects
View project-specific issues
Assign team members
Configure project settings
Track progress independently
This helps teams stay focused while maintaining a central place for collaboration.
Organize your team
Assign the right people to the right projects.
Depending on their role, team members can:
Report bugs and feedback
Review issues
Assign work
Manage projects
View analytics
Configure project settings
This ensures everyone has access to the tools and information they need.
Project settings
Each project can have its own configuration.
Depending on your workspace, you may be able to manage:
Project name and description
Team members
Default issue settings
Labels and categories
Integrations
Keeping project settings up to date helps maintain consistency across your workspace.
Best practices
To keep your workspace organized:
Create separate projects for different products or applications.
Use clear and consistent project names.
Invite only the team members who need access.
Archive inactive projects instead of deleting them.
Review project settings regularly.
Keep issue categories and labels consistent.
These practices make it easier to manage projects as your organization grows.
Example
Scenario
A software company manages three products:
Customer Web App
Mobile Application
Internal Admin Portal
Instead of storing all bug reports together, they create three separate projects in a single JotGo workspace.
Each development team works only on the issues related to their product, while managers can view progress across all projects from the same workspace.
This keeps work organized and reduces confusion.
Why Workspace & Project Management matters
A structured workspace helps your team collaborate more effectively. By organizing work into dedicated projects, you can keep issues separated, improve visibility and ensure everyone is working on the right priorities.
Frequently Asked Questions
Can I create multiple projects?
Yes. You can create multiple projects within a workspace to organize different products, applications or teams.
Can team members access every project?
Not necessarily. Access depends on the permissions assigned by your workspace administrator.
Can I archive a project?
Yes. If a project is no longer active, you can archive it to preserve its history while keeping your workspace organized.
ext-recording
Video Recording
JotGo's Video Recording feature allows you to capture your workflow while reproducing an issue in your browser. During recording, you can freely navigate between pages and switch across browser tabs within the same browser window, ensuring developers can see the complete sequence of actions that led to the issue.
1
Browser Extension
browser-extension
9
This helps developers understand complex workflows and reproduce issues more accurately.
Why use Video Recording?
Some issues cannot be fully explained with screenshots alone. Video recording captures every step performed before the issue occurs.
With Video Recording, you can:
Record your complete workflow within the browser
Navigate across multiple pages during recording
Switch between browser tabs in the same browser window
Capture user interactions and application behavior
Provide better context for developers
Reduce the need for follow-up questions
Reproduce complex issues more easily
This ensures your team has a complete picture of the reported issue.
When to use Video Recording
Video Recording is useful whenever an issue involves multiple steps or navigation.
Common scenarios include:
Testing web application workflows
Navigating across multiple pages
Switching between browser tabs
Demonstrating multi-step user journeys
Capturing intermittent issues
Recording extended testing sessions
Showing application behavior before an error occurs
Start a Video Recording
Recording your workflow is simple.
Open the JotGo browser extension.
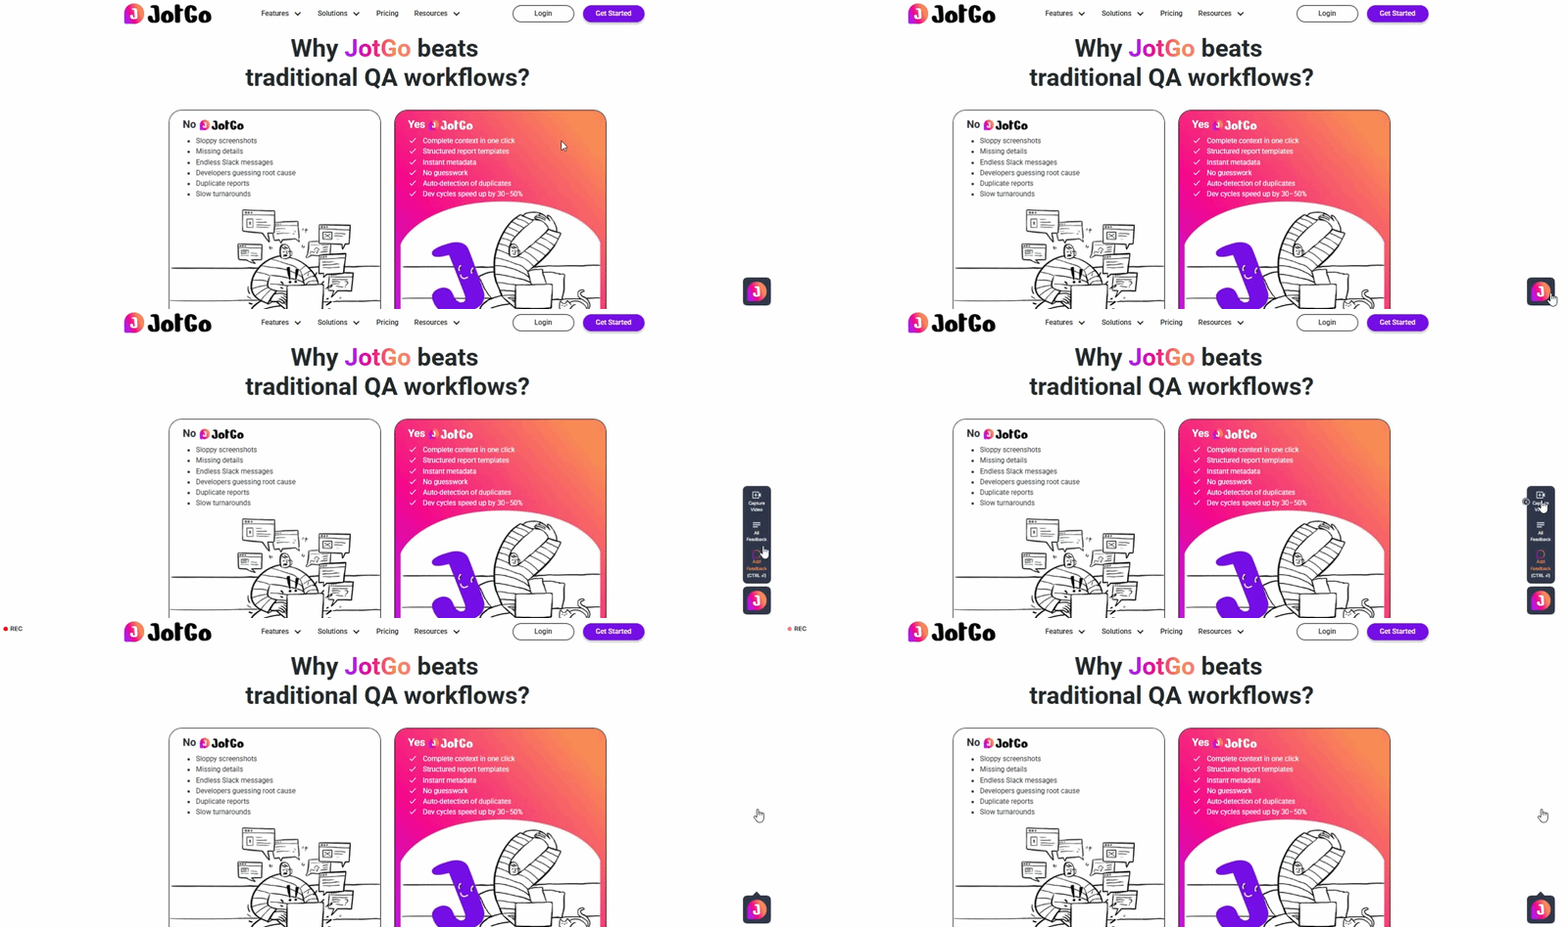
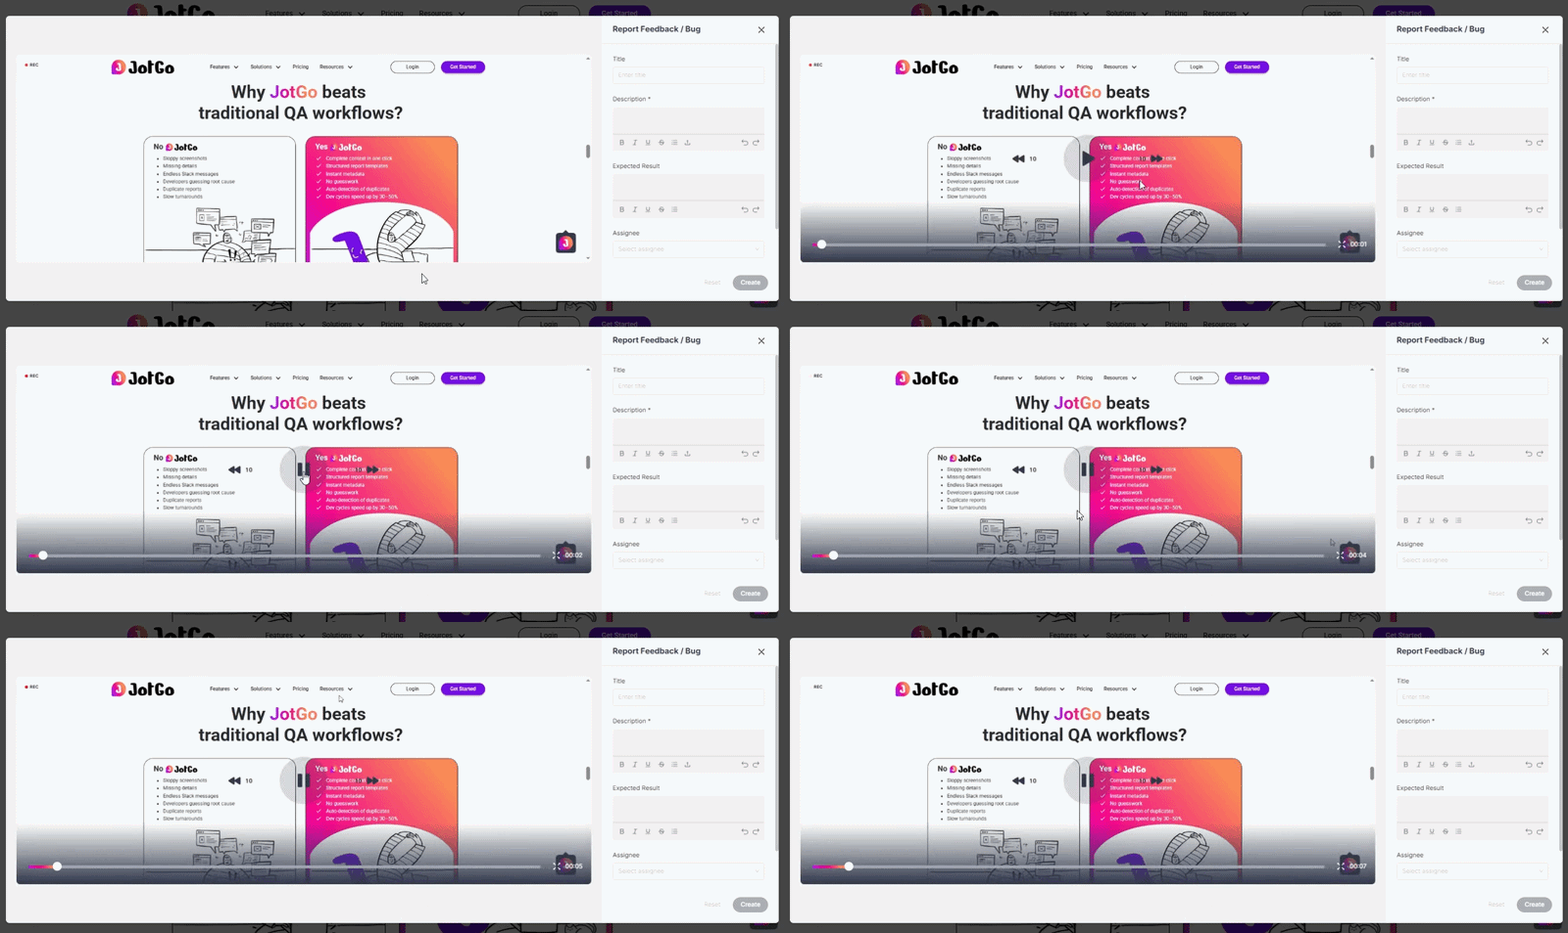
Click Capture Video.
Grant the necessary screen-sharing permissions if prompted.
Start recording and reproduce the issue.
Navigate through the application as needed, including switching between browser tabs.
Stop the recording when you're finished.
The recording is automatically attached to your bug report.
Capture the Complete Workflow
During recording, JotGo captures everything happening within your browser session.
This may include:
Browser activity
Navigation across pages
Switching between browser tabs
User interactions
Form submissions
Error messages
Steps leading to the issue
This gives developers the full context needed to understand and reproduce the problem.
Share Recordings with Your Team
Once the recording is uploaded, your team can:
Watch the complete workflow
Understand how the issue occurred
Review every step leading to the issue
Collaborate using comments
Resolve issues more quickly
Everyone works from the same visual evidence, reducing misunderstandings.
Benefits of Video Recording
Using Video Recording helps your team:
Capture complete user workflows
Improve bug reproduction
Reduce back-and-forth communication
Save time during investigation
Provide richer context for developers
Speed up issue resolution
The more context you provide, the faster your team can identify the root cause.
Best Practices
For the best recording experience:
Close unnecessary browser tabs before recording.
Record only the workflow needed to demonstrate the issue.
Reproduce the issue step by step.
Switch between browser tabs only when relevant.
Keep recordings focused and concise.
Review the recording before submitting the report.
These practices help create clear and useful bug reports.
Example
Scenario
A QA engineer is testing an e-commerce application.
The engineer starts on the product page, opens the shopping cart in another browser tab, then returns to the original tab to complete the checkout process. During checkout, an error appears after the payment is submitted.
The engineer starts a Video Recording in JotGo and records the entire workflow, navigating across pages and switching between browser tabs.
When the report is submitted, developers can watch the complete sequence of actions and easily identify where the issue occurs.
Why Video Recording Matters
Some issues can't be fully explained with a single screenshot. Video Recording captures the complete workflow, including page navigation and browser tab switching, giving developers the context they need to investigate and resolve issues more efficiently.
Frequently Asked Questions
Can I switch between browser tabs while recording?
Yes. You can freely switch between browser tabs within the same browser window during recording.
Can I navigate to different pages while recording?
Yes. You can browse through your application normally while the recording is in progress.
Will the recording be attached automatically?
Yes. Once you stop recording and submit your report, the video is automatically attached to the JotGo issue.
quickstart
Quick Start
Welcome to JotGo! This guide will help you submit your first bug report or feedback in just a few minutes. No technical setup or training is required. By the end of this guide, you'll know how to capture an issue add helpful details and submit a complete report to your team.
2
Getting Started
getting-started
1
Before you begin
Before using JotGo, make sure:
You have access to your JotGo workspace.
The JotGo widget is installed on your website or web application or you have the JotGo browser extension.
You're signed in to your account.
If you're not sure which option your team uses, ask your workspace administrator.
Step 1: Open JotGo
Open the page where you found the issue.
Launch JotGo using one of the following:
Open the JotGo browser extension.
Click the JotGo widget on your website.
The reporting panel will appear without interrupting your work.
Step 2: Capture the issue
Choose how you'd like to report the problem.
Screenshot
Capture a single image of the issue. This is best for visual bugs, layout issues or incorrect content.
Screen Recording
Record your screen to show how the issue happens. This is useful for bugs that require multiple steps to reproduce.
Choose the option that best explains the problem.
Step 3: Highlight the problem
Use JotGo's annotation tools to make your report easier to understand.
You can:
Draw attention to a specific area.
Add arrows or shapes.
Highlight important elements.
Leave comments directly on the screenshot.
Clear visual feedback helps your team identify the issue faster.
Step 4: Describe the issue
Write a short description of the problem.
Include information like:
What happened?
What did you expect to happen?
Can the issue be reproduced?
Does it happen every time?
Example
Title
Login button does not respond.
Description
After entering valid credentials, clicking the Login button does nothing. The page remains unchanged, and no error message is displayed.
Simple, clear descriptions help developers reproduce the issue quickly.
Session Replay - Captured user actions for the previous 1 min
This information helps developers investigate the issue without asking for additional details.
What happens next?
Once your report is submitted:
The issue is added to your JotGo workspace.
Your team can review the report.
Developers receive all the technical context needed to investigate.
The issue can be assigned, tracked and resolved.
You don't need to send extra emails or screenshots - everything stays together in one report.
cap-video
Video recording for bug reproduction
Some issues can't be explained with a single screenshot. They happen only after a series of actions, making them difficult to reproduce. JotGo's screen recording feature lets you capture your workflow, showing exactly what happened before the issue occurred. This gives developers the full context they need to investigate and resolve the problem faster.
2
Bug & Feedback Capture
bug-feedback-capture
2
When to use screen recording
Use a video recording when reporting issues such as:
Multi-step bugs
Unexpected application behavior
Navigation or workflow problems
Performance or loading issues
Animation or transition glitches
Form submission errors
Intermittent or hard-to-reproduce bugs
User experience issues
If a screenshot cannot fully explain the issue a screen recording is the best option.
Start a recording
Open the page where the issue occurs.
Launch the JotGo browser extension.
Select Capture Video.
Choose the screen, browser tab or application window you want to record.
Click Share.
JotGo will begin recording your actions while you reproduce the issue.
Reproduce the issue
Perform the same steps that lead to the problem.
For example:
Open the dashboard.
Click Create Project.
Enter the required information.
Click Save.
Observe the unexpected behavior.
Try to move through each step naturally so your team can easily understand what happened.
Stop the recording
Once you've captured the issue:
Click Stop Recording.
Wait a few moments while JotGo processes the recording.
Review the video before submitting.
If the recording doesn't clearly show the issue, you can record it again.
Add issue details
Complete your report with a clear title and description.
Issue title
Keep it short and specific.
Good example
Settings page freezes after clicking Save.
Description
Explain what happened and what you expected.
Include:
Steps to reproduce
Expected result
Actual result
How often the issue occurs
Example
Steps to reproduce
Open the Settings page.
Update your profile information.
Click Save.
Expected result
The changes should be saved successfully.
Actual result
The page freezes and the loading spinner continues indefinitely.
Automatic technical information
Every video report automatically includes technical details to help your team investigate the issue.
Depending on your workspace settings, JotGo may collect:
Browser and version
Operating system
Device information
Screen resolution
Current page URL
Console logs
Network requests
Timestamp
Session information
This additional context helps developers reproduce the issue without asking for more information.
Review before submitting
Take a moment to review your recording.
Check that:
The issue is clearly visible.
All reproduction steps are included.
The recording starts before the problem occurs.
The title and description are complete.
No sensitive or personal information is visible.
A clear recording helps your team understand the issue much faster.
Submit your report
Click Create to send your report.
Your video recording, issue description and technical details are automatically added to your JotGo workspace, where your team can review, assign and track the issue.
Best practices
Follow these tips to create more useful video reports:
Start recording before reproducing the issue.
Keep the recording focused on the problem.
Record only the necessary steps.
Speak clearly if voice recording is enabled.
Pause briefly before and after the issue occurs.
Avoid switching between unrelated applications.
These practices make it easier for developers to identify the root cause of the problem.
Example report
Title
Unable to complete payment during checkout.
Steps to reproduce
Add a product to the cart.
Proceed to checkout.
Select a payment method.
Click Pay Now.
Expected result
The payment should be processed and the order should be confirmed.
Actual result
The checkout page displays a loading spinner indefinitely and the payment is never completed.
Attachments
Screen recording
Browser information
Current page URL
Device information
Console logs
Network logs
Session Replay (User actions done before capturing the video)
Why use video recording?
Screen recordings provide valuable context that screenshots alone cannot capture. They help developers see the exact sequence of actions, making it easier to reproduce and resolve complex issues.
mng-assignment
Issue assignment & ownership
Assigning every issue to the right person helps your team stay organized and ensures that nothing gets overlooked. With JotGo, you can assign ownership, track responsibility and monitor progress from the moment an issue is reported until it's resolved.
2
Bug & Feedback Management
bug-feedback-management
3
Whether you're working with a small team or managing multiple projects, clear ownership keeps everyone accountable and work moving forward.
Why assign issue ownership?
Without a clear owner, issues can remain unresolved or be worked on by multiple people at the same time.
Assigning an owner helps your team:
Clarify who is responsible for each issue
Avoid duplicate work
Improve team accountability
Balance workloads across team members
Track progress more effectively
Ensure issues are resolved on time
Every issue should have a single owner, even if multiple people collaborate on it.
Assign an issue
Assigning an issue takes just a few clicks.
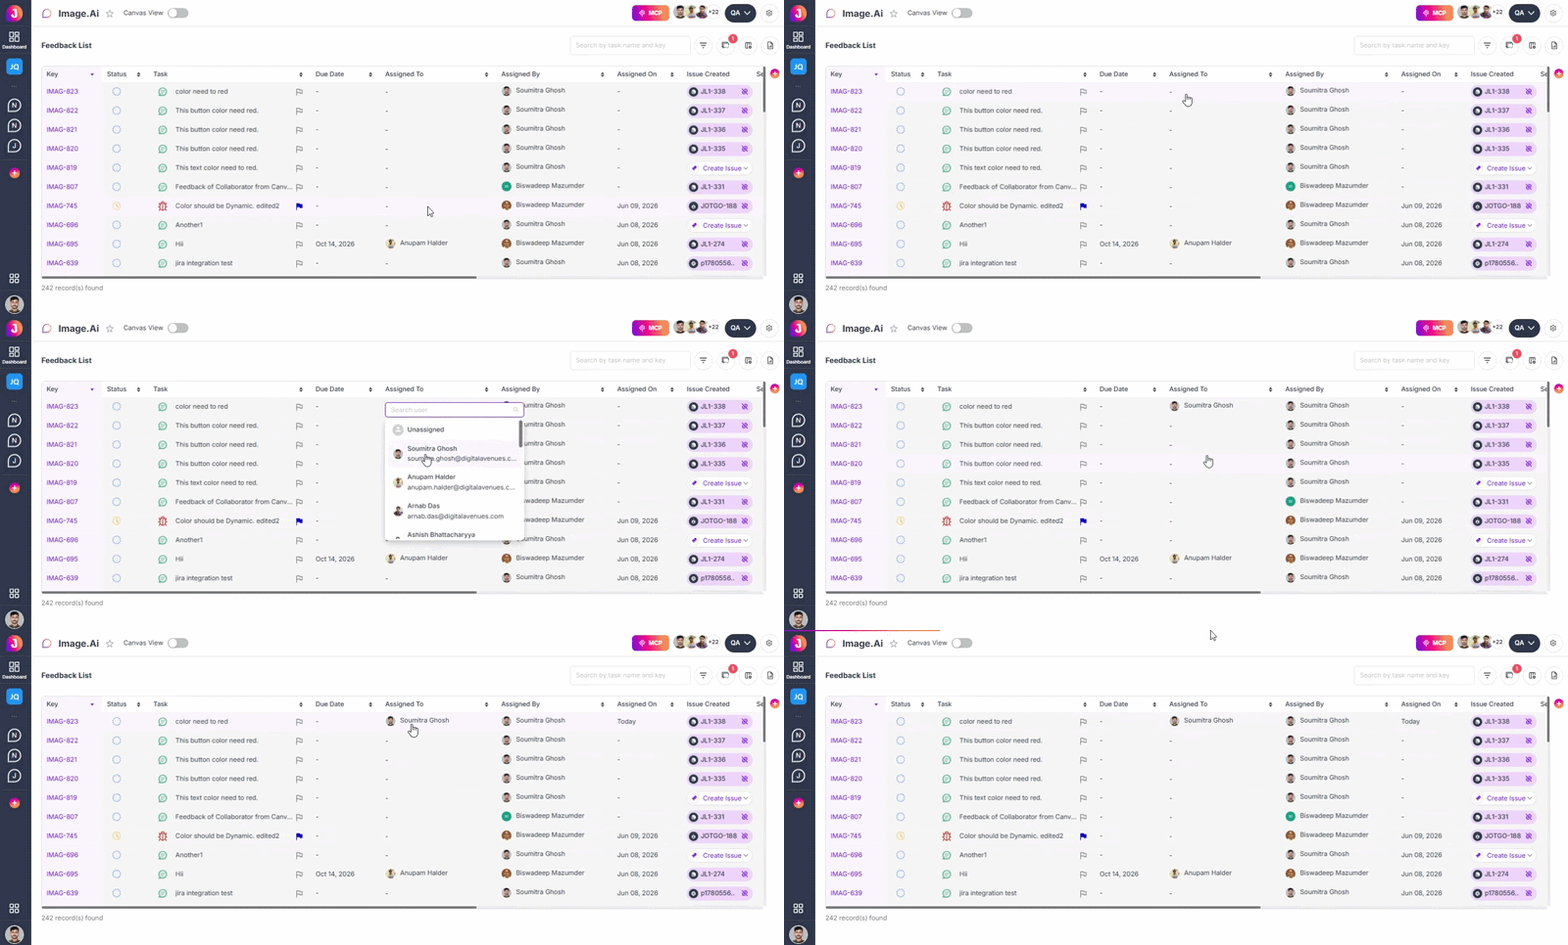
Open the issue from your workspace.
Locate the Assignee field.
Select a team member from the list.
Save your changes.
The selected user becomes the owner of the issue and is responsible for driving it toward resolution.
Reassign ownership
Sometimes priorities change or another team member is better suited to handle the issue.
You can easily reassign ownership at any time.
Common reasons to reassign an issue include:
The issue belongs to a different team.
A specialist is needed.
Team responsibilities have changed.
The original assignee is unavailable.
The issue history keeps track of assignment changes, providing visibility into who handled the issue and when.
View assigned issues
Team members can quickly see the issues assigned to them.
This helps them:
Focus on their current workload
Prioritize important tasks
Track pending work
Stay organized throughout the project
Managers can also review assignments across the team to ensure work is distributed evenly.
Update issue status
Ownership works together with issue status to keep everyone informed.
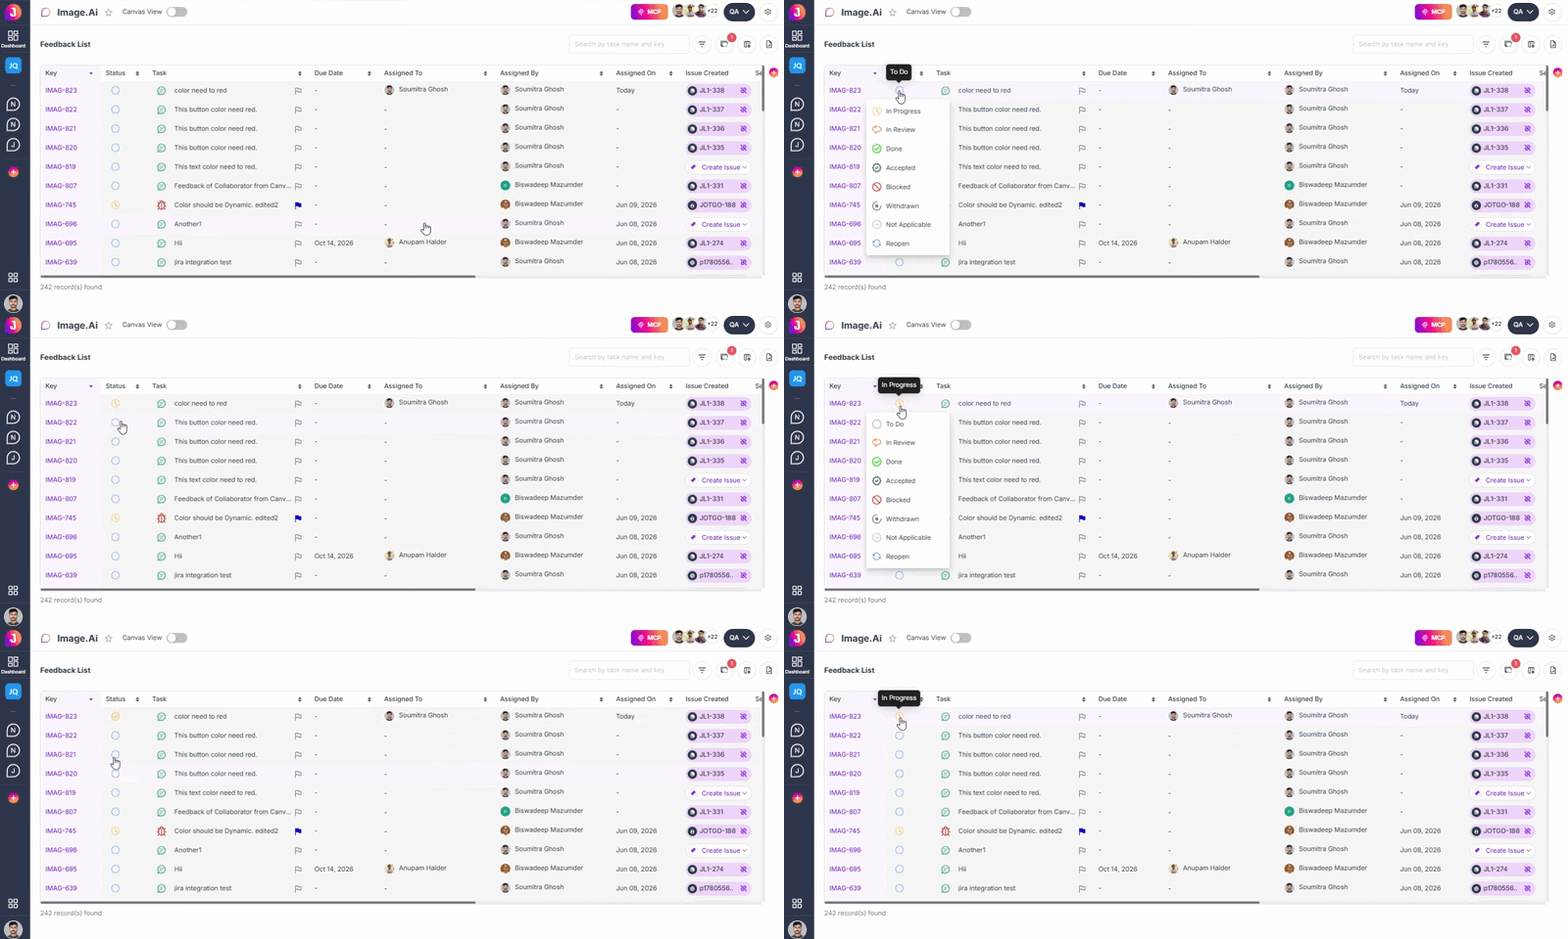
As work progresses, update the issue status to reflect its current stage.
Typical statuses include:
To Do
In Progress
In Review
Done
Accepted
Blocked
Withdrawn
Not Applicable
Reopen
Keeping statuses up to date gives the entire team visibility into project progress.
Collaborate on assigned issues
Even though one person owns an issue, others can still contribute.
Team members can:
Add comments
Share updates
Upload attachments
Mention teammates
Review bug reports
Provide testing feedback
This keeps all discussions and decisions in one place.
Best practices
Follow these recommendations to keep issue management efficient:
Assign a clear owner as soon as a new issue is reviewed.
Choose the team member best suited to resolve the issue.
Update the issue status regularly.
Reassign issues if priorities or responsibilities change.
Add comments when handing an issue to another team member.
Close issues only after the fix has been verified.
These habits help improve collaboration and prevent issues from being forgotten.
Example workflow
Issue Reported
A user reports that the login page displays an error after entering valid credentials.
Assignment
The issue is assigned to a frontend developer responsible for authentication.
Progress
Status changes from New to In Progress.
The developer investigates and implements a fix.
The issue is reassigned to the QA team for verification.
QA confirms the fix and updates the status to Resolved.
After final validation, the issue is marked as Closed.
Why ownership matters
Clear ownership ensures that every issue has someone responsible for investigating, updating and resolving it. This improves accountability, reduces delays and helps teams collaborate more effectively from start to finish.
col-mentions
Mentions & notifications
Good communication keeps your team moving. JotGo's Mentions & Notifications feature helps you quickly involve the right people and keeps everyone informed about important updates without constantly checking the workspace.
2
Collaboration
collaboration
4
Whether you need a teammate's input or want to stay updated on an issue, notifications ensure you never miss important activity.
Why use mentions and notifications?
As projects grow, it's easy to lose track of conversations and updates.
Mentions and notifications help you:
Notify the right team members instantly
Stay informed about issue updates
Respond to questions more quickly
Reduce delays in communication
Keep everyone aligned throughout the issue lifecycle
Instead of manually informing teammates, JotGo automatically keeps everyone connected.
Mention a teammate
Need someone's attention? Simply mention them in a comment.
Open an issue.
Go to the Comments section.
Type @ followed by the teammate's name.
Select the person from the list.
Post your comment.
The mentioned user will receive a notification, making it easy for them to join the discussion.
When to use mentions
Use mentions whenever you need input or action from a specific team member.
For example:
Ask a developer to investigate a bug.
Request QA to verify a fix.
Ask a designer to review a UI issue.
Notify a project manager about a blocker.
Request additional information from the reporter.
Mentions ensure your message reaches the right person without delay.
Receive notifications
JotGo automatically notifies you when something important happens.
You may receive notifications when:
You are assigned a new issue.
Someone mentions you in a comment.
A comment is added to an issue you're involved in.
The issue status changes.
The issue priority is updated.
An issue is reopened.
Someone assigns or reassigns an issue to you.
This helps you stay informed without having to monitor every issue manually.
Stay updated on your work
Notifications help you keep track of the issues that matter most.
You can quickly see:
New assignments
Pending reviews
Team discussions
Status updates
Recent activity
Requests for your input
This allows you to respond faster and keep work moving.
Avoid unnecessary notifications
To keep communication effective:
Mention only the people who need to take action.
Avoid mentioning large groups unless necessary.
Combine related questions into one comment.
Provide enough context so teammates understand why they were mentioned.
Thoughtful notifications help reduce unnecessary interruptions.
Example
Developer needs QA verificationDeveloper
@Emma The fix has been deployed to the staging environment. Could you please verify it?
QA Engineer
Receives a notification, opens the issue, performs testing, and replies:
Verified successfully. The issue has been resolved.
The conversation stays connected to the issue, making it easy for everyone to follow the progress.
Notification history
Every notification is linked to the related issue, allowing you to quickly open the report and review the latest activity.
This helps you:
Understand what changed
See who made the update
Respond without searching for the issue
Stay informed about ongoing work
Best practices
To improve team communication:
Mention teammates only when their input is required.
Write clear and actionable comments.
Respond to mentions promptly.
Keep discussions within the issue thread.
Review your notifications regularly to stay up to date.
Good communication leads to faster issue resolution and better collaboration.
Why mentions and notifications matter
Bug tracking is a team effort. Mentions and notifications ensure that the right people are informed at the right time, reducing delays and improving collaboration. Instead of chasing updates through emails or chat messages, your team can communicate directly within JotGo and keep every conversation connected to the issue.
Frequently Asked Questions
Will I receive a notification every time an issue changes?
You'll receive notifications for updates that are relevant to you, such as assignments, mentions, comments or status changes, depending on your workspace settings.
Can I mention multiple teammates?
Yes. You can mention multiple team members in the same comment if their input is needed.
Can I view previous notifications?
Yes. Your notification history allows you to review recent updates and quickly navigate to the related issue.
shr-guest
Guest access & commenting
Not everyone who reviews a bug report needs a JotGo account. Guest Access & Commenting allows external users, such as clients, partners or stakeholders, to view shared issues and provide feedback without joining your workspace.
2
Sharing & Stakeholder Engagement
sharing-stakeholder-engagement
5
This makes it easy to collect feedback, answer questions and keep conversations in one place.
Why use guest access?
There are times when you need input from people outside your organization.
Guest access helps you:
Collect feedback from clients
Collaborate with external partners
Review issues with stakeholders
Reduce long email conversations
Keep all discussions connected to the issue
Speed up the review and approval process
Instead of asking guests to create an account, simply share the issue and invite them to comment.
How guest access works
If guest access is enabled for your workspace:
Create a public shareable link for the issue.
Send the link to your client or stakeholder.
The guest opens the shared issue in their browser.
They can review the issue details and add comments.
All comments are automatically added to the issue's conversation, making them visible to your team.
What guests can do
Depending on your workspace settings, guests may be able to:
View the issue details
Review screenshots and screen recordings
Read existing comments
Add comments and feedback
Reply to discussions
View the current issue status
This allows external reviewers to participate without needing full workspace access.
What guests cannot do
For security reasons, guests have limited permissions.
Depending on your workspace configuration, guests cannot:
Edit issue details
Change issue status
Assign issues
Update priorities
Manage projects
Access workspace settings
View private issues that haven't been shared
This ensures that only authorized team members can make changes to your workspace.
Add comments as a guest
Guests can provide feedback directly within the shared issue.
For example, they might:
Confirm that the issue is reproducible.
Share additional information.
Answer questions from the development team.
Verify whether a reported fix resolves the problem.
Suggest improvements or clarify requirements.
Keeping feedback within the issue helps maintain a complete history of the discussion.
Collaborate in one place
Every guest comment becomes part of the issue's conversation.
Your team can:
Respond to guest questions
Request additional information
Share progress updates
Notify stakeholders when a fix is available
This creates a single source of truth for everyone involved.
Best practices
To make guest collaboration effective:
Share links only with people who need access.
Clearly explain what feedback you're requesting.
Keep discussions focused on the issue.
Respond to guest comments promptly.
Following these practices helps maintain an organized and secure collaboration process.
Example
Scenario
A client reports that the Checkout page displays an error during payment.
The support team creates a bug report and shares it using a public link.
The client opens the link and comments:
"This issue occurs only when paying with a credit card. PayPal works as expected."
The developer replies:
"Thank you for the additional information. We've identified the cause and are preparing a fix."
After the fix is deployed, the QA team asks the client to verify it.
The client confirms:
"The issue has been resolved. Payment is working correctly now."
The entire conversation remains attached to the issue, making it easy to review at any time.
Why guest commenting matters
Great products are built through collaboration. Guest Access & Commenting allows clients, partners and stakeholders to participate in the feedback process without giving them full access to your workspace. This keeps communication simple, organized and connected to the issue from start to finish.
Frequently Asked Questions
Do guests need a JotGo account?
No. Guests can comment on a shared issue without signing in to JotGo.
What happens after a guest submits a comment?
The comment is added to the issue, making it immediately available for your team to review and respond to.
Why use Guest Commenting?
Guest Commenting makes it easy to collect feedback from clients, partners, testers and other stakeholders without requiring them to join your JotGo workspace.
resolution-metrics
Resolution metrics
Understanding how long it takes to resolve issues is essential for delivering a great customer experience. JotGo's Resolution Metrics help you measure your team's performance, identify bottlenecks, and continuously improve your development workflow.
2
Analytics & Insights
analytics-insights
6
These metrics provide valuable insights into how efficiently issues move from creation to resolution.
Why measure resolution time?
Tracking resolution metrics helps your team answer important questions such as:
How long does it take to resolve a bug?
Are high-priority issues being resolved on time?
Which projects require more attention?
Is the team's resolution efficiency improving over time?
Where are delays occurring in the workflow?
By monitoring these metrics, you can make informed decisions and continuously improve your development process.
Average Resolution Time
Average Resolution Time measures the average duration required to resolve issues across your workspace.
This helps you understand:
Overall team performance
Resolution trends over different time periods
The impact of process improvements
Opportunities to optimize workflows
Regularly reviewing this metric helps identify long-term improvements in issue resolution.
Issues Resolved
Track the total number of issues your team has resolved within a selected time period.
This metric helps you:
Measure team productivity
Review sprint outcomes
Monitor project progress
Understand workload completion
Comparing resolved issues with newly reported issues provides a clear picture of overall project health.
Resolution trends
Analyze resolution trends over time to understand how efficiently your team is resolving issues.
Trend analysis helps you:
Compare resolution performance across different time periods.
Identify recurring workflow bottlenecks.
Measure the impact of process improvements or new releases.
Monitor changes in workload and resolution efficiency.
Support continuous improvement with data-driven insights.
Use metrics to improve performance
Regularly reviewing resolution metrics helps your team:
Identify workflow bottlenecks
Improve team collaboration
Set realistic performance goals
Prioritize critical issues
Resolve issues more efficiently
Enhance the overall customer experience
Small improvements in resolution time can have a significant impact on customer satisfaction.
Best practices
To make the most of your metrics:
Review resolution reports regularly.
Prioritize critical and high-priority issues.
Keep issue statuses up to date.
Analyze recurring delays and improve workflows.
Share performance reports during sprint reviews and retrospectives.
Use historical trends to identify opportunities for improvement.
Consistent monitoring helps your team maintain high service standards.
Example
Scenario
A project manager reviews the last month's performance and finds:
Average Resolution Time: 2.5 days
Issues Reported: 142
Issues Resolved: 136
The data shows that while most issues are being resolved within the expected timeframe, high-priority issues are taking longer than anticipated.
Based on these insights, the team improves its prioritization process and allocates additional resources to critical issues, resulting in faster resolution times in the following sprint.
Why these metrics matter
Resolution Metrics help your team understand how effectively issues are being managed. By tracking resolution performance, identifying delays and improving workflows, you can resolve issues more efficiently and deliver a better experience for your users.
Frequently Asked Questions
What is Resolution Time?
Resolution Time is the total duration from when an issue is created until it is marked as Resolved or Closed.
Why should I monitor Resolution Time?
Monitoring Resolution Time helps you evaluate team efficiency, identify workflow bottlenecks and measure the impact of process improvements over time.
How can Resolution Metrics improve my team's performance?
By highlighting resolution trends and identifying delays, Resolution Metrics help teams optimize workflows, prioritize work effectively and improve overall productivity.
int-slack
Slack
Stay connected without leaving your team's conversations. JotGo's Slack Integration automatically sends bug reports, feedback and issue updates to your Slack workspace, so your team can stay informed and take action faster.
2
Integrations
integrations
7
2-Way Sync
Instead of constantly checking your issue tracker, important updates are delivered directly to the Slack channels where your team already collaborates.
Why integrate with Slack?
Keeping your team informed is essential for resolving issues quickly.
With the Slack integration, you can:
Receive real-time notifications for new bug reports
Share feedback instantly with your team
Stay updated on issue progress
Reduce delays in communication
Collaborate without switching between tools
This helps your team respond to issues as soon as they happen.
Before you begin
Before connecting Slack, make sure you have:
A Slack workspace
Permission to install or authorize apps in Slack
Access to your JotGo workspace
Administrator or integration permissions (if required)
If you're unsure about your permissions, contact your Slack workspace administrator.
Connect Slack
Setting up the integration only takes a few steps.
Click your profile picture.
Go to Integrations.
Select Slack.
Click Add Integration.
Sign in to your Jira account and authorize access.
Choose the Slack project you want to connect.
Once connected, JotGo will begin sending notifications to your selected Slack channel.
Receive real-time notifications
JotGo can notify your team when important events occur.
Depending on your workspace settings, notifications may include:
New bug reports
New feedback submissions
Issue assignments
Status changes
Priority updates
New comments
Issue resolutions
Reopened issues
This ensures your team is always aware of important updates.
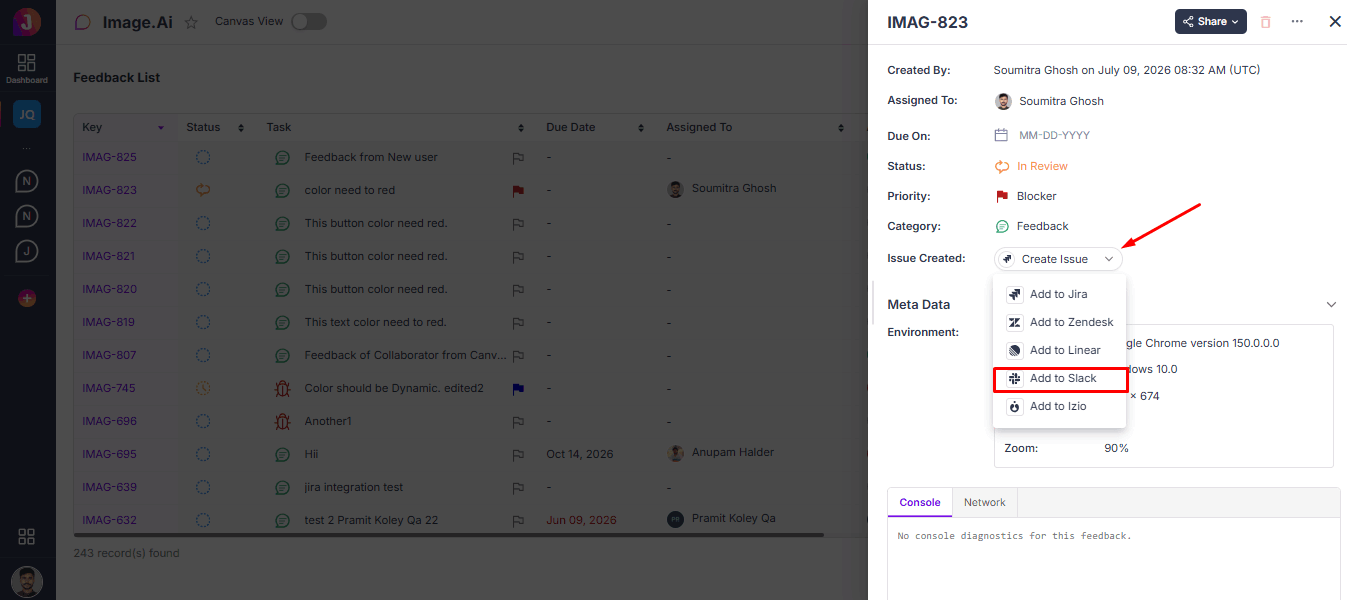
Create a Slack issue
You can create a Slack issue directly from any bug report.
Open the task in JotGo.
Click Create Issue.
Select Add to Slack.
Choose the issue type (such as Bug, Task or Story).
Review the details.
The issue is created in Slack and linked to the original JotGo report.
What information is shared?
Slack notifications can include useful information such as:
Issue title
Issue ID
Priority
Status
Reporter
Assignee
Project name
Link to the issue in JotGo
Team members can quickly open the issue from Slack to review the full details.
Choose notification channels
You can send different notifications to different Slack channels.
For example:
#engineering - Development updates
#qa - New bug reports
#product - Product feedback
#support - Customer-reported issues
Organizing notifications by channel helps each team stay focused on the updates that matter to them.
Collaborate faster
When a notification appears in Slack, your team can immediately:
Open the issue in JotGo
Review screenshots or recordings
Discuss the issue with teammates
Assign ownership
Update the issue status
This reduces response time and keeps everyone aligned.
Benefits of Slack integration
Connecting Slack with JotGo helps your team:
Stay informed without checking multiple tools
Respond to issues more quickly
Improve collaboration across teams
Reduce communication delays
Keep everyone updated in real time
It brings issue tracking directly into your daily communication workflow.
Best practices
To get the most value from the integration:
Send notifications only to relevant channels.
Avoid notifying every channel for every update.
Keep issue titles clear and descriptive.
Use Slack for discussions and JotGo for issue management.
Review notification settings regularly to reduce unnecessary alerts.
A well-configured notification system keeps your team informed without creating noise.
Example
Scenario
A customer reports that users cannot complete the checkout process.
As soon as the report is submitted:
A notification is posted in the #qa Slack channel.
The QA team reviews the issue.
The issue is assigned to a developer.
Status updates are automatically shared as work progresses.
When the issue is resolved, the #product team receives a notification to verify the fix.
Everyone stays informed without leaving Slack.
Why Slack integration matters
Fast communication leads to faster resolutions. By connecting JotGo with Slack, your team receives important updates where they already work every day. This reduces response times, improves collaboration and ensures that no critical issue goes unnoticed.
Frequently Asked Questions
Do I need a Slack workspace?
Yes. You'll need a Slack workspace and the necessary permissions to connect it with JotGo.
Can I choose which notifications are sent?
Yes. Depending on your workspace configuration, you can customize which events trigger Slack notifications.
Can I send notifications to multiple channels?
Yes. If supported by your workspace settings, you can configure different channels for different projects or types of notifications.
adm-users
User & permission management
Managing who can access your workspace is essential for secure and efficient collaboration. JotGo's User & Permission Management allows you to invite team members, assign roles and control what each user can view or manage within your workspace.
2
Administration & Security
administration-security
8
By giving users the right level of access, you can protect sensitive information while enabling your team to work effectively.
Why use User & Permission Management?
As your team grows, not everyone needs the same level of access.
With User & Permission Management, you can:
Invite team members to your workspace
Assign roles based on responsibilities
Control access to projects and settings
Protect sensitive information
Improve security and accountability
Ensure users only see what they need
This helps your organization stay secure while supporting smooth collaboration.
Invite team members
Adding new users to your workspace is quick and easy.
Open your Workspace Settings.
Go to Users or Team Members.
Click Invite User.
Enter the user's email address.
Select the appropriate role.
Send the invitation.
Once the invitation is accepted, the user can access the workspace based on the permissions you've assigned.
Assign user roles
Roles define what users can do within JotGo.
Depending on your workspace configuration, common roles include:
Administrator
Administrators have full access to the workspace.
They can:
Manage workspace settings
Create and manage projects
Invite and remove users
Manage integrations
Configure permissions
Access reports and analytics
Project Editor (Member)
Project Editors oversee project activities.
They can:
Create and manage issues
Assign tasks
Update issue status
Manage project members
View reports and dashboards
Guest (Collaborator)
Guests have limited access.
Depending on your sharing settings, they can:
Add feedback
View shared issues
Add comments
Participate in discussions
Review updates
Guests cannot manage workspace settings or access private projects.
Manage project access
You can control which users have access to specific projects.
For each project, you can:
Add or remove members
Assign project-specific roles
Restrict access to sensitive projects
Manage collaboration across teams
This ensures users only see projects relevant to their work.
Update user permissions
As responsibilities change, you can update user permissions at any time.
You can:
Change user roles
Grant additional permissions
Restrict access
Remove project access
Deactivate inactive users
Keeping permissions up to date helps maintain a secure workspace.
Remove users
When someone leaves your team or no longer needs access, you can remove them from the workspace.
Removing a user:
Revokes access immediately
Protects workspace data
Keeps project history intact
Preserves previously reported issues and comments
This ensures your workspace remains secure without losing valuable project history.
Best practices
To maintain a secure and organized workspace:
Assign the lowest level of access required.
Review user roles regularly.
Remove inactive users promptly.
Limit administrator access to trusted team members.
Use guest access for external collaborators.
Review project permissions when new projects are created.
Following these practices helps protect your workspace while supporting efficient collaboration.
Example
Scenario
A company has three teams working in JotGo:
QA Team reports and verifies bugs.
Developers investigate and resolve issues.
Project Managers oversee progress and assign work.
The workspace administrator assigns each team the appropriate role.
When a freelance designer joins the project, they receive Guest access so they can review shared issues and leave comments without accessing sensitive workspace settings.
This keeps collaboration simple while maintaining security.
Why User & Permission Management matters
Every team member plays a different role in your development process. By assigning the right permissions, JotGo helps you maintain security, improve collaboration and ensure everyone has access to the tools and information they need - without exposing sensitive workspace data.
Frequently Asked Questions
Can I change a user's role later?
Yes. Workspace administrators can update user roles and permissions at any time.
Can users access every project?
No. Access depends on the projects and permissions assigned to each user.
What happens when a user is removed?
The user immediately loses access to the workspace. Existing issues, comments and activity history remain available for your team.
ext-annotation
Integrated annotation tools
Clear visual communication helps teams resolve issues faster. JotGo's Integrated Annotation Tools let you highlight, explain and mark up screenshots directly before submitting a bug report. Instead of describing an issue with long paragraphs, you can point to the exact area that needs attention.
2
Browser Extension
browser-extension
9
This makes bug reports easier to understand and reduces back-and-forth communication between reporters and developers.
Why use annotation tools?
A screenshot is helpful, but adding annotations provides even more clarity.
With Integrated Annotation Tools, you can:
Highlight the exact problem area
Add notes and explanations
Draw attention to important UI elements
Reduce misunderstandings
Help developers reproduce issues faster
Visual annotations make bug reports more accurate and easier to review.
Available annotation tools
JotGo provides a variety of tools to help you explain issues clearly.
Arrow - Point to a specific element or issue.
Rectangle - Highlight buttons, forms or sections.
Circle - Emphasize important areas.
Freehand Drawing - Mark up screenshots with custom drawings.
Text Tool - Add comments or instructions directly on the image.
Highlight Tool - Draw attention to important content.
Blur Tool - Hide sensitive information such as personal data, passwords or confidential details.
These tools help create professional and informative bug reports.
Annotate your screenshot
After capturing a screenshot:
Open the annotation editor.
Select the tool you want to use.
Mark the area that needs attention.
Add notes or comments if needed.
Review your annotations.
Save and attach the annotated screenshot to your report.
Your edited image is included automatically when you submit the issue.
Protect sensitive information
If your screenshot contains confidential data, use the Blur Tool before sharing it.
You can blur information such as:
Email addresses
Phone numbers
Customer information
Account IDs
Payment details
Personal or confidential data
This helps protect user privacy while still providing the context needed to investigate the issue.
Communicate more clearly
Annotations help everyone understand the issue more quickly.
Developers can immediately see:
Where the problem occurs
Which element is affected
What behavior is unexpected
Additional notes from the reporter
This reduces confusion and speeds up the investigation process.
Benefits of Integrated Annotation Tools
Using annotation tools helps your team:
Create clearer bug reports
Improve communication
Reduce follow-up questions
Protect sensitive information
Help developers identify issues faster
Resolve bugs more efficiently
A well-annotated screenshot often provides more value than a long written explanation.
Best practices
For the best results:
Highlight only the relevant area.
Add short, clear notes.
Use arrows to indicate the exact issue.
Blur sensitive or personal information before sharing.
Avoid adding unnecessary annotations that may clutter the screenshot.
Review the final image before submitting your report.
Simple and focused annotations are the most effective.
Example
Scenario
A tester notices that the "Submit" button overlaps with the form on a mobile device. They capture a screenshot using the JotGo extension and:
Draw a rectangle around the affected area.
Add an arrow pointing to the overlapping button.
Include a text note: "Button overlaps the input field on smaller screens."
Blur the user's email address before submitting.
The development team can instantly understand the problem without requesting additional screenshots or clarification.
Why Integrated Annotation Tools matter
A picture is worth a thousand words-but an annotated picture is even better. By allowing you to highlight issues, add explanations and protect sensitive information, JotGo helps your team create clearer bug reports and resolve issues faster.
Frequently Asked Questions
Can I edit a screenshot after capturing it?
Yes. Before submitting your report, you can annotate the screenshot using the built-in editing tools.
Can I remove or change annotations?
Yes. You can edit, undo, or remove annotations before saving your screenshot.
Can I blur sensitive information?
Yes. The Blur Tool lets you hide confidential information before sharing your screenshot with your team.
cap-annotation
Annotation & markup tools
Sometimes a screenshot or video alone isn't enough to explain an issue. Annotation and markup tools let you highlight the exact problem, making it easy for your team to understand what needs attention. With JotGo, you can draw, highlight, point and comment directly on your screenshots before submitting a report.
3
Bug & Feedback Capture
bug-feedback-capture
2
Why use annotations?
Annotations remove guesswork by showing exactly where the problem is.
Instead of writing:
"The button on the page isn't working."
You can highlight the button, point to it with an arrow and add a comment explaining the issue.
This helps developers and designers identify the problem much faster.
Available annotation tools
JotGo provides a set of simple tools to clearly communicate visual feedback.
Arrow
Point to a specific element or area on the screen.
Best for:
Broken buttons
Incorrect icons
Missing content
UI elements
Rectangle
Draw a box around the affected area.
Best for:
Layout issues
Forms
Cards
Sections with incorrect styling
Circle
Highlight smaller elements that need attention.
Best for:
Icons
Buttons
Images
Individual text fields
Freehand Drawing
Draw freely to emphasize important areas.
Best for:
Complex UI issues
Multiple affected elements
Custom highlights
Text Comments
Add notes directly to your screenshot.
Use comments to explain:
What is wrong
What you expected
Why the issue is important
Example:
"Added text here"
Blur Tool
Hide sensitive or personal information before sharing.
You can blur:
Email addresses
Phone numbers
Personal details
Payment information
Account numbers
This helps protect user privacy while sharing reports.
How to annotate a screenshot
Capture a screenshot.
The annotation editor will open automatically.
Select the tool you want to use.
Highlight or comment on the affected area.
Review your annotations.
Click “Comment” and give your feedback / issue description
Submit your report.
Your annotations become part of the bug report and are visible to everyone reviewing the issue.
Tips for effective annotations
Keep your annotations simple and focused.
✔ Highlight only the affected area.
✔ Add short, meaningful comments.
✔ Use arrows to indicate the exact location.
✔ Avoid covering important parts of the interface.
✔ Remove unnecessary drawings before submitting.
A clean and focused annotation makes reports easier to understand.
Example
Before annotation
A screenshot shows an entire dashboard, but it's not clear what the problem is.
After annotation
An arrow points to the Export button.
A rectangle highlights the affected section.
A comment says:
"Clicking this button does not download the report."
The issue is now immediately clear to anyone reviewing the report.
Best practices
To create clear and helpful reports:
Use one annotation for each issue whenever possible.
Keep comments short and specific.
Highlight the smallest area necessary.
Blur sensitive information before sharing.
Review your screenshot before submitting.
Well-annotated reports reduce misunderstandings and help teams resolve issues faster.
Why annotations matter
Visual feedback is often easier to understand than written descriptions alone. By combining screenshots with annotations, your team can quickly identify the issue, understand its impact and begin working on a solution without asking for additional clarification.
mng-priority
Priority & status management
Not every issue has the same level of impact. Some bugs require immediate attention, while others can be scheduled for a future release. JotGo helps you organize your work by assigning priorities and updating issue statuses throughout the development process.
3
Bug & Feedback Management
bug-feedback-management
3
Using priorities and statuses together gives your team a clear understanding of what needs attention, what is being worked on and what has already been resolved.
Why use priorities and statuses?
As the number of reported issues grows, it becomes important to organize work effectively.
With priority and status management, your team can:
Focus on the most critical issues first
Track progress throughout the issue lifecycle
Improve planning and resource allocation
Keep everyone informed about current work
Prevent important issues from being overlooked
This creates a structured workflow that helps teams deliver fixes more efficiently.
Set issue priority
Priority indicates how urgently an issue should be addressed.
When reviewing a new report, assign the appropriate priority based on its impact and urgency.
Common priority levels include:
Blocker
Issues that prevent users from using the application or affect core functionality.
Examples:
Users cannot log in
Payment processing fails
Application crashes
Major security issues
These issues should be addressed immediately.
Critical
Important issues that significantly affect users but may have temporary workarounds.
Examples:
Major features not working
Broken navigation
Data synchronization problems
These issues should be prioritized for the next available fix.
High
Issues that affect usability but do not block core functionality.
Examples:
Minor UI problems
Validation errors
Incorrect messages
Performance issues affecting specific workflows
These can be scheduled alongside regular development work.
Low
Minor issues with limited impact on the user experience.
Examples:
Typographical errors
Small design inconsistencies
Cosmetic layout issues
These can usually be resolved in future maintenance releases.
Update issue status
Status shows where an issue is in its lifecycle.
As work progresses, update the status to reflect the current stage.
A typical workflow includes:
To Do
The issue has been created and is waiting to be worked on.
In Progress
Work on the issue is currently underway.
In Review
The issue is under Review / Testing.
Done
The issue has been completed successfully.
Accepted
The issue has been reviewed and approved.
Blocked
Progress is temporarily prevented due to a dependency or obstacle.
Withdrawn
The issue has been removed or is no longer being pursued.
Not Applicable
The issue does not apply to the current project or scenario.
Reopen
A previously closed issue has been reopened for further investigation or fixes.
Manage your workflow
As work moves forward, update both the priority and status when needed.
For example:
Increase the priority if more users are affected.
Lower the priority if a temporary workaround is available.
Update the status whenever the issue changes stages.
Reopen an issue if the problem occurs again after being resolved.
Keeping these fields up to date gives your team an accurate view of ongoing work.
Filter by priority and status
JotGo makes it easy to find the issues that matter most.
You can filter reports by:
Priority level
Current status
Assigned team member
Labels
Reporter
Date created
These filters help teams quickly identify urgent work and monitor overall progress.
Best practices
To keep your issue tracker organized:
Assign a priority as soon as an issue is reviewed.
Update the status whenever work progresses.
Review high-priority issues regularly.
Reassess priorities if the impact changes.
Close issues only after testing confirms the fix.
Reopen issues if the problem returns.
A consistent workflow improves visibility and keeps the team aligned.
Example workflow
Issue
Users receive an error while uploading files.
Priority
High
Status Progress
In Progress - Work on the issue is currently underway.
Each status update provides visibility into the issue's progress and keeps everyone informed.
Why it matters
Priority helps your team decide what to work on first, while status shows where each issue is in the workflow. Together, they provide a clear picture of your project's health and ensure that important issues receive the attention they deserve.
Frequently Asked Questions
Can I change an issue's priority?
Yes. Priorities can be updated at any time if the impact or urgency of the issue changes.
Can an issue move back to a previous status?
Yes. For example, if QA finds that a fix doesn't resolve the problem, the issue can move from “In Review” back to In Progress or updated to Reopen. Also, if any user changes the status by mistake, it can be moved back to its previous status again.
Can I customize priorities and statuses?
Depending on your workspace configuration, your organization may customize priorities and workflow statuses to match its internal processes.
col-rbac
Role-based access control
As your team grows, it's important to ensure that everyone has access to the tools and information they need-without exposing sensitive data or settings. JotGo's Role-Based Access Control (RBAC) helps you manage permissions by assigning roles to team members based on their responsibilities. With RBAC, you can control who can view, create, edit, assign or manage issues within your workspace.
3
Collaboration
collaboration
4
What is Role-Based Access Control?
Role-Based Access Control is a permission system that grants users access based on their assigned role.
Instead of giving every team member the same level of access, you can define what each role is allowed to do.
This helps keep your workspace organized, secure and easy to manage.
Why use role-based access?
Using roles and permissions helps your organization:
Protect sensitive project information
Control who can manage workspace settings
Prevent accidental changes
Ensure team members only access what they need
Improve security and accountability
Support teams of all sizes
Whether you have five users or hundreds, role-based access keeps your workspace secure and well-organized.
Common user roles
Depending on your workspace configuration, you may have roles such as:
Project Admin
Administrators have full access to the workspace.
They can:
Manage workspace settings
Invite and remove users
Assign user roles
Manage projects
View and manage all issues
Configure integrations
Access reports and analytics
This role is typically assigned to team leads or workspace owners.
Project Editor
Managers oversee projects and team activities.
They can:
View all assigned projects
Assign issues
Update issue priorities and statuses
Review team progress
Manage workflows
Collaborate with team members
Managers help coordinate work across the team.
Collaborator
Members are responsible for reporting and resolving issues.
They can:
Create bug reports and feedback
View issues they have access to
Comment on issues
Update assigned issues
Upload attachments
Collaborate with teammates
This role is suitable for developers, QA engineers, designers and product team members.
Assign user roles
Workspace administrators can assign roles when inviting new users or update roles later if responsibilities change.
To assign a role:
Open Project Settings.
Navigate to Edit project.
Select a project member.
Choose the appropriate role.
Save your changes.
The user's permissions are updated immediately.
Permission-based actions
Each role has a different set of permissions.
Depending on your role, you may be able to:
Create issues
Edit issue details
Assign issues
Change priorities and statuses
Add comments
Upload attachments
Manage projects
Invite team members
Configure workspace settings
View reports and analytics
If you don't have permission to perform an action, you'll only see the features available for your role.
Update user roles
As your team evolves, responsibilities may change.
Administrators can update a user's role at any time to match their new responsibilities.
For example:
Promote a Project editor to Project admin.
Change a Collaborator to Project editor.
Keeping roles up to date ensures everyone has the right level of access.
Best practices
To maintain a secure workspace:
Give users only the permissions they need.
Limit administrator access to trusted team members.
Review user roles regularly.
Remove access for inactive users.
Update permissions when team responsibilities change.
Follow your organization's security policies.
These practices help protect your workspace and reduce the risk of accidental changes.
Example
Scenario
A software company has four different team members:
Project Admin- Manages workspace settings and user access.
Project Editor- Assigns issues and tracks team progress.
Collaborator- Resolves bugs and updates issue statuses.
Each user sees only the features and actions appropriate for their role, ensuring a secure and organized workflow.
Why role-based access matters
Not everyone needs the same level of access. By assigning roles and permissions, JotGo helps organizations protect sensitive information, reduce accidental changes and ensure every team member can focus on the tasks that matter most.
Frequently Asked Questions
Can I change a user's role later?
Yes. Workspace administrators can update user roles at any time.
Can multiple users have the Administrator role?
Yes. If your organization requires it, multiple users can be assigned administrative permissions.
What happens if I don't have permission to perform an action?
Features that require additional permissions may be hidden or unavailable. If you need access, contact your workspace administrator.
shr-external
External stakeholder collaboration
Successful products are built through collaboration-not just within your team, but also with clients, customers, partners and other stakeholders. JotGo makes it easy to involve external stakeholders in the feedback process while keeping all communication organized in one place.
3
Sharing & Stakeholder Engagement
sharing-stakeholder-engagement
5
Whether you're reviewing a new feature, discussing a reported bug or validating a fix, everyone can stay aligned throughout the development process.
Why collaborate with external stakeholders?
External stakeholders often provide valuable insights that help improve your product.
Collaborating directly in JotGo helps you:
Collect accurate feedback
Reduce communication gaps
Keep discussions organized
Improve transparency
Speed up issue resolution
Build stronger relationships with clients and partners
Instead of managing feedback across emails, chat messages and meetings, everything stays connected to the relevant issue.
Share issues with stakeholders
When you need feedback from someone outside your organization, simply share the issue using a secure shareable link.
Stakeholders can:
View the issue details
Review screenshots and recordings
Understand the reported problem
Follow the latest updates
Participate in discussions (if permitted)
This gives everyone access to the same information without requiring full workspace access.
Collect feedback in one place
Stakeholders can provide feedback directly on the issue.
They can:
Share additional details
Confirm reported behavior
Answer questions from the team
Suggest improvements
Validate proposed solutions
All feedback is automatically linked to the issue, making it easy for your team to review and act on.
Keep stakeholders informed
As work progresses, stakeholders can stay updated on the latest developments.
They can see:
Current issue status
Recent comments
Progress updates
Assigned team members
Resolution details
This reduces the need for manual status updates and follow-up emails.
Collaborate throughout the issue lifecycle
External collaboration doesn't end after an issue is reported.
Stakeholders can participate at every stage, including:
Issue Reporting
Report bugs or share product feedback.
Investigation
Answer questions from the development team and provide additional context.
Review
Review proposed fixes and confirm whether the issue has been addressed.
Verification
Test the updated feature or bug fix and provide final confirmation.
This continuous collaboration helps ensure that issues are resolved correctly.
Best practices
To make external collaboration more effective:
Share complete and well-documented issues.
Clearly explain what feedback you're requesting.
Respond to stakeholder questions promptly.
Keep discussions focused on the issue.
Notify stakeholders when important updates are available.
Confirm the resolution before closing the issue.
Following these practices helps build trust and improves communication.
Example workflow
Step 1 - Client reports an issue
A client notices that users cannot upload profile pictures and reports the issue.
Step 2 - Team investigates
The development team reviews the report and asks the client for additional information through the issue comments.
Step 3 - Fix is implemented
The developer resolves the issue and updates the status to Ready for Testing.
Step 4 - Stakeholder verifies
The client tests the updated feature and confirms:
"The upload is working correctly now. Thanks for the quick fix!"
Step 5 - Issue is closed
The team marks the issue as Closed and the complete conversation remains available for future reference.
Benefits of external collaboration
Using JotGo for stakeholder collaboration helps your team:
Improve communication
Reduce unnecessary meetings
Collect faster feedback
Increase transparency
Validate fixes more efficiently
Deliver a better customer experience
Everyone works from the same information, making collaboration simpler and more effective.
Frequently Asked Questions
Do external stakeholders need a JotGo account?
No. External stakeholders can access shared issues and collaborate using a public shareable link without signing in to JotGo.
How can external stakeholders provide feedback?
Stakeholders can review the shared issue and add comments directly on the issue page, making it easy to ask questions, share observations and validate fixes.
Where can my team view stakeholder feedback?
All stakeholder comments and discussions are attached to the issue, providing a complete history of feedback and collaboration in one place.
ana-trends
Bug & feedback trends
The Bug & Feedback Trends section helps you understand how bugs and feedback are distributed across your project. It provides visual insights into issue volume, severity, status, ownership and resolution performance, making it easier to identify recurring problems, prioritize work and monitor project health.
3
Analytics & Insights
analytics-insights
6
Key Metrics
At the top of the dashboard, summary cards provide a quick overview of your project's current status:
Total Items Reported - Total number of bugs and feedback items submitted.
Open Items - Number of unresolved issues currently awaiting action.
Critical & High Priority Items - Count of issues requiring immediate attention.
Average Time to Resolution - Average time taken to resolve reported items.
Reopen Rate - Percentage of issues reopened after being marked as resolved.
Trend & Distribution Reports
Net Fix Rate
Tracks the number of reported, resolved and cumulative open items over time. This chart helps you evaluate whether your team is resolving issues faster than new ones are being reported.
Items by Status
Displays the distribution of items across different workflow stages, such as:
To Do
In Progress
In Review
Done
Accepted
Blocked
Reopened
This helps identify bottlenecks and monitor the progress of ongoing work.
Items by Severity
Visualizes issues based on their severity levels, including:
Blocker
Critical
Major
Minor
Test
Use this chart to quickly identify high-impact issues that require immediate attention.
Team Performance
Count by Assignee
Shows the number of bugs and feedback items assigned to each team member. This helps track workload distribution and identify ownership across the team.
Average Resolution Time by Priority
Displays the average resolution time for each priority level, such as:
None
Low
Medium
High
Critical
Blocker
This report helps evaluate response efficiency and ensures high-priority issues are resolved within expected timelines.
Open Items Age
Categorizes unresolved items based on how long they have remained open, for example:
0–7 days
7–15 days
15–30 days
30+ days
Monitoring issue age helps teams identify stale items and prioritize long-pending work.
Filtering Data
Use the filters in the top-right corner of the dashboard to customize the displayed data:
Date Range - View reports for a specific period.
Issue Type - Display only Feedback, Bug or Uncategorized items.
Benefits
Monitor overall project health at a glance.
Identify trends in bug reporting and resolution.
Prioritize critical and high-severity issues.
Measure team workload and performance.
Detect long-pending issues before they impact project quality.
Make informed decisions using real-time analytics and visual reports.
Example
Scenario
A QA team wants to review the health of the QA project for the last 30 days.
Dashboard Insights:
243 total items reported.
233 items are still open.
34 issues are marked as Critical or High Priority.
The average resolution time is 91.9 hours.
The Items by Status chart shows most issues are still in the To Do stage, indicating a growing backlog.
The Items by Severity chart highlights several Critical and Blocker issues that require immediate attention.
Result:
Using these insights, the project manager assigns additional resources to high-priority issues, balances the team's workload and schedules a backlog cleanup to reduce long-pending items.
Frequently Asked Questions (FAQ)
What is the Bug & Feedback Trends dashboard?
The Bug & Feedback Trends dashboard provides a visual overview of your project's bugs and feedback, helping you monitor issue trends, track project health and make informed decisions using real-time analytics.
How can this dashboard help my team?
The dashboard helps your team identify high-priority issues, monitor workload distribution, track resolution trends and uncover bottlenecks, enabling faster and more effective decision-making.
Can I customize the dashboard view?
Yes. You can filter the dashboard by Date Range, Project and Issue Type to focus on the data most relevant to your analysis.
int-linear
Linear
Connect JotGo with Linear to seamlessly turn bug reports and user feedback into actionable Linear issues. Instead of manually recreating bugs, you can create Linear issues directly from JotGo with screenshots, recordings and technical details attached.
3
Integrations
integrations
7
2-Way Sync
This integration helps product, QA and engineering teams collaborate efficiently while keeping the complete context of every reported issue.
Why integrate with Linear?
Your development team shouldn't waste time copying bug details between tools.
With the Linear integration, you can:
Create Linear issues directly from JotGo
Automatically include bug details and attachments
Reduce manual work and duplicate data entry
Keep product, QA and engineering teams aligned
Track issues from reporting to resolution
Work within your existing Linear workflow
By connecting JotGo with Linear, your team can focus on fixing issues instead of managing them.
Before you begin
Before connecting Linear, make sure you have:
A Linear account
Access to the Linear workspace and team where issues will be created
Access to your JotGo workspace
Administrator or integration permissions (if required)
Connect Linear
Setting up the integration only takes a few minutes.
Click your profile picture.
Go to Integrations.
Select Linear.
Click Add Integration.
Sign in to your Linear account and authorize access.
Choose the Linear project you want to connect.
Once connected, your workspace is ready to sync issues with Linear.
Create a Linear issue
You can create a Linear issue directly from any bug report or feedback item.
Open the task in JotGo.
Click Create Issue.
Select Add to Linear.
Choose the issue type (such as Bug, Task or Story).
Review the details.
A new issue is created in Linear and linked to the original JotGo report.
What information is synced?
When a Linear issue is created, JotGo can include:
Issue title
Description
Screenshots
Screen recordings
Annotations
Attachments
Priority
Labels
Reporter information
Technical diagnostics
Link to the original JotGo issue
This provides developers with all the context they need to investigate and resolve the issue.
Track progress
Once the issue has been created in Linear, your team can continue working without losing visibility.
Depending on your workspace configuration, you can:
View the linked Linear issue
Open the issue directly in Linear
Track issue status
Monitor progress
Avoid duplicate issue creation
This keeps both teams aligned throughout the issue lifecycle.
Benefits of Linear integration
Integrating JotGo with Linear helps your team:
Save time by eliminating manual issue creation
Improve collaboration between QA and engineering
Keep bug reports and development tasks connected
Provide developers with complete issue context
Resolve issues faster with fewer follow-ups
Everyone works from the same information, reducing confusion and improving productivity.
Best practices
To get the most from the integration:
Connect the correct Linear team before creating issues.
Review issue details before syncing.
Include screenshots and recordings for better context.
Keep issue priorities consistent.
Avoid creating duplicate Linear issues.
Update issue status regularly as work progresses.
Following these practices helps maintain an organized and efficient development workflow.
Example
Scenario
A QA engineer discovers that the checkout page fails during payment.
Using JotGo, they capture:
A screenshot of the error
A screen recording
Steps to reproduce
Browser and device information
Console logs and technical diagnostics
They click Create Linear Issue, select the Engineering team and create the issue.
A new Linear issue is automatically created with all the captured information attached, allowing the development team to begin investigating immediately without requesting additional details.
Why Linear integration matters
JotGo helps you capture detailed, high-quality bug reports, while Linear helps your engineering team plan and manage development work. By integrating the two, your team can move from bug discovery to resolution with less manual effort, better collaboration and complete visibility throughout the process.
Frequently Asked Questions
Do I need a Linear account?
Yes. You'll need a Linear account with permission to create issues in the selected workspace or team.
Can I choose which Linear team receives new issues?
Yes. During setup, you can select the Linear team where JotGo will create new issues.
Can developers access the original JotGo report from Linear?
Yes. Each Linear issue includes a link back to the original JotGo report, making it easy to review screenshots, recordings, diagnostics and other supporting information.
cap-diagnostics
Automatic technical diagnostics
When you report a bug, the more information your team has, the faster they can investigate and fix it. JotGo automatically collects technical details in the background, so you don't have to gather them manually. This means developers receive more than just a screenshot or video-they also get the technical context needed to reproduce the issue.
4
Bug & Feedback Capture
bug-feedback-capture
2
What are technical diagnostics?
Technical diagnostics are system details that help explain the environment in which the issue occurred.
Instead of asking questions like:
Which browser were you using?
What operating system are you on?
Which page were you viewing?
Can you share the console errors?
JotGo automatically includes this information with your report.
Information JotGo can collect
Depending on your workspace settings and permissions, JotGo may collect the following information automatically.
Browser Information
Identify the browser where the issue occurred.
Examples include:
Browser name
Browser version
Rendering engine
This helps developers determine whether the issue is browser-specific.
Operating System
JotGo records the operating system being used.
Examples:
Windows
macOS
Linux
ChromeOS
This helps identify platform-specific issues.
Device Information
Capture basic details about the device used to report the issue.
This may include:
Device type
Screen size
Screen resolution
Display scaling
These details are useful when troubleshooting responsive or display-related issues.
Current Page URL
JotGo automatically records the page where the issue occurred.
This allows developers to open the exact page without asking you to copy and paste the URL.
Timestamp
Every report includes the date and time it was created.
This helps teams:
Match server logs
Review deployments
Investigate incidents
Track when an issue occurred
Console Logs
JotGo can attach browser console logs.
Console logs help developers identify:
JavaScript errors
Warnings
Failed scripts
Runtime exceptions
These logs often provide valuable clues about the root cause of an issue.
Network Requests
JotGo can capture network activity while you reproduce the issue.
This helps identify:
Failed API requests
Slow responses
Timeout errors
Server response codes
Developers can use this information to understand whether the issue is related to the frontend, backend or network.
Why automatic diagnostics matter
Without automatic diagnostics, developers often need to request additional information before they can begin troubleshooting.
With JotGo, everything is included in the initial report, helping teams:
Reproduce issues more quickly
Reduce back-and-forth communication
Identify the root cause faster
Resolve bugs more efficiently
The more context included in a report, the easier it is to investigate.
Best practices
To create the most helpful reports:
Reproduce the issue before submitting the report.
Include a screenshot or screen recording whenever possible.
Add a clear title and description.
Explain the expected and actual behavior.
Combining visual evidence with technical diagnostics creates a complete and actionable bug report.
Example report
Issue Title
Search results are not loading
Description
After entering a search term and pressing Enter, the loading spinner continues indefinitely and no results are displayed.
Automatically Attached Information
Browser: Google Chrome
Operating System: Windows 11
Screen Resolution: 1920 × 1080
Current Page URL
Timestamp
Console Logs
Network Requests
Session Replay
With this information, developers can begin investigating immediately without requesting additional details.
Frequently Asked Questions
Can I disable technical diagnostics?
By default, the diagnostic data is attached with the report without any human intervention. Some information may be hidden from the Guest user in the report.
Do I need to collect technical details manually?
No. JotGo automatically collects supported diagnostics in the background, allowing you to focus on describing the issue.
Will technical diagnostics slow down reporting?
No. Technical information is captured automatically and attached to your report, so the reporting process remains quick and simple.
mng-search
Advanced search & filtering
As your workspace grows, finding the right issue quickly becomes essential. JotGo's advanced search and filtering tools help you locate bugs and feedback in seconds, whether you're looking for a specific report or reviewing a group of related issues.
4
Bug & Feedback Management
bug-feedback-management
3
Instead of scrolling through hundreds of reports, you can narrow down your results using search, filters and sorting options.
Why use advanced search?
Searching and filtering helps your team:
Find issues quickly
Focus on relevant reports
Save time during triage
Track work assigned to specific team members
Monitor project progress
Review unresolved or high-priority issues
Whether you're a developer, QA engineer or project manager. advanced search makes issue management more efficient.
Search for issues
Use the search bar to quickly find issues using keywords.
You can search by:
Issue title
Issue ID
The search results update instantly, helping you locate the information you need without browsing through the entire repository.
Filter your results
Filters help you display only the issues that match specific criteria.
Depending on your workspace configuration, you can filter by:
Key
Status
Priority
Assigned To
Assigned By
Issue type
Assigned On
You can combine multiple filters to create more targeted results.
Combine multiple filters
Using more than one filter helps you narrow down large lists of issues.
For example, you can view:
High priority issues assigned to you
Bugs currently in testing
Open issues reported this week
Resolved issues in a specific project
Feedback awaiting review
Combining filters allows you to focus on exactly what matters.
Sort your results
Once you've filtered your issues, you can sort them in the order that works best for you.
Common sorting options include:
Newest first
Oldest first
Recently updated
Highest priority
Alphabetical order
Due date (if available)
Sorting helps you review issues in a logical and consistent way.
Save time with quick filters
Frequently used filters can help you access important issues faster.
Examples include:
My Open Issues
High Priority
Recently Reported
Unassigned Issues
In Progress
Waiting for Review
Closed Issues
These shortcuts reduce the time spent searching for common views.
Best practices
To get the most accurate search results:
Use clear and descriptive issue titles.
Apply labels consistently.
Keep issue statuses up to date.
Assign priorities during issue review.
Use multiple filters for more precise results.
Archive or close duplicate issues when appropriate.
A well-maintained repository makes searching faster and more effective.
Example
Scenario
You're preparing for a sprint planning meeting and need to review all unresolved, high-priority bugs assigned to your team.
Search Criteria
Status: Open
Priority: High
Assignee: Frontend Team
Environment: Dev
Within seconds, JotGo displays only the issues that match your criteria, helping your team focus on the most important work.
Why advanced search matters
As the number of reported issues grows, manually browsing through reports becomes inefficient. Advanced search and filtering help your team quickly find the right information, prioritize work and make informed decisions without wasting time.
Frequently Asked Questions
Can I apply multiple filters at the same time?
Yes. You can combine multiple filters to narrow down your results and create highly specific searches.
Does search look through issue descriptions?
Yes. Depending on your workspace configuration, search can include issue titles, descriptions, IDs, labels and other searchable fields.
Will filters affect other team members?
No. Filters and search results only change your current view.
int-zendesk
Zendesk
Connect JotGo with Zendesk to turn customer support tickets into actionable bug reports and keep your support and development teams in sync. With this integration, you can easily link customer-reported issues to your engineering workflow without losing important details.
4
Integrations
integrations
7
2-Way Sync
This helps your team resolve customer issues faster while providing better visibility across support and development.
Why integrate with Zendesk?
Support teams are often the first to hear about product issues. The Zendesk integration makes it easy to share those issues with your engineering team.
With the Zendesk integration, you can:
Create JotGo issues from Zendesk tickets
Link bug reports to customer support requests
Share technical details with developers
Reduce manual copying of information
Keep support and engineering teams aligned
Track customer-reported issues from start to finish
By connecting Zendesk with JotGo, customer feedback becomes part of your development workflow.
Before you begin
Before connecting Zendesk, make sure you have:
A Zendesk account
Access to your Zendesk workspace
Access to your JotGo workspace
Administrator or integration permissions (if required)
Connect Zendesk
Setting up the integration only takes a few steps.
Click your profile picture.
Go to Integrations.
Select Zendesk.
Click Add Integration.
Sign in to your Zendesk account and authorize access.
Choose the Zendesk project you want to connect.
Once connected, your support team can start linking Zendesk tickets with JotGo issues.
Create an issue from a Zendesk ticket
When a support ticket requires engineering attention, you can create a JotGo issue directly from Zendesk.
Open the task in JotGo.
Click Create Issue.
Select Add to Zendesk.
Choose the issue type (such as Bug, Task or Story).
Review the details.
The issue is created in JotGo and linked to the original Zendesk ticket.
What information is synced?
When an issue is created, JotGo can include:
Ticket subject
Customer description
Screenshots and attachments
Priority
Comments
Reporter information
Issue status
Technical diagnostics (when available)
Link to the original Zendesk ticket
This gives developers the complete context needed to investigate the issue.
Keep support and engineering aligned
Once the ticket and issue are linked, both teams can stay informed throughout the resolution process.
Depending on your workspace configuration, you may be able to:
View the linked Zendesk ticket
Open the ticket directly from JotGo
Track issue progress
Share updates between teams
Reduce duplicate reporting
This creates a smoother workflow between customer support and engineering.
Benefits of Zendesk integration
Using JotGo with Zendesk helps your team:
Respond to customer issues more quickly
Reduce manual work
Improve communication between support and engineering
Keep customer reports connected to development work
Resolve issues faster with complete context
Everyone works from the same information, improving efficiency and customer satisfaction.
Best practices
To get the most from the integration:
Create JotGo issues only for tickets that require engineering work.
Include screenshots and attachments whenever possible.
Keep ticket and issue statuses updated.
Avoid creating duplicate issues for the same problem.
Add clear comments so both teams understand the current progress.
Close the support ticket only after the issue has been verified and resolved.
These practices help ensure a smooth handoff between support and development.
Example
Scenario
A customer submits a Zendesk ticket reporting that they cannot reset their password.
The support agent reviews the ticket and determines it's a product bug.
hey click Create JotGo Issue and the following information is automatically included:
Customer's issue description
Screenshot of the error
Ticket priority
Attachments
Link to the Zendesk ticket
The development team investigates the issue in JotGo while the support team tracks progress through the linked ticket.
Once the issue is fixed, the support agent updates the customer and closes the ticket.
Why Zendesk integration matters
Great customer support depends on fast communication between support and engineering teams. By integrating JotGo with Zendesk, you can ensure customer-reported issues are captured accurately, shared with developers quickly and resolved with full visibility throughout the process.
Frequently Asked Questions
Do I need a Zendesk account?
Yes. You'll need a Zendesk account with permission to access and manage support tickets.
Can I link multiple Zendesk tickets to the same issue?
Depending on your workspace configuration, multiple tickets related to the same bug can be associated with a single JotGo issue.
Can I track issue progress from Zendesk?
Yes. If synchronization is enabled, support agents can view the linked JotGo issue and follow its progress without leaving Zendesk.
cap-replay
Session Replay
Sometimes a screenshot or video recording isn't enough to understand how an issue happened. Session Replay lets your team watch the user's journey leading up to the bug, making it easier to reproduce and resolve issues. Instead of relying on written descriptions, developers can see the exact sequence of actions that occurred before the problem appeared.
5
Bug & Feedback Capture
bug-feedback-capture
2
What is Session Replay?
Session Replay records how users interact with your application during a session. It captures user actions such as clicks, scrolling, navigation and form interactions, allowing your team to replay the session later.
This provides valuable context that helps developers understand what happened before, during and after an issue occurred.
Why use Session Replay?
Session Replay helps your team answer important questions like:
How did the user reach this page?
What actions triggered the issue?
Was the problem caused by a specific workflow?
Can the issue be reproduced consistently?
What happened immediately before the error?
Having this context reduces guesswork and speeds up troubleshooting.
What Session Replay captures
JotGo can capture:
Page navigation
Mouse clicks and interactions
Scrolling activity
Form interactions
User interface changes
Page loading events
Session timeline
This information creates a replay of the user's experience without requiring them to record their screen manually.
How Session Replay works
A user interacts with your application.
JotGo securely records supported interactions in the background.
When a bug or feedback report is submitted, the related session is linked to the report.
Developers can open the session replay directly from the issue details.
The session can be replayed to understand exactly what happened.
This makes it much easier to reproduce issues that are difficult to explain with text alone.
View a session replay
To review a recorded session:
Open the reported issue in your JotGo workspace.
Navigate to the Session Replay section.
Click View Instant Replay.
Watch the user's interactions leading up to the issue.
Pause, rewind or skip through the timeline to inspect specific actions.
This allows developers to investigate issues step by step.
Benefits of Session Replay
Using Session Replay helps your team:
Reproduce bugs more accurately
Understand user behavior before an issue occurs
Reduce follow-up questions
Investigate complex workflows
Resolve issues faster
Improve the overall user experience
Instead of guessing what happened, your team can see it.
Best practices
To get the most value from Session Replay:
Pair Session Replay with screenshots or video recordings for complete context.
Add a clear issue title and description.
Use session data alongside technical diagnostics for faster root cause analysis.
Combining visual evidence, technical details, and session replay creates a complete picture of the issue.
Example
Issue Title
Checkout page freezes after selecting a payment method
Issue Report Includes
Screenshot of the error
Screen recording of the workflow
Automatic technical diagnostics
Linked Session Replay
Session Replay shows
User added items to the cart.
User selected a payment method.
User clicked Pay Now.
Loading spinner appeared and never completed.
No further interaction was possible.
With this replay, developers can quickly identify the workflow that triggered the issue and begin investigating.
Frequently Asked Questions
Does Session Replay record my entire screen?
No. Session Replay records interactions within the supported application or website, based on the user’s actions.
Is Session Replay always enabled?
Yes, Session Replay is always enabled.
Can I view Session Replay for every report?
Any user other than a guest user, can view the Session Replay from the issue details.
int-izio
Izio
Connect JotGo with Izio to seamlessly convert bug reports and user feedback into development tasks. By integrating JotGo with Izio, your team can move issues from reporting to execution without manually recreating tickets or losing important information.
5
Integrations
integrations
7
2-Way Sync
This integration keeps product, QA and engineering teams connected while ensuring every issue includes the context developers need to resolve it quickly.
Why integrate with Izio?
Managing bugs across different tools can slow down your development process.
With the Izio integration, you can:
Create Izio tasks directly from JotGo
Automatically transfer bug details and attachments
Eliminate manual copy and paste
Keep QA and development teams aligned
Track issues from reporting to completion
Improve collaboration across your organization
By connecting both platforms, your team spends less time managing tasks and more time fixing issues.
Before you begin
Before connecting Izio , make sure you have:
An Izio account
Access to your Izio workspace or project
Access to your JotGo workspace
Administrator or integration permissions (if required)
Connect Izio
Setting up the integration is quick and easy.
Click your profile picture.
Go to Integrations.
Select Izio.
Click Add Integration.
Sign in to your Izio account and authorize access.
Choose the Izio project you want to connect.
Once connected, your team can start creating Izio tasks directly from JotGo.
Create an Izio task
You can create an Izio task from any bug report or feedback item.
Open the task in JotGo.
Click Create Issue.
Select Add to Zendesk.
Choose the issue type (such as Bug, Task or Story).
Review the details.
A new task is created in Izio and linked to the original JotGo issue.
What information is synced?
When an Izio task is created, JotGo can include:
Issue title
Description
Screenshots
Screen recordings
Annotations
Attachments
Priority
Labels
Reporter information
Technical diagnostics
Link to the original JotGo issue
Developers receive all the information they need without requesting additional details.
Track progress
After the task is created, your team can continue managing the work in Izio .
Depending on your workspace configuration, you may be able to:
View the linked Izio task
Open the task directly in Izio
Track task status
Monitor development progress
Keep reporting and development connected
This provides complete visibility from issue reporting to resolution.
Benefits of Izio integration
Using JotGo with Izio helps your team:
Reduce manual work
Improve collaboration between QA and developers
Keep issue information synchronized
Speed up bug resolution
Maintain a single source of truth for every reported issue
Everyone stays aligned throughout the development process.
Best practices
To get the most from the integration:
Connect the correct Izio project before creating tasks.
Review issue details before syncing.
Include screenshots and recordings whenever possible.
Assign tasks to the appropriate team members.
Keep task statuses updated.
Avoid creating duplicate tasks.
Following these practices helps your team work more efficiently.
Example
Scenario
A QA engineer discovers that users cannot update their account settings.
The report includes:
Screenshot of the issue
Screen recording
Steps to reproduce
Browser and device details
Technical diagnostics
The engineer clicks Create IZIO Task and selects the appropriate project.
A new task is automatically created in IZIO with all the captured information attached. The development team begins working immediately without needing to request additional details, while the original JotGo issue remains linked for easy reference.
Why Izio integration matters
JotGo captures complete and detailed bug reports, while Izio helps your team organize and manage development work. Together, they create a connected workflow that reduces manual effort, improves communication and helps your team deliver fixes faster.
Frequently Asked Questions
Do I need an Izio account?
Yes. You'll need an Izio account with permission to create and manage tasks in the selected project.
Can I choose which project receives new tasks?
Yes. During setup, you can select the Izio project where JotGo will create new tasks.
Can I access the original JotGo issue from Izio ?
Yes. Each Izio task includes a link back to the original JotGo issue, allowing developers to review screenshots, recordings, diagnostics and other supporting information whenever needed.
Docs/Category/Title
Heading
Lorem ipsum dolor sit amet, consectetur adipiscing elit. Suspendisse varius enim in eros elementum tristique. Duis cursus, mi quis viverra ornare, eros dolor interdum nulla, ut commodo diam libero vitae erat. Aenean faucibus nibh et justo cursus id rutrum lorem imperdiet. Nunc ut sem vitae risus tristique posuere.